This article was originally published on avocadoposts.com and has been republished here with permission.
Green symbolizes life, renewal, and hope, embodying a refreshing essence that invigorates any space. Incorporating a lush, healthy houseplant into your home not only enhances its aesthetic but also promotes a sense of wellbeing and connection to nature. However, even the most cherished plants can experience periods of decline. Symptoms like wilting, yellowing leaves, or a leggy appearance can indicate that your plants are struggling.
Perhaps they’re not as robust as before, losing their vibrant allure. But don’t give up hope! With the right knowledge and a few expert tips, you can rejuvenate your ailing houseplants. By understanding their specific needs and applying targeted care strategies, you can restore their health and vitality, allowing them to thrive once again in your living space. These hacks will help you revive and rehabilitate your houseplants with little to no costly spending. You can use your everyday supplies and kitchen ingredients to help your plants grow and flourish.
Use water from boiling vegetables to water your plants
Here is another way to water your plants that’s both inexpensive and effective. To give your plants an extra boost of nourishment, use the cooking water from pasta and veggies. Instead of tossing the water down the drain the next time you make pasta or steam veggies in your kitchen, use it to keep your plants green and flourishing.

Many micronutrients, such as phosphorus, nitrogen, and calcium, are cooked into the water when you boil pasta, vegetables, eggs, or potatoes. Allow the water to cool and water your plants with this refreshing drink that is also a much-needed fertilizer.
Banana Peels
A banana peel seems useless enough to throw away on a regular day. But today, we are considering an alternative to help get rid of the dust on plants. However, we have to be careful because we don’t want to leave any banana grease behind. Moreover, the aphids cannot stand the smell of bananas, so they will leave our beautiful plants alone.

Simply shred the banana peels into small pieces and wrap them around the plants to chase the pesky insects away. To remove dust from the plants, rub the peel on the leaves, and it should give a glossy appearance to the greens.
Use brewed tea or wet tea leaves
When you brew a cup of tea, you also brew a nutritious treat for your houseplants. Tea leaves are packed with tannic acid, a natural substance that can help lower the pH of your potting mix, creating an ideal environment for acid-loving houseplants. Tea leaves are a rich source of nitrogen, a crucial nutrient for plant health. So how do you prepare this tea-rrific treat? It’s as simple as it sounds. After enjoying your cup of tea, allow them to cool instead of tossing the tea bag or the loose tea leaves.
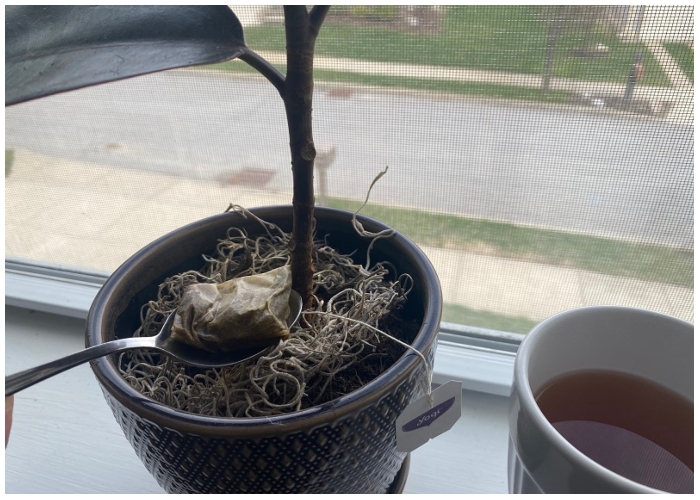
You can then Directly apply wet tea leaves to the soil: Gently work the cooled, wet tea leaves into the top layer of soil around your plants. The tea leaves will gradually break down, releasing nutrients and tannic acid into the soil, or water your plants with brewed tea: Allow your leftover tea to cool completely, then use it to water your houseplants as you usually would. The tea hydrates your plants and infuses the soil with its tannic acid and nutrient contents.
Place a coffee filter in the bottom of your pot
A coffee filter placed between your plant’s dirt and the drainage hole in the pot prevents dirt from spilling out. When water and dirt move out of the hole, the hole can get plugged, limiting water flow. This might cause root rot, which is fatal to your plant.

Not only that, but the filth that is washed away with the water creates a mess. To avoid these issues, some people put rocks at the bottom of their pots, but a coffee filter is much easier. Water and air will be able to flow freely, and dirt will be kept neatly in place.
Revolutionize Your Repotting: The Damp Sponge Trick!
Give your houseplants a moisture-retaining boost with a simple tool you likely already have – a sponge! When repotting, place a damp sponge at the bottom of your pot. It acts like a mini reservoir, slowly releasing water when the soil starts to dry, ensuring your plant stays hydrated but not overwatered. This innovative trick is a game changer, especially for those prone to giving their green friends too much TLC in the watering department.
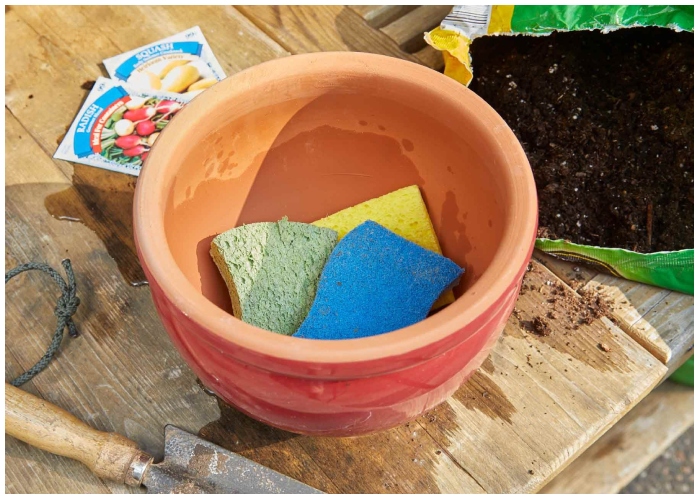
It also works wonders for plants that enjoy consistent moisture, like Ferns or Calatheas. So, next time you’re repotting, don’t just sponge off your plants, give them a sponge instead! Your green companions will thank you with lush growth, and you’ll enjoy a new level of indoor gardening success. Remember, the secret to thriving plants sometimes lies in the most straightforward solutions!
Clean your plants with mayonnaise
This is a great technique to add to your list of must-try houseplant hacks. Did you know that mayonnaise makes the leaves of your plants shine? When leaves become dusty, they lose their shine and are unable to photosynthesize properly. Using a rag, dab a small amount of mayonnaise on the plant leaf and gently wipe it away.

You will be pleasantly surprised at how healthy and lustrous your foliage becomes. Do this every once a month or when you see dust or gunk starting to collect on the plant’s leaves. Mayo is another household product that has various uses.
Or – use Epsom-salt solution as a mist
Another option to give your plants a nutrient uplift is to sprinkle them with an Epsom salt solution. For potted plants, simply dissolve two tablespoons of Epsom salt per gallon of water, and substitute this solution for normal watering once a month. Begin spraying an Epsom salt solution on your vegetable plants when you see blooms first appear.

This solution will aid tomato and pepper crop yields and keep the plants looking green and bushy. When soil deficiencies occur, tomato and pepper plant leaves turn yellow between the veins late in the season, and fruit may be slow to ripen.
Repotting a Leggy Anthurium
Spotted your Anthurium’s soil becoming compact and salty? It’s repotting time! Any season works, but for the quickest recovery, pick between early spring and midsummer. Gather light, airy soil like an orchid mix and a new pot 2 to 4 inches larger than the current one. Then, gently flip the pot, tap its bottom, and loosen the root ball. You’ll likely find a mass of tangled roots; simply trim the lengthy ones, untangle the rest, and clear out the old soil.

Next, add fresh potting mix to the new pot and settle the plant lower than before. Fill in more mix around the roots, water generously, then let it recover in the shade for a few days before moving to a well-lit spot. Is your Anthurium tall and leggy? Consider creating stem cuttings instead of repotting. They root easily, and in no time, you’ll have baby Anthuriums! To maintain a gorgeous, non-leggy Anthurium, aim for a repotting cycle every two years. This green thumb adventure will keep your Anthurium thriving, adding lively green vibes to your home!
Pruning for Plant Health
Keeping houseplants healthy and vibrant often involves regular pruning, but it’s crucial to do it correctly. A common hack for maintaining plant aesthetics and health is trimming off the brown or damaged edges of leaves. However, it’s essential to use the right technique to avoid further stressing the plant.

As shown in the image, one should use sharp, clean scissors or pruning shears to make a clean cut, which helps the plant heal faster and reduces the risk of disease. When cutting, follow the natural shape of the leaf to keep its original form and avoid a blunt or unnatural appearance. This method not only improves the look of your houseplant but also encourages the growth of new, healthy foliage. Remember to remove only the damaged parts of the leaf, as over-pruning can harm the plant’s growth.
Deep Watering with DIY Drip System
Ensuring your plants receive adequate water can be a challenge, but a simple house plant hack can take the guesswork out of deep watering. By repurposing a small plastic cup as a DIY drip system, you can provide a steady, slow release of water that reaches the plant’s roots, promoting healthy growth. Simply fill the cup with water and place it into the soil, as shown in the image.

Small holes in the bottom of the cup will allow water to seep out gradually, ensuring that the plant gets the hydration it needs without the risk of overwatering. This method is especially useful for plants like aloe vera, which prefer a thorough watering less frequently, allowing the soil to dry out between waterings. Plus, it’s an excellent way to recycle and reduce waste while caring for your green friends.
Aerate soil with a chopstick
Over time, you’ll notice that plant soil becomes compacted. Gently poke a chopstick or pencil into the soil to loosen it up again, allowing roots, water, and oxygen to do their jobs. Two pokes per inch of pot diameter is a fair rule of thumb.

As a result of the lack of earthworms, the soil health of your potted plants is dependent on how you keep their structure in balance. As plant roots collect water on a regular basis, the dirt becomes increasingly compacted. When the soil doesn’t hold water as well as it used to, it’s time to aerate.
Group humidity-loving plants together
As you may know, plants, too, require companionship. But, more crucially, your humidity-loving plants will all emit moisture, which will benefit surrounding plants. This is how it works: by grouping your humidity-loving plants together, they can help each other out by making the general area around them more humid.

This happens because their leaves, stems, and flowers transpire, and it leaves a cooling effect on the air. As a styling tip, group plants together that have a similar shade and design, so they don’t clash. This is another way of taking the most advantage of your houseplants during summertime.
Make a vertical garden from an IKEA bag holder
Do you live in a small place with not much extra room for pots, but you still want to have plants? Reconsider your position. The VARIERA bag dispenser from IKEA can be transformed into a walled garden with some moss and soil. To maximize space for growing succulents, flowers, or even strawberries, fill the bag holder with moss and dirt and use it as a planter.

You can turn it into a vertical garden, which is a vertically hanging panel where hydroponically grown plants are produced. These one-of-a-kind structures can be mounted to a wall without occupying any extra space.
Your Secret Recipe for Lustrous, Nourished Houseplant Leaves!
Who knew the secret to glossy, healthy houseplant leaves was sitting in your fridge? Time to reach for the milk! A nourishing concoction of one part milk diluted with nine parts water becomes a marvelous leaf-polishing potion. Spritz it onto your plant’s foliage, then gently wipe it with a soft cloth. Watch as dust and dirt vanish, leaving leaves that glow with health and vitality.
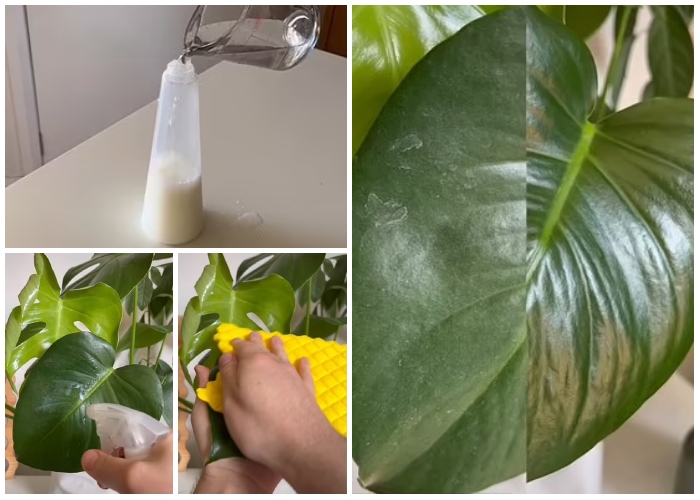
But the magic doesn’t stop there. The milk provides a nourishing feast of calcium and protein, essential nutrients for your plants’ well-being. This simple yet effective routine beautifies and enriches your plants, contributing to their health. So, grab that milk carton and let your plants enjoy a milky spa treatment. They’ll repay you with stunning, lustrous leaves that will be the talk of your indoor jungle!
Plant care cheat sheet
Before you buy a plant at the store, make sure to inspect it for possible damage thoroughly. Always re-pot your plant after buying. Go about an inch or two larger than the plastic pot that they’re in, so it has enough room to grow. Add some fertilizer if you consider it necessary. The next thing you need to do before bringing the plant inside the house and placing it among the other plants is to debug it and quarantine it.

When potted indoor plants are outside, aphids, mealybugs, and other sorts of houseplant insect pests can be brought inside and infect the rest of your houseplants. Remember that there are no “low-light” plants; all plants require direct sunshine or bright spots. Sunlight is an important component of your plant’s nutrition. And finally, always follow nature’s lead and only water when the soil is completely dry, then soak it from the bottom.
Slow-release houseplant fertilizers
Likewise referred to as time-release fertilizers, slow-release fertilizers for indoor plants are created using a synthetic supply of nutrients. A covering surrounds the liquid nutrition of the dragee.

This coating degrades gradually and releases the nutrients over time in small doses. You will need to fertilize less regularly if you use products like these. Although it’s quite practical, keep in mind that they are not produced using environmentally safe materials.
Use the upside-down water bottle trick to water plants while you’re on vacation
Fill a water bottle halfway with water, remove the cap, and turn it upside down and into the soil a few inches deep. The water will be absorbed by the soil over time, keeping it moist. Plant spikes made of clay can also be purchased for better control over picky plants.

Because the terracotta spike keeps the soil constantly moist but also doesn’t drown them, it lets you off the hook if you forget about watering or go out of town for a couple of weeks. As for bottles, you can recycle a glass wine bottle or a plastic one.
Houseplant Fertilizer Basics: How And When To Feed Houseplants
Rather than waiting for a signal from the plant, fertilize your houseplants on a schedule that corresponds to their growth cycle. When it comes to houseplant fertilizer levels and frequency, each plant has somewhat varied requirements. Some houseplants require more food than others. However, a houseplant fertilizer regimen like the one shown below strikes a fair compromise between satisfying heavy feeders and preventing you from overfeeding houseplants that require less fertilizer.

Fertilize houseplants about 8 weeks before the last spring frost is forecast. The frequency with which you apply summer fertilizer is determined on the type of fertilizer you’re applying. Reduce the amount and frequency of houseplant fertilizer about 8 weeks before the first forecast fall frost. Because plants are not in an active growth phase throughout the winter, they should not be fertilized.
Blooming Houseplants with Aspirin
Aspirin isn’t just for headaches anymore – it’s time to introduce it to your houseplants! This common medicine cabinet staple can work wonders by boosting your plants’ immune system and promoting extravagant blooms. All you need to do is dissolve one tablet into a gallon of water, and you’ve got yourself a potent plant elixir! Using this concoction to water your plants once a month will supercharge their defenses, helping them fend off diseases.
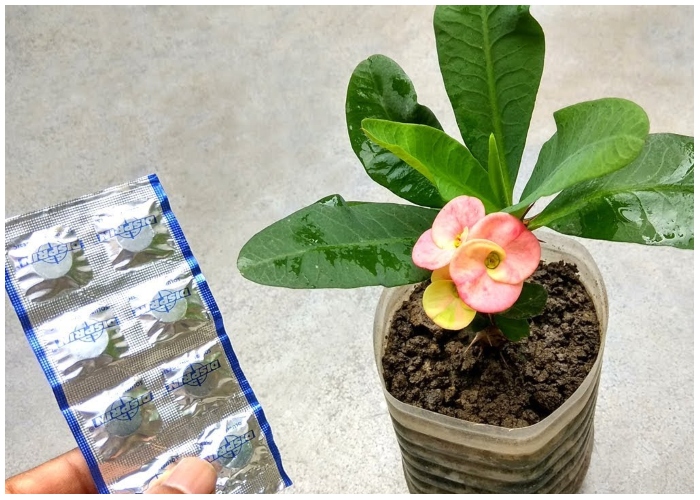
The salicylic acid in aspirin also triggers flowering, leading to more vibrant and abundant blossoms. So why not give your houseplants the aspirin advantage? They’ll reward you with healthier growth and an impressive flower display that will be the envy of all your plant-loving friends. It’s the ‘plant doctor’ solution you never knew your indoor garden needed!
Regrowing pineapple top in water or soil
Pineapple tops make great houseplants! First, twist the pineapple top off the fruit, then peel off about 4 rows of the lower leaves to expose the stem. Let it dry and cure for 3-5 days, and put the pineapple top in water.

To bear fruit, pineapples require two years of growth along with plenty of heat and sunlight. However, growing them, even as houseplants, may be quite enjoyable and gratifying.
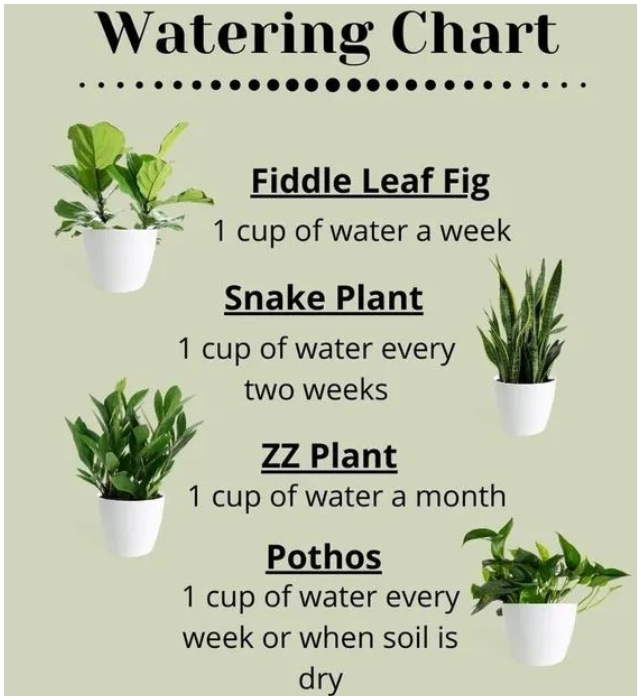
Plant Watering Needs
Different plants have distinct watering requirements based on their natural habitats and physiological adaptations. Succulents, for instance, thrive on minimal watering and store water in their leaves, while tropical plants like ferns demand a consistently moist environment to mimic their rainforest origins. Recognizing the specific needs of each plant is crucial to prevent both underwatering and overwatering, which can lead to stress, disease, or death.
Use eggshell halves to start seedlings
To start your seedlings, you don’t need to buy little pots. To get your seeds off to a good start, save your eggshells for a while and fill them with dirt. Crack them carefully to avoid breaking them completely.

There are numerous advantages to growing seeds directly in eggshells. Calcium carbonate, which is found almost entirely in eggshells, is one of the most important minerals for healthy plants. The eggshells nourish the soil with calcium and nitrogen as they decompose, which the plant’s roots will absorb and utilize as it grows. It is also a smart way to reduce waste.
Propagation hack
Propagation is the process of creating new plants from existing ones. One method of propagating plants is through the use of a small styrofoam board (piece) as a rooting medium. This technique involves cutting a stem from the parent plant and inserting it into a small hole made In the styrofoam board.

The stem is then held in place with a toothpick or a wooden skewer. The styrofoam provides support for the stem while it develops roots. Once the stem has been rooted, it can be transplanted into soil. This technique is great for propagating plants that are difficult to root, such as succulents, and it is also a useful way to propagate plants when soil is not available.
Use an empty cardboard egg carton to start seedlings
Similarly, if the eggs came in a cardboard carton, you don’t need the shells at all—just start the seeds in it. After you’ve used a cardboard egg carton, cut the cups apart, put some fresh soil with the seedling, and plant the whole cup right in the garden’s soil.

The cardboard will disintegrate (since it’s biodegradable) and return back to the ground. It’s also a good idea to cut some slits in the cardboard cup’s base to make it easier for the roots to expand as the plant grows. This is another way to upcycle what would otherwise be trash.
Singing to your Plants
An intriguing trick to potentially accelerate plant growth is the practice of singing to your plants. While it might seem like an old wives’ tale, there’s a kernel of scientific truth underlying this method. Plants don’t “enjoy” music in the human sense, but the vibrations produced by sound waves can stimulate growth. Singing to plants, or playing music near them, can lead to vibrations that might affect plant growth hormones.

Cleaning Plants
When cleaning large, shiny-leaved houseplants like rubber plants, using a damp cloth is an effective way to remove dust and grime. Opt for microfiber cloths or cheesecloths, as they are gentle yet effective. Submerge the cloth in water, wring out the excess, and carefully clean both sides of each leaf. This method suits both indoor and outdoor plants, including Gunnera, Plantain Lilies, and Elephant Ears, ensuring they remain healthy and dust-free.
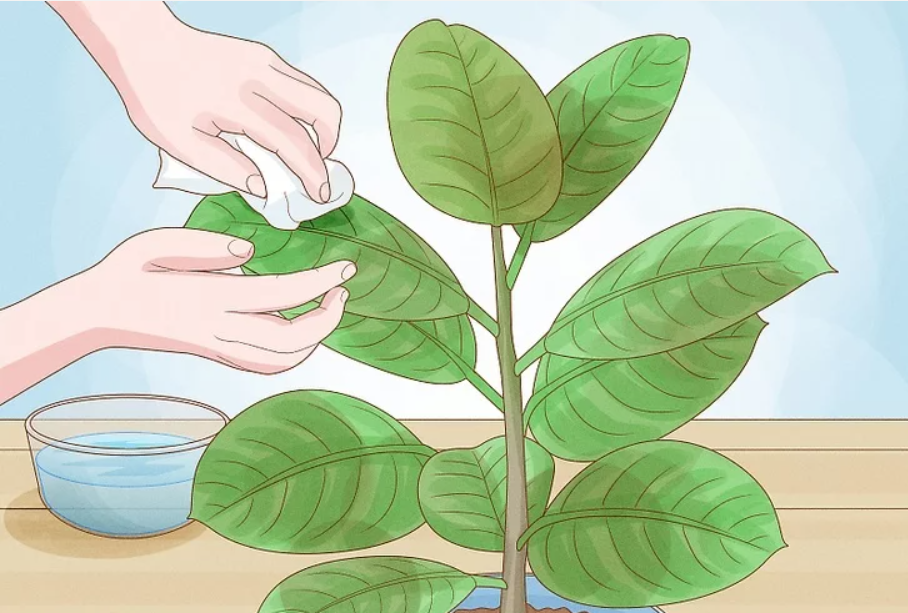
For plants troubled by insects, a drop of dishwashing liquid on the cloth can offer additional protection. However, avoid over-wetting the leaves or using harsh chemicals, as this can damage the plant. Excessive moisture may promote fungal growth, while strong cleaning agents can strip the leaves of their natural protective coatings. Regularly cleaning when you notice dust buildup is key, but doing so excessively or improperly can lead to more harm than good.
Determine Wetness
To gauge whether your houseplants need watering, the finger test is a simple yet effective method. By inserting your finger into the soil up to your knuckle, you can feel the moisture level beneath the surface. If the soil feels damp, it’s best to wait before adding more water, as over-watering can cause root rot, a condition detrimental to the plant’s health. Conversely, dry soil indicates that your plant requires watering.
It’s important to note that water needs can vary significantly from one plant to another. Over-hydration might manifest through discolored leaves, stunted growth, leaf loss, and soft, rotten spots. On the other hand, signs of dehydration include slow leaf growth, brown, dry leaf edges, and the yellowing and curling of lower leaves. Understanding these indicators can help you maintain the perfect moisture balance for your plants, ensuring their health and vitality.
Signs of trouble
Diagnose your plant holistically in order to figure out what’s wrong with it. Do the leaves appear to be falling or turning yellow? How does the dirt feel? Here are some red flags to keep an eye out for. The roots will start to decay when you overwater them. If the edges of the leaves begin darkening, it might mean that they are being eaten away by a fungus. When leaves turn yellow, it’s a cautionary sign. It could be too hot, too cold, too wet, or too dry, which is why you should always be on the lookout for secondary symptoms.

Wrinkled or drooping leaves indicate that your plant is dehydrated and needs to be watered. If leaves begin to fall off, it’s mostly due to a lack of light. For plants, light is their source of nutrition. The remedy is to place them in front of a bright window.
The Tampon Trick
Here’s an unconventional gardening tip that might just be a lifesaver for your overwatered houseplants. If you find your green friends a little too drenched, reach for a tampon! It turns out, this hygiene product is incredibly efficient at absorbing excess moisture. Simply insert one into the soil, and it can help draw out the unwanted water, safeguarding your plants from the perils of overwatering.

This method is especially helpful for delicate varieties prone to root rot. So, before you despair over soggy soil, consider this absorbent solution—a surprising but effective way to keep your plants thriving.
Seed Starting Success
When you’re embarking on the journey of seed starting, size matters. Those tiny specks in your hand have the potential to grow into lush, vibrant plants. For a successful beginning, ensure you’re planting seeds at the right depth—generally, three times the size of the seed itself. This ensures proper germination and root development.

It’s also crucial to maintain a consistent moisture level; not too wet, not too dry. Patience is key, as some seeds take longer to wake up than others. Remember, the magic is in the details when nurturing these little dots of life into your future houseplant oasis.
Reviving Thirsty Greens With Milk
Don’t pour that old milk down the drain just yet—it could be just what your parched houseplants need. Surprisingly, diluted milk can be beneficial for plants, serving as a mild fertilizer due to its calcium content. If your greenery looks a bit limp, try giving them a boost with a milk-water solution. Mix one part milk with one part water and pour it into the soil.

This can provide your plants with essential nutrients and potentially help improve their vigor and color. Just remember, moderation is key—too much could lead to odor or fungal issues. A little dairy care can go a long way in perking up your plants!
Water with an Epsom-salt solution
Plants require magnesium and sulfur, and happily, both of these elements are present in Epsom salt, which is made of hydrated magnesium sulfate. To stimulate bushier, more flowering plants, mix two tablespoons of Epsom salt into a gallon of water and water your houseplants with it.

However, excessive levels of magnesium sulfate can cause salt injury to plants. Roses, pansies, petunias, and impatiens are particularly fond of Epsom salt water! You can sprinkle Epsom salt directly on the soil if it becomes depleted of magnesium. This household product can be bought at the supermarket or drugstore for little money.
Light
There is no such thing as a “low light” plant. Light is an important source of nutrition for plants. As a result, they require as much sunlight as possible to thrive fully. You should also consider the origins of your plant species. Different plants come from various places worldwide and require specific amounts of light. Succulents, cactus, and begonias, for example, come from lighter locations in their natural environment and require a lot of direct sunlight indoors.

Subsequently, you will want to put them in the brightest window you have. Plants such as a Birds Nest fern or a Boston fern need more shady areas. And while it may seem obvious, the larger the plant becomes, the more light it requires. So, while a plant may begin on an end table with some indirect sunlight, as it grows, it may need to be moved closer to the window.
Water
When it comes to succulents, remember to water when the soil is dry. To make sure you’re not over- or under-watering your plant, take into consideration the following tricks. Don’t keep track of the days in between waterings. Every few days, check on your soil or whatever you’ve placed it in. You can irrigate the soil if it is dry. Depending on the season, certain plants may need to be watered every few days, every week, or even every two weeks.

if it’s moist and stinks, it’s too wet, and your plant is starting to decay; if it’s bone dry and dusty, you should water it. There is a correct method for watering a plant. First and foremost, always use warm water since most houseplants aren’t from cold climates, and warm water seeps more quickly into the soil. Also, make sure your watering stream is aimed at the plant’s base.
Encouraging Upward Leaf Growth: A Plant Training Manual
Typically, aloe vera plants enjoy spreading horizontally, enjoying their casual demeanor. However, if you enjoy bending the rules and dreams of those lush, succulent leaves growing straight as an arrow pointing toward the heavens, we have an exciting botanical journey for you! Your adventure begins with a youthful plant, the most adaptable of its kind. Arm yourself with a slim, plastic-coated training wire – the gardener’s secret ally, easily found at any local garden center.
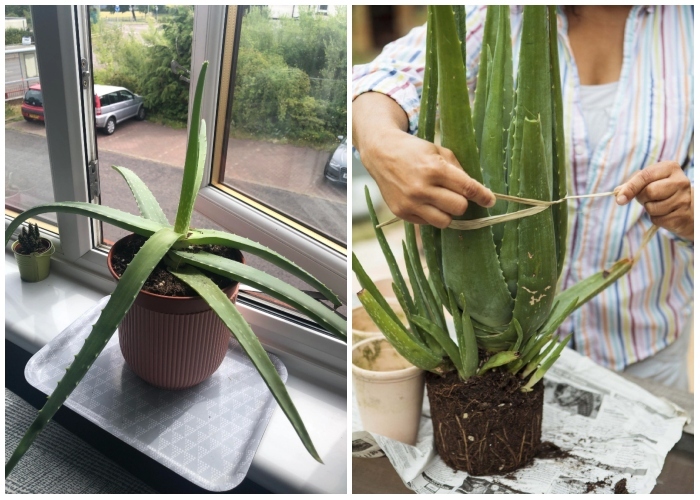
Next, delicately wrap this wire around the external foliage, akin to fastening a comfortable belt around a waist. Draw the ends of the wire close, corralling the leaves to stand united and upright. Once positioned, let the wire maintain its firm embrace, serving as a guide to teaching the plant the path toward upward growth. Give it a few days, at least, to imprint this new direction.
Fill large planters with crushed soda cans
Crushed soda cans can aid with drainage, promote air circulation, and save you money on the soil. Just make sure they are clean and free of debris before you begin. Use empty aluminum cans to save on potting mix and make large containers lighter.

Crush the aluminum cans and place them in the bottom of the pot, and cover them with landscape fabric or screen wire. Then pour in potting soil and place the plant. Pots will drain freely if you accidentally overwater. This is another environmentally friendly way to upcycle soda cans that would otherwise end up in a landfill.
Raise a Glass to Pest-Free Plants: The Beer Trap Method!
Got pests bugging your houseplants? Turn to an unexpected ally – beer! Yes, your favorite brew can double as a highly effective pest trap. Pour some beer into a shallow dish and place it near your plants. The sweet, yeasty aroma proves irresistible to pesky critters like slugs, snails, fruit flies, and ants.

Lured by the scent, these unwelcome guests will enter the dish, only to be trapped and drowned in the beer. It’s a natural, non-toxic way to protect your leafy friends and recycle leftover beer. So, next time pests try to party on your plants, invite them to their own beer bash instead. They’ll check in, but they won’t check out, leaving your plants to thrive in peace. Cheers to that!
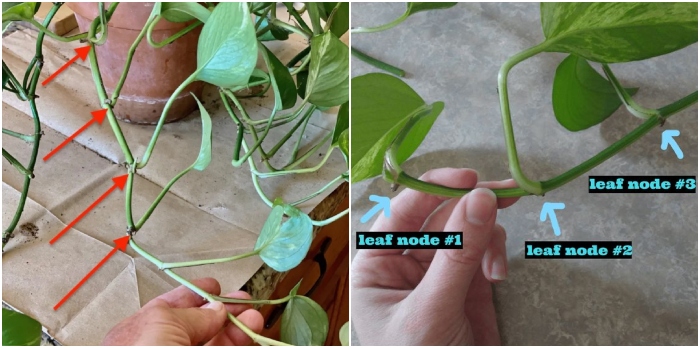
Master the Art of Pothos Propagation
Start by selecting a vine and cutting it just below where a leaf protrudes from the stem. This area, known as the node, will initiate root growth. Once separated, remove a couple of leaves nearest to your cut, leaving the nodes exposed. Next, immerse your stems in water, ensuring the nodes are submerged completely. If you’re new to plant propagation, using a transparent container can provide an easy view of root development. A blend of abundant water and bright yet indirect sunlight will boost the growth of roots on your cuttings. Around 6-8 weeks, you should witness a healthy root system.
Now it’s time to transition your cuttings to potting soil, making sure to quench their thirst with a good dose of water immediately after planting. In the heat of summer, a weekly watering schedule is ideal, whereas during the cooler winter months, watering every two to three weeks should suffice. Use touch as a guide – if the soil surface feels dry, it’s time to hydrate. Remember, overwatering can turn the leaves yellow. It’s recommended to let the soil dry slightly between watering intervals to maintain the health of your Pothos plants.
How To Propagate A Fiddle Leaf Fig In Water
Taking a cutting is the first stage in propagating your tree. Generally, you should select one of the plant’s healthiest leaves or stems and use it. Regardless of whether you choose a stem or a leaf, make sure that a “node” is attached. Your plants will take root at the node. To make the cuts, use a clean, sharp pair of scissors. Before you put your plant in water, dip the end of it in some rooting hormone.

Fill a glass jar halfway with water and add the fiddle leaf fig. Water should only be used to cover the bottom few inches of the stem. Leaves should start to emerge at the end of your cutting after around three weeks. Remove them from the water and plant them after about a month. It’s time to pot your fiddle leaf fig in soil once its roots have formed.
Use a drill to add drainage holes to a pot
Plants benefit greatly from appropriate drainage. If you have a cute planter that doesn’t drain, you can add drainage holes to it, even ceramic ones. Drill plastic pots with a standard drill bit, stone or terracotta with a masonry drill bit, or glazed ceramics using diamond-tipped bits.

Make a small starter mark with your nail where you want the drainage hole. Slowly work with your spray bottle in one hand and your drill in the other. Using the spray bottle, keep the drill bit and the pot surface wet. This prevents the pot from splitting and the bit from overheating and potentially snapping.
Sansevieria cylindrica growing and care hacks
Sansevieria cylindrica prefers temperatures above 41F and well-drained soil. To care for this plant, add organic matter and fertilize it before the blooming season. If the plant is young, protect it during the winter. Fully grown plants should be divided by cutting the connection between the plants when the soil is wet to keep the roots as long as possible.
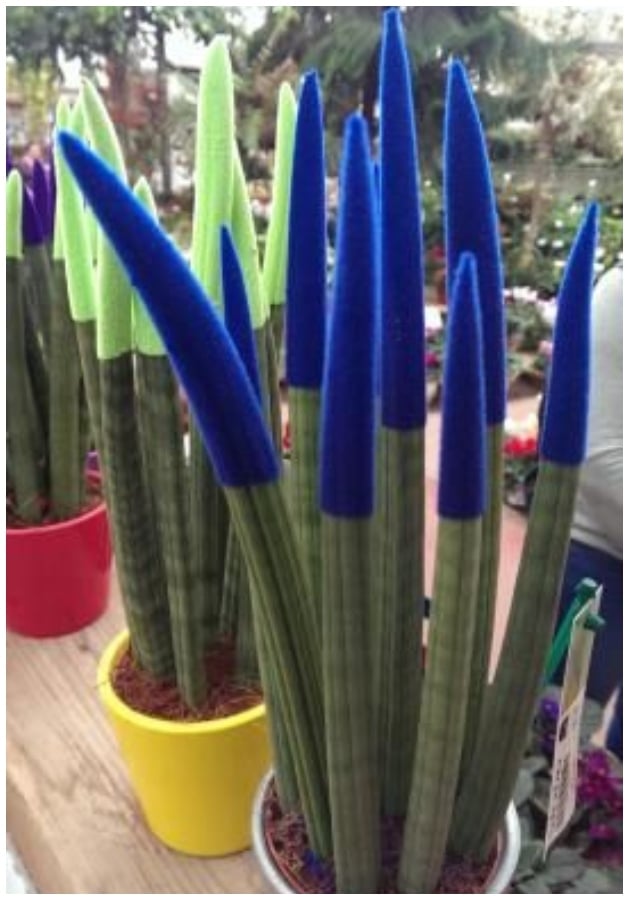
Water the plant more frequently for the first two weeks after planting or until the first leaf grows. Make sure to plant in a location with good drainage, as the plant may die if left in standing water. In areas with heavy rain, it is best to grow the plant above ground level using a raised bed.
Cut a corner off a sponge and designate it as your plant duster
Dusting the leaves of plants can assist them in photosynthesizing to their full potential. To make the leaves sparkle, dampen the sponge slightly and brush it over them while avoiding scratching the leaves. Make a solution with 1/4 teaspoon dish soap per quart of tepid water, then dip your sponge into it until it’s damp.

Wipe off the leaves in a soft manner with a damp sponge until they appear clean, rinsing the sponge frequently to avoid spreading dirt. To differentiate your plant sponge from the ones you use on the dishes or the bathtub, cut a corner off.
Use hard-boiled egg water to water your plants
Eggshells are naturally high in calcium, which aids in soil pH neutralization. This is mainly because the calcium carbonate slightly increases the pH of the soil. When you hard-boil eggs, a small amount of calcium is released into the water, which your plants may appreciate for extra nourishment.

Please make sure that you let the water return to room temperature before you add it to your plant’s soil. Additionally, you are doing something beneficial with water that would otherwise be wasted. This is a great alternative if you do not have the space or time to develop a compost pile.
Use a chopstick to support leaning plants
You may use the wooden chopsticks from your takeaway as miniature plant stakes if your plants require a little stability as they grow: Secure them in the soil and tie your sagging stems up with plant tape or twine. Wood, wire, rattan, and bamboo all make great supports for climbing houseplants as well.

You can get a trellis, spindle, and even round arches. If you are skilled enough, you can always make your own with a couple of chopsticks. This is a great way to repurpose waste that would otherwise end up in a landfill and be more environmentally conscious.
Water plants with your overnight drinking water in the morning
Another useful hack: in the morning, use the drinking water left on your nightstand to water some of your plants. Leave a container of water sitting on the side to evaporate off the chlorine in tap water until it is plant-safe. Then water your houseplants with them in the morning.

You should do this for at least 24 hours before using the water for plants and for longer if you have a large container. Cold pre-boiled tap water is also good for plants because it is an effective method to reduce the calcium that is present in the water.
Water plants with bathwater
There is no harm in using water from the bath to water your plants so long as they are not edible (and no pets or kids could chew on them). If you use Epsom salt in the water, your plants will appreciate it, but if the water contains additives such as colors or scents, you will want to avoid it.

Soapy water can benefit plants, particularly in controlling certain insects. Still, it is important to ensure that the soap product you use does not have additives that are harmful to plants and that you dilute it sufficiently to avoid damage.
Light-dependent plants
There are a few tricks for keeping your orchids thriving. Place them outside to absorb extra sun because the light is food for plants. People frequently fail with houseplants because they’re unaware of how gloomy it’s inside or how light-dependent plants are. But how do you determine if your plant is receiving sufficient light? There’s fresh growth with larger and more durable leaves than the preceding ones. The leaves turn a crimson or purple color (some plants). The plant isn’t losing leaves and is developing rapidly and steadily.

The main cause of spindly growth and leaf drop is a lack of light. That doesn’t rule out other alternatives, but it does make this the most important one. Light is food; thus, plants that receive less light drop their leaves, much like we humans do when we eat less. If you follow this advice, you’ll be on your road to success.
Start seedlings in citrus halves
Half-peels from oranges, grapefruits, and other citrus fruits can also be used as seed or propagated plant starter pots. Growing seeds in citrus peels is as environmentally friendly as it gets. You start with a natural substance, grow a beneficial plant in it, and then reuse it as a nourishing composting agent in the ground. It is a win-win situation.

Growing seeds in citrus peels could not be any simpler. First, hollow out the citrus and leave the thick rind. Then, just fill the rind with potting soil, either homemade or purchased, and add one or two seeds and water.
Mix some cinnamon into your seedling soil
Fungal infections, also known as “damping off,” kill many seedlings. Cinnamon’s antifungal effects can assist in keeping those issues at bay, and it also fertilizes plants. Place a teaspoon of cinnamon on a paper towel and roll damp stem ends in it. Fresh potting soil should be used to plant the stems.

The cinnamon will promote the stem to generate more roots while also preventing damping-off disease caused by fungus, mites, and whiteflies. Damping off is caused by a fungus or mold that thrive in cool, wet conditions. Fortunately, cinnamon is a common household product, and it’s easy to access.
Make propagated plant babies give as gifts
You will have gifts to give for any occasion if you learn to propagate. Because each plant is different, you will want to look up the name of yours to see if and how you can reproduce it. A professional would propagate plants not only for their own collection but for the benefit of others as well.

Because houseplants are such an important part of maintaining a happy and healthy household, be sure to share the love–and your baby plants–with those you care about. To increase their chances of survival, avoid their dormant season. It makes the perfect housewarming gift!
…Or try the water-wicking method
While you are gone, the water-wicking method is another way to keep your thirsty plants well-watered. Use a cotton rope with one end tucked into the soil of your plant and the other end dangling from the bottom of a water container. The cotton rope will slowly wick water from the container into the pot, maintaining a constant level of moisture in the soil.

You will be able to go out on vacation without worrying your plants will dry out and without having to bother a friend to come water them weekly. Martha Stewart swears by this watering technique.
Add your used coffee grounds to soil
After enjoying your coffee, rinse your used coffee grounds and rake a small amount into your plants’ topsoil. Alternatively, use them without rinsing to give an acidic boost to plants that like a lower pH, such as blueberries, maidenhair ferns, and azaleas. Some pests will be deterred by the coffee, and wanted earthworms will be attracted to the area.

Earthworms eat decaying plant material and don’t damage growing plants. They‘re important to soil structure and fertility. Some earthworms emerge at night to feed on dead plant material on the surface and will pull fallen leaves into their tunnels, aiding fertilization.
Cut open a diaper to help your plants retain moisture
Believe it or not, cheap disposable diapers can keep your potting soil from drying out, especially during warm, dry weather seasons when containers require frequent irrigation. Please be aware that we are talking about fresh, clean diapers. Disposable diapers container hydrogel – that is the same stuff you can buy in gardening stores, usually labeled as “water retention crystals”.

First, tear open a diaper and dump the contents in a mixing bowl. Then, add water until you have a thick gel, and follow mixing in equal parts potting soil. Put the stuff in a pot, and now you are ready to plant.
Give your plants drinks of your club soda
Plants need minerals like phosphorus, potassium, and sulfur to grow bigger and greener, and club soda contains all of them. Plants that are fed carbonated water over a length of time will develop faster than those that are fed plain tap water.

Most plants acquire nutrients dissolved in water via their roots, and macronutrients can be found in carbonated water. Carbon, oxygen, hydrogen, phosphorus, potassium, sulfur, and sodium are the macronutrients in question. So, if you have some money to spare, invest in club soda and test it for 10 days. You will see how stronger and greener they become.
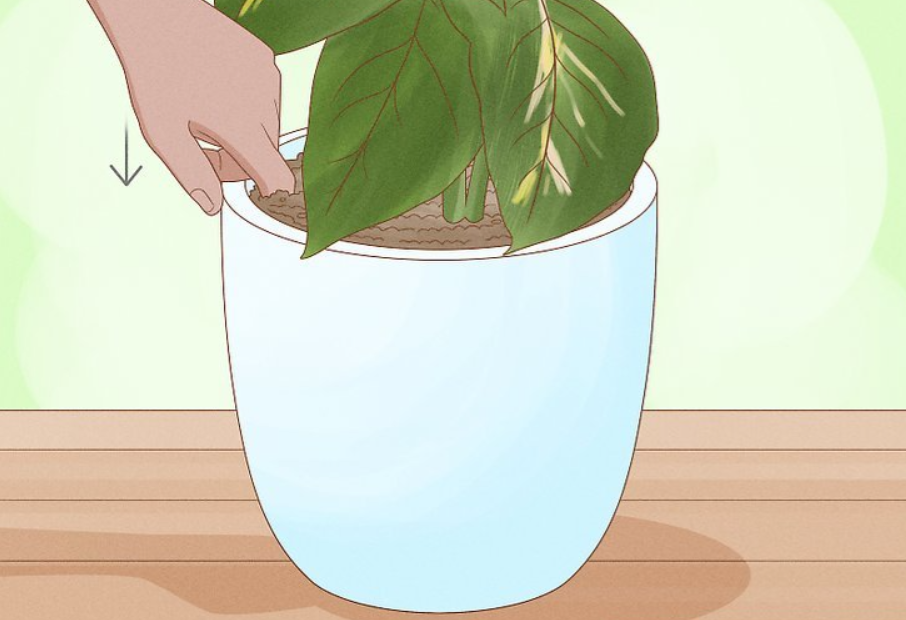
keeping new plants in their nursery pots
Keeping plants in their nursery pots and placing them in a pot cover can have several advantages. According to experts, there is no need to repot the plant immediately unless there is a pest problem or root rot. Keeping the plant in its nursery pot allows for bottom watering, which is a technique that helps prevent overwatering and ensures good drainage.

This is important for preventing root rot and controlling pests. Additionally, leaving the plant in its nursery pot allows it to acclimatize before being transplanted, minimizing the shock from changes in growing conditions.
Add cat litter to your soil mix for succulents and cacti
Cacti and succulents prefer soil that drains quickly. You can buy it at the supermarket or make your own by combining half regular soil and half cat litter—just make sure the litter is unscented and clay-based. By aiding with drainage, kitty litter can provide an essential component that cacti require to thrive.

Succulents and bulb plants, for example, will perish if they sit in water-soaked soil for too long. Keep in mind that well-draining soil doesn’t just let excess water pass through. For it to be effective, the soil has to create air spaces that give the roots oxygen.
Steps to splitting a snake plant
Turn the potted plant over so that it is lying on its side. After that, lightly tap the edges to free it from the saucepan. After removing the plant from its container, you should untie the roots from the dense bundle. Look for the stems’ bulbous base.

Pull the bundle’s complete stems apart slowly. Now you ought to possess two bundles. Each bundle should be put in its own pot.
Sprinkle eggshells in the soil
Another technique to add calcium to your soil is to scatter crushed eggshells on it. Pests such as snails and slugs will be repelled by it. Eggshell calcium is also beneficial in garden soil, where it helps to balance soil acidity while also delivering nutrients to plants.

Eggshells have so much calcium in them that they can be utilized practically like lime, albeit you’d need a lot of them to make a noticeable difference. Grind your eggshells into a fine powder and mix it with other organic matter at the bottom of a hole in the soil to help plants thrive.
Use honey to root plant cuttings
Dip the stem in honey before placing it in the soil to prevent fungal or bacterial problems while trying to root a new plant from a cutting. Honey is a common household item that also happens to contain enzymes for promoting root growth in plants.

Honey is, after all, a natural antiseptic with antifungal characteristics, which is thought to be one of the reasons honey works so effectively as a rooting hormone. In fact, one tablespoon (15 mL) of honey contains 17 grams of carbohydrates, the majority of which are sugars, and appears to provide plants a much-needed boost.
Use ice cubes to water your plants
Once a week, place three or more ice cubes on top of the soil and allow the ice to melt and nourish your plants. The advantages: You won’t get a leak, it will keep you from overwatering, and it will keep fragile foliage (like African violet leaves) from becoming wet. It is also a lot simpler to water hanging plants with it.

The downside of this technique: Because cold water can shock the roots of tropical plants, this suggestion should probably only be used on holidays. Orchids are special plants that require special care, and they like ice-cube watering.