Whether you’re a sewing enthusiast or a seasoned professional, this guide will unlock the secrets to achieving unparalleled precision, craftsmanship, and artistic flair in your projects. Dive into the world of contemporary sewing techniques as we explore a range of advanced hacks designed to maximize your creativity and efficiency. From mastering the art of tension control to exploring the intricacies of intricate embroidery, you’ll learn how to finesse every stitch and create flawless, sophisticated designs.
Our carefully curated selection of techniques will empower you to push the boundaries of your craft, weaving in elements of traditional and modern sewing practices. This guide will walk you through each technique with step-by-step instructions, helpful illustrations, and expert tips to ensure your success.
This article was originally published on worldtravelling.com and has been republished here with permission.
Don’t Have an Official Thread Lifter? Do This
If you don’t have a horizontal spindle, you can utilize a thread lifter, particularly when working with a larger spool or thread cone. If an official thread lifter isn’t available, a viable alternative involves using a large safety pin and a small binder clip. Attach the safety pin to the vertical spindle and secure the binder clip onto the “open-closely” part of the pin. Then, thread the thread through the binder clip to lift it off the spool without causing excessive tension.

If a binder clip isn’t accessible or the safety pin’s spring hole is too small for the spindle, try flipping the pin around, which may cause some wobbling as the thread passes through, but it can be a temporary solution.
Old Blankets for Batting
Because they are warm and breathable, wooly blankets still have a place in our hearts. Their shine begins to fade with age. But you shouldn’t throw them away. Here’s how to use them effectively!

You don’t have to buy new batting to make your next quilt. Old blankets can be used for the batting. They are soft and provide a great finish. They are also easy to fold.
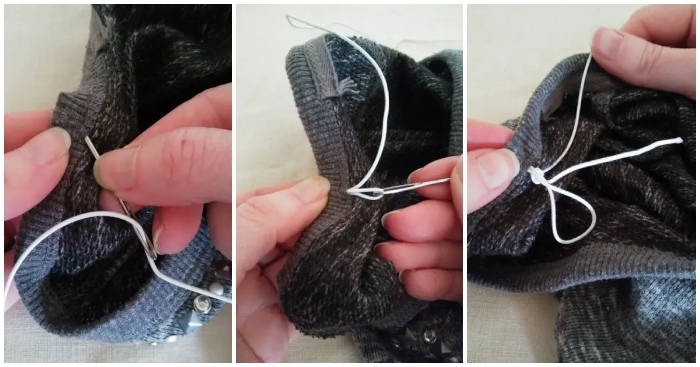
Hold the Drawstring
Hoodies are an excellent choice for winter because they are warm and cozy and don’t require you to put on any earmuffs or beanies. Sometimes, however, keeping the drawstrings intact is the hardest part of hoodies.

Here’s something to try. Make a small stitch at the back to hold the hood in place. This will make the front of your hood look identical and keep the drawstring in place.
Make Your Bias Tape
When making sheets and quilts, bias tape is a must. It allows you to add a border around the edges. Bias tapes are not challenging to make, and you don’t have to rush to the store if you need them.

Draw lines along the edges of the material. You can choose the width according to your preference and task. Iron the edges of the bias tape. You are now ready to use your bias tape. It can be as creative or simple as you like.
DIY Spool Thread Holder Using Household Items
Why break the bank when you can channel your inner MacGyver to create something incredibly functional? We’ve all been there: staring at a $20 spool thread holder at the craft store and wondering if it’s really worth the investment. Well, we have a hack for you that’s not only budget-friendly but also takes minimal effort and time to put together. Say hello to your DIY spool thread holder made from a skewer, a binder clip, and a little Scotch tape. Let’s dive right in! What You’ll Need: A wooden or metal skewer, A binder clip (medium to large size), and Scotch tape.

Steps: Find a heavy book or a flat, stable surface where you can attach your binder clip securely. Open the binder clip and clamp it onto the edge of your stable base. Take your skewer and remove any sharp ends with a pair of scissors. Insert the skewer through the hole in the spool of thread. Use a small piece of Scotch tape to secure the skewer to the binder clip. This ensures that the skewer won’t wobble or fall off. Gently pull some threads to ensure everything is stable. If the skewer moves, add more tape.
Turn Wide-leg Jeans Into Fitted Jeans
Following the instructions, you can transform wide-leg jeans into tailored jeans in less than an hour. You can do this with 8th-grade “Family and Consumer Science,” sewing skills, and some of your mom’s materials. This process is faster and cheaper than going to the store. Plus, you will get a better fit than most pants. It’s time to take those pants out of your closet and get started!

These are the materials you’ll need: loose jeans – the pants you wish to alter in the fit; Fitted jeans – pants that already fit you; Thread TIP: Use a thread that contrasts with the loose jeans to make it easier to follow the steps below; Chalk; Needle; Sewing Machine. The Steps: 1. laying the loose pants; 2. laying the fitted jeans on top of it; 3. outlining the fitted jeans; 4. finishing the outline; 5. hand stitches the chalk line; 6. trying out the sizing; 7. permanently stitching the loose jeans; 8. trying on the newly fitted jeans; 9. cross stitching.
How to Sew Buttonholes Without Leaving the Spacing Different
Sewing buttonholes with consistent spacing can be achieved using a simple finger-marking technique. Start by measuring the button that will be used and marking the same distance on the fabric where the buttonhole will be placed. Then, using the tip of your finger, make a series of indentations along the length of the buttonhole marking, spacing them evenly. These indentations will serve as a guide for your stitches.

When sewing the buttonhole, use small and even stitches, following the spacing marked by your finger indentations. This method allows you to feel the spacing with your finger as you sew, helping you to maintain consistent spacing even when not using a ruler or other marking tool. By using your fingertip to guide your stitching, you can easily sew buttonholes with consistent spacing every time.
Cardboard & Paper Hacks for Precision
Unleash the power of everyday household items to enhance your sewing skills with these genius hacks. Even Stitches with a Cardboard Roll: Start by cutting a small slit in a cardboard toilet paper roll. Place the cardboard roll on your sewing machine as a guide, positioning the fabric alongside it. As you sew, the roll ensures your fabric stays in a straight line, leading to perfectly even stitches every time.

Flawless Pleats Using Paper Templates: Cut strips of paper to your desired pleat width. Lay them onto your fabric, spacing them evenly apart. Fold the fabric over each paper strip and pin in place. Stitch along the edge of each pleat, removing the paper as you go along. With these innovative hacks, you’re not just sewing; you’re crafting with precision and creativity. Say goodbye to wonky stitches and uneven pleats and hello to sewing perfection!
How to Fix a Neckline That’s Too Low
If you’ve been wondering how to fix a low neckline, we’ve got a quick, DIY solution for you! Step 1: You’ll need a tapestry needle (a thick needle with a large eye and blunt tip) and some elastic thread or a 1/16″ (1.5 mm) elastic cord for thicker, heavier garments. Step 2: Thread your elastic cord through the tapestry needle and work it around the neckband’s inside. Aim to slide the needle out from the same hole where it went in. If threading between stitches is tricky, consider making a tiny snip above the tag, cutting only the inside layer. Alternatively, unpick a few stitches on the seam that joins the neckband into a circle;
Step 3: Pull on the elastic cord to raise the neckline after threading it. Try on your garment to check the fit—just remember to keep hold of the elastic cord’s ends! Once you’re happy with your adjustment, tie the ends into a temporary bow to prevent them from slipping inside the neckband; Step 4: Tie a sturdy knot in your elastic cord once you’re satisfied with the fit. Apply a dab of permanent fabric glue to the knot to ensure it stays secure, and let it dry. Once dry, trim the elastic cord ends and gently push the knot inside the neckband using your tapestry needle’s blunt tip. Voila, you’ve successfully revamped your neckline!
Noodle on the Knee Lift
Modern sewing machines often come with knee lifts that can be quite a stretch to reach, especially on models with wider throats. An easy and inexpensive hack can bring the knee lift closer, saving your inner thigh from an unexpected workout. Materials Needed: A pool noodle with a substantial central hole, A bread knife or another serrated blade. Instructions: 1. Measure a comfortable length from the pool noodle—enough to bring the knee lift within easy reach.

2. Using the bread knife, saw off the measured section of the pool noodle. 3. Firmly press and twist the cut piece onto the knee lift. It should be snug enough to stay in place but still easy to remove if necessary. 4. This adjustment will bring the knee lift closer, allowing for more comfortable sewing and preventing one leg from getting more exercise than the other. 5. As a bonus, one pool noodle is usually enough to make multiple extensions, so consider sharing this simple yet effective hack with your sewing circle.
How to Turn a Crew Neck T-Shirt Into a V-Neck
A v-neck t-shirt can be a flattering addition to any wardrobe, drawing attention upwards and creating a slimming effect. Even those new to sewing can achieve this look with a basic t-shirt. Here’s how to do it. Materials Needed: A seam ripper, A pair of sharp fabric scissors, Straight pins, Sewing machine equipped with a ballpoint needle for knit fabrics. Instructions: 1. Begin by carefully detaching the front part of the crew neck’s ribbing using the seam ripper. Proceed until you reach the shoulder seams, leaving the back portion intact. 2. Next, fold the t-shirt lengthwise, aligning the shoulder seams to find the exact center front. 3. With the fabric scissors, initiate the cut from the shoulder seam downward, ensuring you don’t exceed 2 inches at the center fold to avoid needing extra fabric for the neckband.

4. Slice the middle of the existing neckband in half lengthwise. 5. Gently stretch the neckband to make it more pliable for reattachment. 6. Align the neckband with the shirt’s right side along the new neckline cut, pinning them together and forming a ‘V’ at the ends. 7. Starting at one shoulder seam, stitch the neckband with a quarter-inch seam allowance, removing pins as you sew, and pause an inch before reaching the ‘V’. 8. Before continuing, reposition the neckband to line up with the opposite side of the ‘V’. 9. Sew down the edge until a quarter-inch from the end, pivot the fabric, and continue along the neckband’s other edge. 10. Repeat these steps on the opposite side, ensuring the neckband is turned right-side out and the corners are neatly pinned. 10. Once all edges are stitched, you’ll have a newly fashioned v-neck that enhances your t-shirt’s appeal.
Elastic Threads
Unique pieces and one-of-a-kind clothing items will enhance your personality. You can use a regular thread instead. Elastic threads are great for sewing, shirring on lightweight fabrics, and creating home decor. Shirring shrinks fabric by about half its original size.

It also gives it a perfect shape when put on another garment. You can add a sophisticated touch to your clothes by smocking. You can also make ruffles with elastic threads.
Soldering iron for Deco Mesh or Other Fabrics that Fray
To begin with your deco mesh project, find a sturdy, heat-safe surface to work on. You’ll want to avoid using scissors to cut the mesh, as it can lead to fraying. Instead, estimate the length you need and lay the mesh on your chosen surface. You could use a marker to provide a guide line for cutting, if needed. The secret to cutting mesh effectively lies in the use of a soldering iron. Align the wider side of the iron’s tip parallel to the end of the mesh to maximize your cutting surface.

The next step is to press the iron tip against the deco mesh, placing it between two widthwise fibers. This technique works best, as deco mesh is a grid of lengthwise and widthwise fibers. Hold the iron there for a few seconds until it slices through the fibers. You might find it beneficial to gently oscillate the iron back and forth, aiding it in its cutting process. You can commence cutting from either side of the deco mesh.
Clothespin Embroidery Thread Organization on a Pants Hanger Hack
For crafters and embroiderers, managing and organizing an array of colorful embroidery threads can often turn into a tangled nightmare. But what if we told you that a simple and ingenious hack, which uses everyday items such as clothespins and a pants hanger, can take you from chaos to cleaning in no time? Creating your own Clothespin Embroidery Thread Organization system is as easy as 1-2-3. Gather Your Supplies: All you’ll need is a pants hanger (preferably the type with a swivel hook for easy access) and a pack of clothespins. You might already have these items lying around your home!

Attach the Thread: Take each of your embroidery threads and wind them around a clothespin. Make sure to secure the end of the thread under the windings or into the clothespin’s clip to prevent unraveling. Hang Them Up: Clip the clothespins along the bars of the pants hanger. You can arrange them by color or type, depending on your preference. Once done, hang it in your craft room or closet. And that’s it! You’ve now got an affordable, space-saving, and efficient thread organization system that adds vibrant color to your crafting space.
Sew It Yourself: Dual-Fabric Iron Cable Holder
Our project for the day is a dual-fabric iron cable holder. Not only does this add a dash of charm to your ironing routine, but it also serves as a practical solution to manage unruly cables. Let’s dive in! Materials: Two fabric pieces (one plain, one floral), approximately 12 x 3 inches each, One button, One rubber loop, Sewing machine or needle and thread, Scissors. Step 1: Start by cutting both your fabrics into 12 x 3-inch pieces. This dimension works well for most iron cables, but feel free to customize it to suit your iron; Step 2: Place the two fabric pieces together, right sides facing each other. Sew them together along three edges, leaving one of the shorter sides open for turning. Don’t forget to backstitch at the beginning and end to ensure durability;

Step 3: Once your sewing is done, trim the corners to reduce bulk and turn the fabric right side out through the open end. Iron the fabric, ensuring it’s flat and wrinkle-free; Step 4: Fold the edges inward and iron on the open end. This is where we’ll be adding the button and loop. Position your rubber loop on one side of the opening and carefully stitch it in place. On the opposite side, sew on your button. Ensure it aligns with the loop for efficient fastening. Step 5: To finish off, top-stitch around the edges of the holder and close the open end. This will secure the button and rubber loop and give your holder a neat, polished look.
Neat Bobbin Storage
Storing bobbins can be tricky, but with this ingenious hack, you can say goodbye to unraveled thread and clutter. Firstly, take an elastic band and stretch it over the spool of thread. Then, feed the opposite end into the bobbin, making sure it goes all the way through until the end reaches the other side of the bobbin. Next, retrieve the elastic’s end and draw it over the spool, replicating the initial step.

But here’s the real trick – to keep the thread from unwinding from the spool and the bobbin, spritz the thread ends with hairspray. This little-known tip helps keep everything in place. Finally, adjust the elastic so that it sits snugly over the thread end on the spool, ensuring extra security. Voila! With these simple steps, you’ve transformed your sewing chaos into organized peace. Happy sewing!
Sewing Thread Protector
In the realm of sewing, cleanliness is next to godliness, especially when it comes to keeping thread pristine. Repurposing empty plastic soda bottles as protectors is one clever hack to prevent dust and grime from sullying your white thread. As shown in the image, the bottles are ingeniously cut and placed over the thread spools on a sewing machine, forming a barrier against contaminants.

This simple yet effective solution is perfect for those who value resourcefulness and cleanliness in their sewing endeavors. Not only does it recycle waste, but it also ensures that your white threads remain unblemished and ready for your next project.
DIY Sustainable Kitchen Towels
Creating eco-friendly reusable kitchen towels is both easy and rewarding. Start with the materials: an old towel, terry cloth, or even bamboo toweling for an eco-conscious choice. For a softer feel, use brushed cotton from old bedsheets or repurpose cotton fabrics from thrift shop shirts. You’ll need a rotary cutter and mat for cutting squares (scissors work too), a kam-snap kit, a ruler or quilting square, and a sewing machine or serger.

Instructions: 1. Cut the towel and cotton fabric into squares (9 inches works well). 2. Place a towel square and a cotton layer with the WRONG sides together, with the nicer sides facing out. 3. Serge all four sides for durability. 4. Sew a diagonal line from corner to corner. This step strengthens the towel, ensuring it holds up in the wash. These homemade towels add a personal touch to your kitchen and support a sustainable lifestyle.
Elastic Sewing Technique
Sewing elastic onto fabric can often be a fiddly task, but not with this savvy trick! Start with a toilet paper roll, cutting it until you have a single loop. Position this loop flat on your sewing machine, close to the needle, and secure one side with tape. Slide the elastic through the loop, ensuring it lies flat, and then affix the other side with tape as well.

This makeshift guide keeps the elastic stable as you place the fabric over it. Now, you’re all set to sew them together smoothly. This nifty setup prevents the elastic from twisting and ensures an even stitch, making your sewing experience hassle-free and efficient.
Wash Your Fabric Before Stitching
Sewists who have used a variety of fabrics know the differences and how to sew them correctly. Here’s a quick hack that will make your job much easier.

It is a good idea to wash your fabric before you sew it. This will prevent any shrinkage from occurring after the project is complete. This works with most fabrics except 100% polyester.
Effortless Threading
Streamline your sewing process with a quick and easy threading hack. All you need is a disposable pen with a clip and your sewing thread. Attach the pen’s clip to your sewing machine’s needle clamp; this repurposed item will serve as an innovative thread guide.

The Bobbin Cleaning Hack
Keeping your sewing machine in top condition is crucial for smooth operation, and a clean bobbin area is essential for flawless stitches. One clever hack is to use a cotton swab for removing lint and thread remnants from the bobbin case. Gently swipe the cotton swab around the case and any areas where lint typically accumulates.

This simple yet effective technique prevents build-up that can disrupt your sewing machine’s tension and performance. It’s a quick maintenance step that can save you from frustrating thread snags and ensure your sewing projects look clean and professional. Regular cleaning after every project can prolong the life of your machine and make your sewing experience more enjoyable.
Craft a Classic Tote Bag
Gather your sewing essentials to craft a simple tote bag: two pieces each of exterior and lining fabric, straps, interfacing, and standard sewing supplies. Begin by cutting the fabric to size, then iron on the interfacing for stability. Create the straps, fold and iron them for a neat finish, and stitch them down.

Zipper Organization Board
Transform your cluttered sewing space with a DIY Zipper Organization Board. Start with a sturdy wooden board and a collection of metal clips with hooks. Space the clips evenly across the board and secure them firmly using a hammer or a drill, depending on the type of clips.

Hang each zipper by its fabric end, arranging them by color, length, or type for easy identification. This wall-mounted system allows you to see all your options at a glance, preventing the all-too-common zipper tangle and making your selection process a breeze when you dive into your next sewing venture.
Knitting Grater Dispenser
Revolutionize your knitting or crochet station with a quirky, repurposed Grater Yarn Dispenser. Select a clean, old grater and station it on your worktable. Slot each ball of yarn behind the grater’s sections, leading the end through the grating holes.

This setup ensures a smooth, consistent feed of yarn, preventing annoying tangles and the escape of yarn balls across the floor. It’s an efficient, space-saving tool that adds a novel twist to your crafting routine, keeping your yarns organized, accessible, and in a controlled place as you work on your latest creation.
Homemade Puff Quilt
For a cozy addition to your home, crafting a Homemade Puff Quilt is the perfect project. Choose a variety of fabric prints and cut them into uniform squares for the quilt top. Sew pairs of squares together, right sides facing, leaving a gap for stuffing. Turn them right side out, fill each with a puff of batting, then stitch the opening closed.

Attach these puffed squares at their corners, forming a tactile and visually appealing checkerboard pattern. This plush quilt is not only a functional item for snuggling but also an engaging project that showcases your craft and gives life to leftover fabric scraps.
Hemming Denim
To hem denim while preserving the factory edge, begin by deciding on the new length of the garment. Measure for accuracy and cut off the excess material. Then, remove the factory hem by cutting it about a half inch above the seam to reduce bulk. Align this factory hem with the raw edge of your cut denim, right sides together, matching any important seams like the center or sides first.

Save With a Cardboard Mannequin
Investing in a mannequin can undoubtedly be a steep expense, especially for those exploring sewing as a hobby. But did you know that you could craft your very own cost-effective substitute using cardboard? Indeed, creating a makeshift mannequin is a brilliant way to visualize your handiwork on a figure, without breaking the bank. Start by fashioning the cardboard into a bust shape that closely resembles your measurements or those of your intended wearer.

The beauty of this DIY approach is that you can personalize the dimensions to fit any unique body type or design requirement. Once your cardboard mannequin is ready, simply mount it on a coat hanger for easy display and fitting. Not only will this help you save some precious pennies, but it also offers a fun, hands-on way to further involve yourself in the process of creating beautiful, bespoke clothing.
DIY Compact Sewing Toolkit
Transform empty wet wipe covers into a nifty sewing toolkit! Start by collecting several plastic wet wipe lids. Choose a vibrant fabric for the exterior, cutting it to the length of the lids when placed consecutively. Stitch the fabric, allowing room to insert the lids. Slide them in, aligning consecutively, and secure with stitches.

For added safety, use the wet wipe lids to safely store dangerous or easy-to-lose items like needles and tiny buttons. Add a zipper or button for closure. This ingenious toolkit ensures your sewing essentials are organized and safely tucked away, all while sustainably repurposing materials. A DIY sewing marvel!
Toothpick Hack
First, take two toothpicks and two coins, respectively, and secure them together using adhesive tape, ensuring they are firmly attached. Adhere these toothpick duos to the coins, which will serve as a weight and height. Duplicate this setup so you have a pair. Next, place these weighted toothpick guides on either side of your sewing machine’s needle, securing them in place using tape. This setup acts as a makeshift fabric guide and pressure foot, stabilizing the fabric as you sew.

Proceed to feed your folded fabric layers through the toothpick guides, ensuring they remain aligned as they pass under the needle. If your project calls for additional intricacy, you can easily insert a third layer of fabric or interfacing between the folded layers for added texture or support. This simple but effective hack offers a fantastic makeshift solution for those who lack specialized sewing equipment.
DIY Oversized Spool Holder
Dealing with oversized thread spools that don’t fit on standard sewing or embroidery machines can be a frustrating experience. It’s common to place these spools beside the machine, but this often leads to thread getting caught and even breaking. Purchasing a specialized, king-size thread spool holder can be incredibly expensive, sometimes costing upwards of $100. For a budget-friendly alternative, head to your local hardware store. Purchase two wooden dowels with a diameter of about 5/16 of an inch and a pack of small eyelet screws. Cut each dowel in half to create four 20-inch rods. Using a small drill bit, make holes at the top of each rod and screw in the eyelets. If finger strength is an issue, use an awl for added leverage.

For the base, repurpose wooden coasters by drilling a 5/16-inch hole near the edge. Insert a small amount of wood glue into the hole and attach the rods. To help identify where each spool should go, consider adding colored markers to the base, such as circles cut from oilcloth. Allow time for the glue to set. The end result? Four custom, highly functional cone holders for less than $10. This DIY solution not only saves money but also keeps your sewing or embroidery projects running smoothly.
Side Tied, Triangle Tee: How To
Imagine crafting a stylish, unique shirt in just 15 minutes – an irresistible summer delight! Yes, this is possible with our “Side-Tied, Triangle Tee.” It’s a garment and a fashion statement showcasing your creative flair and love for one-shoulder tees this season. Trust us, the joy of wearing something handmade has an unmatched charm, and I bet you’ll revel in every moment of making this chic outfit. Here’s What You Need to Create Your Summer Magic: A Tee Shirt (Pictured is a small Men’s), Scissors, Chalk

Follow these easy steps and make a splash with your trendsetting DIY tee: Mark your shirt where you’d like to cut, ensuring a perfect one-shoulder design. Next, boldly slice through the marked area. Don’t worry; that’s part of the creative process. Now, cut open the side, turning your regular tee into a fantastic canvas of style. The final flourish? Tie the two cut pieces together. This simple action transforms your project into a unique, side-tied triangle tee.
Master the Art of Shortening Your Front Rise: A Tailoring Secret Revealed
Today, we are delighted to unveil a sewing hack that solves one of the most common clothing issues – an excess length in the front rise or front crotch. This unnecessary surplus can create an illusion of your pants being too long, or worse, make it look like you’ve got extra “storage” room at the front. Not quite the fashion statement you want to make, right? The right way to alter your front rise to eliminate length: Step 1 – Draw the line at right angles – perpendicular – to your front cutting edge on your front pattern piece, squaring across to the side seam.

This slash line should sit approximately 1/3 up from the front fork, staying clear of the front curve of the fork area. Make sure to mark your stitching line on your pattern if your seam allowance exceeds 6mm (1/4″); Step 2 – Cut along this entire line, dividing the pattern into two pieces; Step 3 – Pivoting from the side seam, fold out or decrease the required amount. In instances with large seam allowances, measure the amounts at the stitching line, not the cutting edge. On occasions, the front curve might also need to be slightly scooped out, varying between 6mm (1/4″) to 1cm (3/8″); The best way to gauge how much to reduce your front rise length is by making a mock-up (toile) of your garment and pinning out a horizontal wedge while wearing it. As shown in the image. Step 4 – With a pencil, blend your cutting edge with a smooth, continuous line.
How To Clean a Self-Healing Cutting Mat
This hack will make wielding a rotary cutter as exciting as pulling a rabbit out of a hat. So, prepare yourself for a thrilling game changer: the secret to cleaning your beloved self-healing cutting mat with everyday clear packaging tape. Your first mission involves crafting a sticky tool. Snip a generous piece of tape, sufficient enough to loop around your four fingers, sticky side out. Voila, your homemade lint picker is ready! For your next trick, you need to make those hidden cuts on your mat visible. How, you ask? Simply bend your cutting mat to expose the elusive grooves.

Ready for some action? March your sticky soldier across the battlefield of the mat, allowing it to conquer all the debris. Rotate the bending direction of the mat as required, ensuring no corner is left unexplored. Keep up the assault until you’ve swept over the entire surface. Has your trusty sticky tool lost its mojo? Fear not; recruit a fresh one and continue your quest. In a matter of mere minutes, your mat will be reborn, squeaky clean, and prepped for your next sewing escapade. Believe us; it’s a game changer in the world of sewing hacks. Happy sewing!
Thrifty Cone Thread Sewing, 2nd Option
Are you interested in using a thread cone for sewing rather than the smaller spools? Don’t worry; you can do it without special equipment or stands. Utilize what you have available, like a Magnetic Clip from Harbor Freight. Attach it to your horizontal spool pin and place the cone on the table behind your sewing machine. This method works perfectly and can also be used with a vertical spool pin holder, but keep the thread away from the hand wheel to prevent it from wrapping around it.

While using the clip on the horizontal spool pin to make a thread catcher/pin cushion bag, we didn’t encounter any problems with obstruction of the thread path. Some use a clothespin and thread the thread through the coil, so we tried it. It worked well on the horizontal spool pin but didn’t hold as well on the vertical pin. Bringing a few clothespins in your carry bag when meeting with quilting friends would be a simple solution, and you could even share them!
DIY Thread Storage Carousel
Here are the step-by-step instructions. Materials: 17″ diameter wooden circle; 24″ wooden dowel, 1 inch in diameter; 2 metal flanges, 1 inch in diameter (these will be used to attach the wooden dowel to the base); 4 screws, 1 inch long; Removable bobbin storage carousel that holds up to 90 bobbins (you can purchase this online or at a sewing supply store); Wood glue; Drill; Saw; Sandpaper; Paint or stain (optional); Paintbrush (optional). Instructions: Begin by sawing the wooden dowel into one 6″ piece and one 18″ piece. Take the 17″ diameter wooden circle and sand any rough edges. Attach a metal flange to the center of the circle using screws. Apply wood glue to one end of the 6″ wooden dowel piece and insert it into it the metal flange that is attached to the wooden circle.

Allow the glue to dry completely. Next, attach the removable bobbin storage carousel to the end of the 18″ wooden dowel piece using screws. Apply wood glue to the other end and insert it into the 18″ wooden dowel piece and the other metal flange. Allow the glue to dry completely. Once the glue is dry, attach the second metal flange to the center of your work surface using screws. Finally, attach the Thread Storage Carousel to the metal flange on your work surface. The 6″ wooden dowel piece should fit snugly into the metal flange.
Salt Shakers for Pin Storage
Need a novel way to store your sewing pins and needles? Consider repurposing an old salt shaker! It’s an incredibly convenient solution that offers easy access while keeping your essential sewing tools neat and safe. Just pour your pins and needles into the shaker, ensuring the pointed ends face upwards. The small holes on top work perfectly as an easy-access dispenser while the glass body allows a quick inventory check. No more rummaging through your sewing box in frustration.

Plus, it’s an excellent way to add a touch of charm to your sewing space. By using shakers of different designs, you can effortlessly organize various types of pins and needles while adding aesthetic appeal. So, save that empty salt shaker next time – it might just be the smart storage solution your sewing supplies need.
Fix a Hole in a Shirt with Embroidery
Materials: Medical syringe (needle removed), embroidery thread, small fabric piece, scissors, pins or fabric glue, and iron (optional). Steps: 1. Assess the damage and choose an embroidery design. 2. Prepare the shirt and position the fabric piece behind the hole. 3. Thread the syringe with embroidery thread.

4. Create loops by inserting the syringe through the fabric layers and pushing the plunger. 5. Secure the edges of the fabric piece with stitches. 6. Trim excess thread and fabric and press the embroidered area if desired.
Plastic Straws For Bobbins
Initiate your bobbin organization by placing each one on top of a plastic holder. Be sure to orient the flexible part of the holder upwards and then glide your bobbins onto it. To secure the setup, simply bend the top of your holder downward to prevent it from tipping over and the bobbins from falling off. The ideal candidate for this task? Slim straws from Ikea.

They outshine standard, wider straws you might find elsewhere, which are often too unstable for this purpose. Ikea’s slender straws fit snugly around the bobbin and onto the plastic holder, offering a reliable and firm fit. While it may seem unconventional, this method truly delivers. And the best part is that there’s no need for screws or drills – a straightforward, efficient DIY bobbin storage solution!
DIY Thread Spool Box
To create your own thread spool box, measure the distance between the rods of your purchased carton box (2.3 cm in the author’s case). Divide the box measurements by the rod distance to determine the number of rows and columns (40 in this example: 8 rows, 5 columns). Map out the placement of nails at the bottom of the box and push the nails through. The nails were sufficient in length, but longer ones may provide extra stability.

We opted not to use glue, as the cardboard was thick enough (2 layers), but adding glue is an option for added security. Then, to add some design to the box, rap it with chalkboard contact paper and write on it whatever you like.
Jean Repair
High-quality jeans can actually help you save money over the long term. Jeans were designed to withstand a beating. There are some areas that will wear faster than others. You don’t need to worry about this; you only need a sewing machine with matching-color fusible interfacing.

You can simply sew fusible interfacing on top of the holes, following the grain of your original fabric. You should use a stitch length of 1.5. Although the result may be flawed, it is still better than throwing your perfectly made trousers in a garbage can.
Make Ruffles with Fork
Lace or ruffles are common as they add style to a dress’s neck and wrist. You should learn how to do it if you like sewing. And trust us, we promise you can create ruffles with a fork!

You can fold your fabric quickly and efficiently with the fork to create pleats. This hack allows you to create stunning ruffles from satin, velvet, or other materials.
DIY Rug Hooking Stand
Rug hooking is a popular craft requiring a sturdy and adjustable stand to hold your work comfortably. While there are many DIY rug hooking stand designs out there, using a camera tripod is a unique and practical option that is easy to make. To create your own DIY rug hooking stand using a camera tripod, you’ll need a few materials, including a camera tripod, PVC pipes, connectors, and a drill. First, remove the camera mount from the tripod and attach a piece of wood to the tripod’s top using screws. Next, construct a rectangular frame using PVC pipes and connectors. The frame’s dimensions should be based on the size of the rug you plan to work on. Attach the frame to the piece of wood on the tripod using screws.

Drill holes into the PVC pipes for your rug hooking tool and yarn. Once your stand is complete, you can adjust the height and angle of your rug by adjusting the tripod’s legs and pivoting the PVC frame. This will give you the perfect working position for your comfort. Using a camera tripod as the base for your rug hooking stand makes it easy to adjust the height and angle of your work and allows you to fold up and store the stand easily when not in use. Overall, creating a DIY rug hooking stand using a camera tripod is an affordable and convenient solution that provides you with a sturdy and adjustable working surface. Try it out and see how it enhances your rug hooking experience!
Sewing Buttons
If you only have a few buttons to sew, you can do it by hand. However, if you have many buttons to attach to an article of clothing, you will need a machine. It is easy to sew many buttons using a machine. Let’s take a look at what we are talking about.

Reduce the feed dogs to allow the needle to stitch repeatedly in a single location. The feed dogs will usually drop automatically when you select the button sewing function. For more clarity, you can refer to the manual.
Install Zipper Easily
It’s easy to install a zipper, and this trick will even make it easier to make. Start sewing on the right-hand side of the seam by keeping the needle to your left.

Place your fabric under the presser foot, and mark the bottom zipper. Turn your fabric under the presser foot and mark the bottom of the zipper. Then, backstitch once more. Continue sewing the zipper until it reaches about 2 inches. It’s done!
Sewing Buttons by Hand
It is an easy skill to sew buttons by hand. It can be frustrating when you are all set to go, and a button falls from your dress. This can be very frustrating, but we have a tip that will make it easy to sew a button quickly.

Make sure that the thread is long enough to reach the fabric without pulling it. As shown in the image, keep the button still in place and stitch it with the button’s pattern. It’s so simple!
Making Crisp Corners
You might be anxious about sewing crisp corners when you sew shirts. Crisp corners make the garment look professional and neat. Let’s find out how to make crisp corners. You can always turn the fabric inwards for a perfect corner when sewing.

You can also use a shorter stitch length to square the corner with 1-2 shirt stitches. The corner stitch can be sewn over a piece of thread, and the thread tail pulls the corner.
Circular Sewing
You will be familiar with the need to sew in circles if you are a frequent sewer. This could be to fit the project or the pattern. This hack will make your life much easier.

Use a circular object, such as a plastic cap, with sandpaper attached at the bottom. This can be used as a sewing template and help you create a round shape without edges.
Remembering Skirt Length
It is difficult to remember how long a skirt should be because each skirt has a specific measurement. You will only be able to remember some things. For a solution, let’s go back to school.

A chart can be prepared by printing the desired length measurements for different types of skirts. Keep it close at hand for any emergencies. You can easily refer to this chart whenever you need it.
Toe Separator for Bobbins
If you use a sewing machine, you will need a variety of bobbins. They are tiny. It is unacceptable to drag them around in a hurry. Let’s share a simple trick to keep your bobbins secure.

Toe separators are a great way to keep your bobbins in one place. They can be purchased at dollar stores or sewing shops. Toe separators keep the bobbins together and make them easy to find and select.
Stitching the Perfect Quilt Line
People who love to make quilts at home know the difficulty of creating perfect lines. The quilts are too wide, making it difficult to create lines that match the design. This hack should help.

Use masking tape to mark the lines you want. You can create the perfect margin for sewing using tape that won’t let squares move.
Marking Perfect Seam Allowance
When stitching the edges, ensure that your seam allowance is the correct width. It allows you to loosen your attire easily and double-protect your stitches. This hack is straightforward but highly effective.

To mark a perfect seam allowance, tie two pencils together with a rubber band and then draw a seam allowance. Both pencils must be at least 3/8 inches apart.
Organize Your Trim
You can use trims to enhance the elegance of your attire. They are usually very thin and should be kept safe to avoid tangles.

A rectangular piece of cardboard is the best way to organize your trims. You can take the cardboard from either a shoebox or a cereal container. Wrap the trim around it to prevent it from getting tangled.
Quick Hem
Hems can add style and beauty to your garments, especially if the thread is a contrasting color to the fabric. Bias tape is required to create a sleek hem. It isn’t easy to sew a perfect hem with bias tape. We have something for everyone!

When you align the bias tape to the curve, you will see little waves. This indicates that excess fabric is starting to fall away from the curve. Your machine should not cut this line.
Dress Clothing
After losing weight, your first thought is to resize your large dresses so they fit correctly again. You can shrink a piece of clothing by taking it off.

You should also know this: All the garments are too small. You cannot wear dress clothes like tailored shirts. It will ruin the overall look. The overall shirt will look unsymmetrical if it is just pulled in at the base.
Organize Your Sewing Needles & Pins
The most minor but most crucial equipment for sewing is pins and needles. You can’t replace them with any other equipment. It can be challenging to keep these pins and needles in place. This hack will save you.

To keep your needles and pins together, attach a small iron or steel bowl to the top of the sewing machine. Glue two small magnets into the bottom of your bowl, and there you have it.
DIY Weights
It can be challenging to hold light fabric while you trace a pattern, especially if the template is made from something other than cardboard. If the fabric you are cutting has delicate fibers, you don’t want to use too many pins or a pen. To hold the cloth down, use washers and nuts as fabric weights.

These iron or small steel nuts are extremely handy and can be placed wherever you like. They won’t damage or mark the fabric beneath, making it easy to trace the pattern accurately and cleanly. To keep them together, use a small tin can.
Fray Prevention
A pair of serrated edge-pinking scissors can help you stop fraying your fabric when stitching. These pinking scissors have spring-loaded blades that pop open after each cut.

The fabric is less likely to fray because the blades create a zigzag pattern. This hack is excellent for old fabric that will eventually fray.
No More Thread Tangling
Sewing can cause threads to tangle. We have a solution to make thread tangling a thing of the past. A circular beeswax container is common in a tailor’s sewing box.

Use beeswax to coat your thread, and you will see how easy it can be. The thread is easy to use because the wax doesn’t allow it to move around. You can now find it in a plastic bag with notches that allow you to pull the thread through beeswax.
Staystitching
Staystitching is a skill that all professional stitchers or those who use it frequently understand. This is a row that you stitch on fabric to preserve its shape. It’s particularly useful for curved edges. This hack will make it easy!

Staystitching allows you to keep the fabric in place while making it more efficient. Like tucks, staystitching keeps the fabric in place while attaching other pieces. It can also be helpful when working on diagonal edges.
Making Scissors Handy
It would be wrong to assume that scissors are only needed when cutting fabric at the beginning. They are essential throughout the sewing process. You might need to remember where your scissors are at times.

Attach a string to your scissors’ loop. Make sure the string is long enough that you can place it around your machine and table edges. You will be able to reach them whenever you need them. Simple!
Push the Needle Eye
Threading a needle is the most challenging task, regardless of whether you are sewing with your hands or with an automatic machine. The thread’s edge often frays. You will find it annoying to have to trim the thread’s end over and over.

Instead of pushing the thread’s tip into the needle eye, push the needle eye onto it. To make it glide effortlessly into the needle eye, pinch the end.
Use Binder Clips
Sewing lightweight fabrics is difficult because it can be challenging to keep them from unraveling. This is where a great hack comes in. Use a binder or office clip to keep your fabric in place while you sew.

These small clips will allow you to keep all layers of fabric in one place while sewing around the edges. Keep in mind, however, that if your needle gets too close to the clip, you should remove it and go on sewing.
Pinning Button Holes
Sometimes, mistakes can be made when sewing at high speeds. It can be difficult to remember not to sew buttonholes when sewing shirts that have so many buttons. This incredible hack will help you avoid making mistakes while sewing.

Pin the hole with pins so you can see it when sewing. This will allow you to avoid sewn up a buttonhole and help you avoid cutting it again after it is finished. It works!
Magnet Hack
Everyone wants to be able to find the right equipment at the right time. This is especially true for small items like needles. There is an alternative to a pin cushion (or steel wool) that will keep your needles together.

To keep all your needles and pins together, a handy way to organize your sewing supplies is to keep a magnet in your sewing kit. Place the magnet in the work area after you are done. You will be amazed at the power of attraction!