
Welcome to the verdant realm of indoor gardening, a world rich in wonder, tranquility, and the lush beauty of nature – all inside the comfort of your own home. As houseplants continue to gain popularity among those who desire a splash of green in their urban dwellings, the need to understand and master the art of houseplant care becomes more vital than ever.
This article is your compass and map, a guide designed to take you on a botanical journey through the enchanting world of indoor plants. We’ve gathered over 35 unique tips and tricks that will empower you to nurture your leafy companions with confidence, grace, and perhaps a touch of that coveted green thumb. Let’s begin.
From Waste Bin to Water Barrel
You may think crafting your own rain barrel is a daunting task. Think again! Tap into the hidden potential of an ordinary trash can, transforming it into a personalized rain barrel. The digital age provides many straightforward guides to ease your rain barrel creation journey.

Visualize this – your ordinary trash bin, basic PVC pipes, and a few electrical connections morph into a self-made rain barrel. You can stack these fantastic contraptions as high as your water needs require. Once in place near a downspout, simply drill a hole towards the bottom and install a drain valve. Voila! Your eco-friendly water storage solution is ready!
Butterfly Traps
Turns out, plant decorations aren’t just there to sit still and look pretty. Gardening stores now stock multi-purpose decorations that get two jobs done at the same time. Think of those adorable butterfly-shaped plant decors everyone is obsessing over these days. Butterfly-shaped sticky traps have great aesthetic value, but they are this popular for a good reason.

This decor helps with pest control and stops flies, gnats, mosquitoes, and similar pesky bugs from damaging the plants. Yellow is the common color of these traps, as small flying insects are drawn to this hue and quickly fall victim to this trick.
Clay Pebbles
It goes without saying that pebbles should be placed at the bottom of planter pots to make way for drainage. Gardening professionals have claimed that clay betters are better at this job than regular rocks. Thanks to their property to absorb additional water from the pot, clay pebbles make the best air moisturizers. Plus, they understand when the soil is drying out too much and release water to dampen it.

On top of enhancing water retention, clay pebbles assist in aeration, stop root rotting, and prevent excess acidity. Granted, clay pebbles aren’t as readily available as regular rocks, but consider them for better plants.
LED Growing Lights
Growing plants is a difficult task when the living space of a house lacks proper, natural light. Plant lovers are often annoyed at their constricting space, and this has given rise to the LED grow lights wave. These bright artificial lights come in many forms and shapes and can be rather useful when growing plants or seedlings that need intense light or ones that are best kept in the dark corner of the room or near a south-facing window.

Three-headed LED lights work the best for these cases since they will provide the plants and saplings with the sun rays they require to grow.
The Ultimate Care for Your Gardening Tools
Looking for an effortless way to maintain the sharpness and cleanliness of your gardening tools? Here’s a pro tip – after a gentle rub with mineral oil, store your tools in a bucket of sand. This simple sandbox trick aids in sharpening and polishing your tools, ensuring they’re always in top-notch condition.

The secret lies in the sand, slightly moistened with oil but not drenched. After a hard day’s work, just wipe off the chunkier bits of soil and plunge your tool’s head into the sandy sanctuary. Brush off the sand; your tool is clean, sharp, and ready for the next gardening session.
Leggy Plants
“Leggy plants” is a term frequently used to define plants with long, drawn-out stems with a few leaves crowning the top. This generally happens if the plant does not receive enough natural light. It fights for the sun rays it needs to survive by reaching out in arbitrary directions. The solution to this problem is quite simple, actually.

All we have to do is to find a new place to keep the leggy plants – best to find someplace with enough light. Feel free to prune the top of the plant to give it a fuller and bushier appearance.
Light Source
Plants need the correct environment to thrive, much like any living thing. They have to be placed in the right place to support their growth, but this is undoubtedly one of the bigger dilemmas plant owners face. Seedlings tend to branch out in directions of light, a process called phototropism.

However, that does not necessarily entail that one needs to move all their plants by the window to help them get more light. Plants differ based on the amount of light they require to grow, which is termed “light groups.” Do some research to understand what plant goes where in the garden.
Watering Schedule
Ask any plant owner, and they will vouch for the fact that watering plants aren’t something that can be made into a schedule. Watering all the plants in a garden once or twice a week simply will not work because each sapling is unique.

At this point, we can understand that we have to water the plants at the right time, not when we feel the best time. Regularly inspect the soil moisture and only add more water into the equation when the plants have completely absorbed the existing volume. Give the soil time to dry to save the soil from the pain of overwatering.
Epsom Salt Spray
On top of watering plants with a simple Epsom salt solution, it can also be used in a spray form. For that, mix two tablespoons of the useful salt into a gallon of water. Put the mixture into a spray bottle and spray the plants with the solution once a month.

Vegetable plants adore this trick, especially pepper crops, and tomatoes. Start spraying the Epsom salt solution during the first blooms. It helps reduce the chances of plants developing soil inadequacies which can cause yellow leaves as well as slow their ripening process. It is clear that Epsom salt, used correctly, can bear many benefits for plants.
Kitchen Sponges: The Unsung Heroes of Hydration for Your Plants
Keeping the base of your planters hydrated can be a perennial challenge. Try this ingenious hack – repurpose your kitchen sponges! Tucked at the bottom of your planters, they become the perfect moisture magnets for your plant’s root system.

These handy kitchen sponges act as a dual agent – retaining moisture and providing ample air space. They cleverly prevent water from escaping, effectively becoming tiny reservoirs that keep your soil moist for longer periods.
Unmask the PH of Your Soil to Get Valuable Insights
With a simple home experiment, you can decipher the secrets of your garden’s soil. Start by mixing a cup of soil from different parts of your garden. Divide this blend into two separate containers. Add a splash of vinegar to the first container – a fizzing reaction signifies alkaline soil, likely with a pH level of 7-8.

If your soil remains quiet, turn to the second container, mixing in baking soda and distilled water. Fizzing at this stage indicates acidic soil, with a pH level between 5-6. No reaction? Rejoice, for your soil pH is just right! This easy experiment can unlock valuable insights into your garden’s soil, allowing you to optimize plant health and growth.
Air Layering
Pruning the tops of leggy plants and repositioning them isn’t the only thing that can be done to fix these lanky seedlings. Air layering is a popular method appreciated by plant lovers around the world to breathe life back into the greenery of their houses. This propagation technique is generally done with older plants that cannot be saved in any other way.

In simple words, the procedure involves slicing the stems halfway through, adding damp moss or rooting hormone to them, and loosely wrapping them with plastic. The entire idea is here to encourage root formation. Although it may seem complicated, air layering is easier than one might think.
Loosening the Root Ball
At one point, a plant’s life will bring it to a position when it overgrows its old pot and has to be moved to a new one. The work is messy and will get dirty, so most people want to finish it as quickly as possible. However, there is one step no one should skip regardless of how much the ick-factor hits, which is loosening the root ball.

The roots will be tangled up into a small ball when the plant is lifted from its old planter. If the plant owner leaves them like them, they will not grow to their full potential in the new pot. Gently untangle the roots by running your fingers through them.
Moving Plants Outdoors
Warm summer days can get unbearable if we are cooped inside our houses. Many people like to spend it outdoors, and surprise, surprise; so do plants! Most indoor plants love staying outside during the colder seasons, so do consider transferring them outside to improve their appearance and health.

However, before taking this step, understand that it will take a little for any plant to adjust to the warm temperatures and shade. For the first two weeks, make a gradual move. Take them out in the daytime and bring them inside at night. By the end of the week, the plants should be accustomed to the new water.
Pest Check
Plant owners want to make sure their new plants are in mint condition, which means no unwanted damage or nasty pest infection. That is why we must carefully check for unwelcome little invaders when buying new plants. When checking a seedling, carefully observe it for patterns of damage and insects, such as fungus gnats, tiny bugs, and even small cobwebs from small arachnids.

If any of these problems are noticeable with a plant, strike it off the list. Not only will it not grow properly, but it may also pass on the problems to the other plants in the garden.
Choosing Fertilizer
Plants can easily thrive in nature because it is their natural habitat where they are constantly being delivered nourishment from other decaying animal and plant matter. Indoor plants, however, do not have that privilege. They are stuck with the soil designated to their pot as well as the fertilizer that will be finished in a few months after the owner has added it.

Repotting plants and adding fertilizer to the soil is a hard process, and one can avoid having to do it often by taking good care of their plants amidst the growing season. Find a liquid and granular fertilizer that can be sprinkled on top of the ground to help the plants grow fully.
Mastering Drainage: An Exciting Guide to Drilling a Hole in Your Ceramic Flower Pot
This easy step-by-step guide will transform you into a DIY superstar, empowering you to add that crucial drainage hole to your ceramic planter with ease. Step 1: Start by placing your flower pot upside down on a sturdy flat surface, such as a cement floor or a deck. To keep your workspace neat, consider laying down some newspaper or cardboard underneath. Decide where you want your drainage hole, typically positioned in the center of the pot base; Step 2: The type of drill bit you need depends on your flower pot’s material. For metal or plastic, a regular bit will do. Unglazed ceramic pots call for a masonry bit, whereas glazed ceramic pots need a tile and glass bit.

Step 3: Place the drill bit perpendicular to the pot base where you want the hole. You may have heard advice about using masking tape or water during the drilling process, but you’ll find those unnecessary; Now, it’s time for action. Apply firm pressure on the drill, gradually initiating the drilling until the bit begins to penetrate the surface of the pot. Ease up on the pressure, then, but rev up the drill speed to complete your hole. This process might take a few seconds to a few minutes, depending on your pot’s thickness, so patience is key.
Air Drying
Cacti and succulents vary vastly from other plants in multiple sectors, and the variations are most visible when we talk about propagation techniques. If the goal is to reproduce them, the cutting must be allowed to air dry for a few days.

The moist ends of the plants cannot be lodged inside the soil as there is a solid chance of stifling the roots. At one point, they will start to rot. Propagating these plants takes more effort and patience than others. Give them a little time to dry entirely before transferring them to a soil bed.
Ice Cream Stick Markers
When working with a huge variety of plants at the same time, keeping track of all of them can be a difficult task. It gets trickier when they are in their seedling or seed stage. Gardening lovers use plant markers to jot down the plant names and date of sowing on them. Plant markers can be found in almost all garden stories. However, this hack will help save money.

After all, there is no reason to waste money on new markers when one can use ice cream sticks. They are flexible, strong, and biodegradable. Plus, this is a good way to upcycle them.
Using Club Soda
Water isn’t the only thing a plant loves for its growth. By this point, we have established that plant owners can supply water to their gardens with ice cubes and also use the residual water from boiling eggs. Here is one thing no one would have ever imagined in their wildest dreams: club soda. Carbonated beverages like club soda are high in minerals that plants require thrice, including sulfur, phosphorus, and potassium.

Test this technique’s viability by alternating water for club soda to drench the plant’s soil for ten days. We promise they will be stronger and greener.
Multiply Your Snake Plant Collection Using Sand and Leaf Cuttings
With just a few household items and some basic gardening tools, you’ll be on your way to creating an entire fleet of these beautiful, hardy plants. Gather Your Tools: Your beloved Snake plant (the future parent!), A sharp pair of Pruning shears or a knife, A Pot or container to house your new green friends, Sand. The Path to Plant Proliferation: Begin by crafting leaf cuttings from your snake plant, each about 3-5 inches long. Plant these cuttings in your pot or container filled with sand, your chosen growth medium; Seek out a shaded area to place your newly potted cuttings. Avoid the temptation of the sun’s direct rays; they’re a little too harsh for these young ones.

In about a month’s time, you’ll witness the first signs of life as roots start to appear. Continue to nurture them in the shaded area until the leaves start to show themselves and establish firm growth. Finally, after 1-2 months, you’ll see the emergence of snake plant pups, the first sign that your leaf cuttings are ready to stand on their own as full-fledged snake plants. And voila! You have successfully expanded your snake plant collection. Remember, the magic lies not just in the destination but also in the journey of propagation itself.
Rose Propagation Hack with Toilet Paper
We’re sharing a unique trick that promises to revolutionize the way you propagate roses. This innovative method involves an everyday item you would never associate with your floral friends – toilet paper! In this novel approach, we’re wrapping rose cuttings in toilet paper to ensure they receive all the necessary moisture for timely root development. This simple yet effective hack has shown impressive results and is incredibly easy to implement.

The How-To Guide: Begin by preparing your rose cuttings as usual, making sure they are clean and healthy; Grab a roll of toilet paper, unroll a sufficient amount, and dampen it lightly. The toilet paper will act as a moisture-retaining wrap for the cuttings; Wrap the cut end of the rose cutting with damp toilet paper. Make sure it’s snug but not overly tight.; Place your wrapped cuttings in a shaded, cool place while the rooting process takes place; Wait with anticipation as the magic unfolds; The toilet paper maintains the perfect level of moisture around the cut end, encouraging speedy and healthy root development. Before you know it, you’ll be rewarded with robust, flourishing rose plants ready to burst into a riot of colors.
Overwatered Plant? This is How To Fix it
Have you ever drowned your beloved houseplant with over-enthusiastic watering? Don’t worry; we’ve all been there. The Lifesaver Hack: Tampons, designed to absorb moisture, can be an unexpected hero when it comes to saving your overwatered plants. This method is simple, cost-effective, and can potentially save your precious green friends from root rot. Your Step-by-Step Guide to Plant Salvation: Start by identifying the overwatered plant. The telltale signs are usually yellowing leaves, a wilting appearance, or even a strange smell coming from the soil.

Using a clean gardening tool, make a hole in the soil about as deep as your knuckle. This hole will be the entry point for our unexpected garden assistant. Now comes the fun part—head to your local store and purchase a pack of tampons. They are all designed to absorb moisture efficiently. Unwrap a tampon and insert it into the prepared hole in the soil. It’s just like planting a seed, but this time, you’re planting a lifeline for your waterlogged plant. Leave the tampon in the soil to do its work. As it absorbs the excess water, it will expand. Once the tampon is fully saturated, remove it from the soil and discard it. Repeat the process, replacing the tampon as necessary until the soil is back to its ideal moisture level.
Teaching Your Plants to Grow Skyward: A Guide to Vertical Growth
As is the norm, aloe vera plants like to stretch out horizontally, basking in their laid-back nature. But suppose you’re one to challenge norms and envision those beautiful, plump leaves growing perfectly straight, saluting the sky. In that case, we’ve got a thrilling gardening adventure for you! Begin your expedition with a young plant, for they are the most malleable. Acquire a thin, plastic-coated training wire, a gardener’s secret weapon, readily available at your local garden centers.
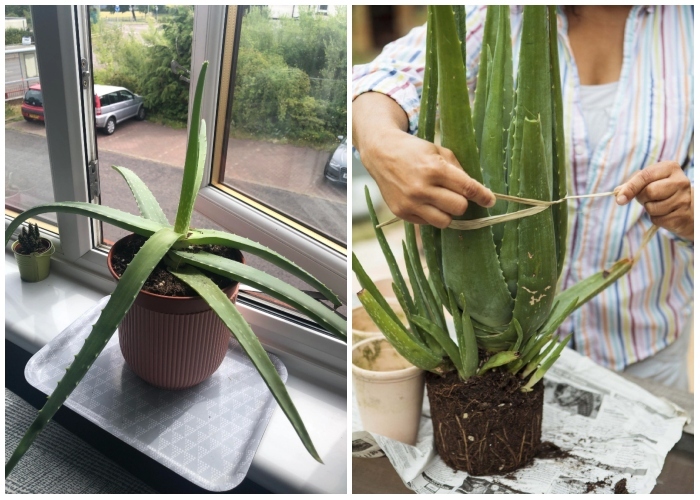
Now, gently encase the outer layer of leaves with this wire, much like a snug belt on a waist. Pull together the ends of the wire, gathering the leaves so they stand compact and erect. It’s all about supporting the plant to reach its vertical potential! Once set, allow the wire to stay put, effectively acting as a mentor for the plant, teaching it the upward growth route. Let it hold the aloe for a few days, at least. Remember, you are not just directing the growth; you’re training your aloe vera plant to strive for vertical heights. If the wire is removed too early, your aloe, with its inherent horizontal tendencies, may just sprawl out to the sides.
Fuller Pothos
Looking for a way to make your Pothos plant appear more lush and full? Here’s a nifty trick that only requires a pack of bobby pins and a little bit of patience. Start by widening an open bobby pin so it forms a V-shape. Next, gently lift one of the Pothos’ trailing stems and position it along the surface of the soil in the pot.

Now, here’s where the bobby pins come into play. Use them to pin down each joint on the stem, anchoring them firmly into the soil. The idea is to create multiple contact points between the stem and the soil, which will encourage new root growth at each pinned joint. Make sure the bobby pins are inserted securely, but take care not to damage the stem or roots in the process. Within a few weeks, you’ll start to notice new growth emerging from these contact points. As the roots establish themselves, your Pothos plant will take on a fuller, more vibrant look. This simple yet effective technique maximizes the plant’s natural ability to propagate, giving you a denser, more luxuriant Pothos with minimal effort.
Fix Root Rot In A Fiddle Leaf Fig
Fiddle leaf figs are adored for their lush, vibrant leaves, but they can suffer from root rot due to overwatering. To revive a struggling plant, first remove it from the pot and examine its roots. If they’re brown and mushy, you’ve got root rot. Repot in a slightly larger container, adding a layer of gravel for better drainage. Trim away rotten roots and plant in fresh, well-draining soil.

After repotting, water the plant thoroughly and place it in indirect sunlight. Be cautious with watering; allow the topsoil to dry before the next watering session. Maintaining a moderate room temperature and avoiding drafts will also help. For pest control, consider homemade traps or neem oil sprays. Monthly fertilization, except in winter, will keep your fiddle leaf fig thriving. Follow these simplified steps, and your fiddle leaf fig should recover nicely.
Kitty Litter
Some plant variants despise wet and humid conditions. Naturally, they do not grow well in them. Thus, different methods have to be used to care for them the proper way. Succulents and cacti are the best examples – they like soil that is well-drained and will wilt quickly if their soil remains wet for extended periods. To prevent this problem, mix the soil of such plants with clay-based cat litter. Remember to use unscented litter for the job.
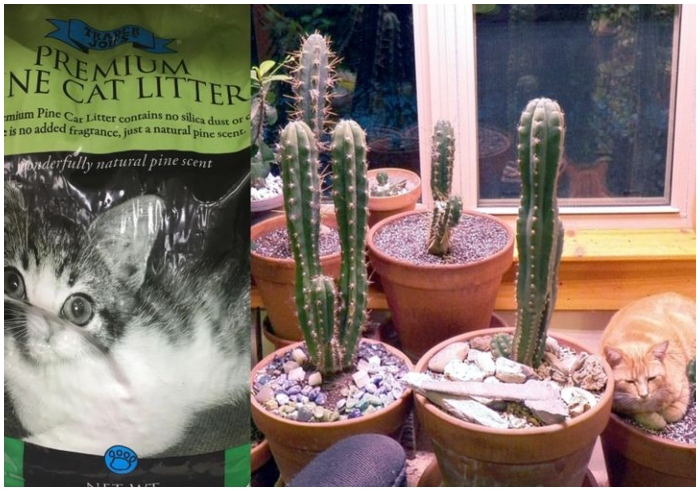
Kitty litter helps with the process of drainage and makes plants healthier by building root strength. The result? Stronger, more lively plants in the garden.
Honey Solution
Plant propagation through the cutting method has received popularity in recent times. But this process also calls for taking proper care of plants’ roots to prevent the growth and development of germs – mainly bacteria and fungi. Honey is famous for its antifungal benefits, making it one of the best household items to keep plants healthy on a budget.

After the plants are cut, applying honey to them provides them with a much-needed dost. Moreover, honey is helpful in growing roots. Make it a practice to dip the seedlings’ stems in honey prior to planting them. Who knew something that makes our dishes sweeter could be so good on plants too?
Toilet Paper Roll Planters
Apart from using old egg cartons and eggshells to grow seedlings, try out leftover toilet paper rolls. This hack went viral recently, where people could be seen growing mushrooms and similar vegetation using tissue paper rolls. Similar to egg cartons, toilet paper rolls are made of cardboard, making it super easy to grow plants inside them.

Fill potting soil in the toilet paper rolls before putting the seeds inside. Allow the seedling to grow some inches before transferring them to the garden. There is no need to remove the cardboard as it will disintegrate within the soil (it is biodegradable).
Disposable Plastic Forks
Anything plastic is quite wasteful, but perhaps nothing is worse for the environment than single-use plastic bags and small plastic utensils. This is why people today are more concerned than ever about finding secondary uses for these items; on days when the plastic forks sitting on the counter start feeling useless, stick them into the soil to protect the plants from animals. Alternatively, it can shield the seedlings from plants that may intrude with growth.

Plants are the most vulnerable when they are in their seedling stage so it is crucial to protect them. Looking for an eco-friendly substitute? Disposable wooden forks work too.
Cooking Water
Egg water is certainly an efficient and effective way to nourish plants without any extra costs. However, this is not the only trick that concerns boiled water. Cooking water from pasta and veggies can be good for plants, too, given one understands how much to use and when. Boiled water like this contains heaps of micronutrients such as calcium, nitrogen, and phosphorus.

All these elements have already been mentioned for their benefits to plants. Allow the water to cool down and use it on the plants accordingly. The plants will grow and flourish significantly faster than how they would if tap water were used.
Oxygenate Plants With Chopsticks
We already mentioned how to plant lovers could utilize chopsticks to stabilize their climbing pants, but there is another way in which these nifty utensils can come in handy. Chopsticks may be used to oxygenate the soil of houseplants, which cannot be done as easily indoors since there are no earthworms to do the job.

Use chopsticks or a pencil to make some holes in the plant’s soil, letting oxygen and water pass through it freely. Be gentle with this, but don’t worry too much about breaking the plant’s roots since they are not that weak. Plus, they will grow back in case they snap.
Crushed Soda Cans
A lot of soil is needed to fill big planters, but smart plant lovers save a ton of money by switching a little soil with vacant soda cans. Before trying this trick, ensure the soda cans are clean so they can be crushed. Place them at the base of the pot and pour the soil in.

Not only is this a feasible way to upcycle unused and empty soda cans, but this hack is also beneficial to plants. Cans can improve air circulation and assist in draining, which is particularly useful for those who have a bad tendency to overwater their plants.
Coffee Filters
Coffee filters are a true lifesaver when it comes to planting maintenance. They make the muddy process simpler by allowing water to drain without getting dirt everywhere. Sandwich one between the drainage hole and the hole to prevent the dirt from splashing everywhere whenever the plants need watering.

Coffee filters can stop dirt from lodging in the drainage hole. This problem can cause root rotting and restricted water flow. While new coffee filters are good for the job, used ones can be upcycled, too, since coffee grounds are considered a solid fertilizer. Coffee holds many nutritional benefits for plants.
Power Up Your Plants with Rice Water
Unleash the hidden potential of rice water, a nutrient-rich elixir for your plants, backed by research from Hasanuddin University, Indonesia! This amazing concoction contains nitrogen, phosphorous, potassium (NPK), Vitamin B1, iron, manganese, and other vital plant elements. Combined with coconut water, it stimulates seed growth and overall plant development and increases foliage! Simply add rice water to a clean spray bottle and mist your plants’ leaves on top and underneath.

Carry out this process in the morning or evening for optimal nutrient absorption and moisture retention. Studies by GreenPrints, the institutional repository of De La Salle Medical and Health Sciences Institute, confirm that rice water enhances plant height and leaf growth, making it an incredible organic fertilizer. To fully immerse your plants in rice water nutrients, place their containers in a bowl or tray filled with rice water for 15-20 minutes, allowing the soil to absorb the goodness. Rice water can be obtained by washing rice grains, boiling and straining the remaining water, or fermentation.
Making Drainage Holes
Drainage is one of the key elements for plant survival. Regardless of how nice a planter seems, they serve no value to plants if there is no drainage hole. In case there is none, it is advised that the plant owner make one themselves.

One can make drainage holes with a drill. Start the process slow and steady with the correct bit since the last thing one would want is to snap the pot in half. A standard drill bit works best for plastic pots, whereas a masonry drill bit fits terracotta or stone pots more. Diamond-tipped bits can only be used on glazed ceramic pots.
Mayo Clean Up
While good fertilizers are a guaranteed way to ensure better plant health and growth, there are numerous household products around us that can help plants bloom. Crazily enough, mayonnaise falls under this list. No point grimacing like that! This tasty condiment offers a genius hack to get plants to shine like never before.

Dab a bit of mayo on an old rag and gently wipe away the dust and dirt from the plant’s leaves with it. Dusty plants lose their original shine, and only using water to clean them will not do the job. We recommend using this mayo hack one time a month.
Aquarium Water
Perhaps the one thing discouraging people from getting an aquarium is the cleaning requirements. While the beauty of beautiful fishes swimming in the clean water in front of our eyes is a promising sight, cleaning an aquarium is no child’s day. But what if all that old water does not have to be thrown away? Effectively kill two birds with one stone by applying aquarium water to nurture any plant because it is a good fertilizer.

Aquarium water assists in plant growth because it contains many good minerals needed for seedling development, like nitrogen, phosphorus, potassium, and ammonia. Avoid water from saltwater tanks, though, because it has too much salt in it, which can damage plants.
Kitchen Scraps
From coffee grounds and eggshells to banana peels and citrus fruits, the possibilities for using kitchen items around the garden are endless. Numerous kitchen items that usually end up in the trash once we are done using them the instructed way can promote healthy growth in plants. This applies more to vegetables and fruits.

There is always the option of putting them in a compost bin. Some of them, like tomatoes and peppers, can be blended with water and applied to the soil to enrich it. Vegetables and fruit scraps act as natural fertilizers devoid of any harmful chemicals while reducing overall waste.
Soda Bottle Mini Garden
Soda bottles are quite versatile. Nifty crafters have come up with unique ideas to upcycle them, and one of them is making a mini garden for plants. A soda bottle can easily be transformed into a planter or terrarium. Plus, even a newbie can do this project without breaking a sweat. When cutting soda bottles, ensure they are big enough to accommodate the plants and soil within. Poke some holes in the bottom to facilitate drainage and add some pebbles.

Keep in mind that this trick does not have a 100% success rate, but it works perfectly for smaller plants and seeds.
Noticing Red Flags
Figuring out how each of the plants in a garden works is too time-consuming but a necessary evil. While it might not always be feasible to invest that much time and energy into individual plant species, it is important to look out for the red flags and take necessary action when needed.

A few symptoms to keep an eye out for include falling, red, or darkening leaves, especially dark patches on the edges. Chances are, the plants need more fertilizer or water or simply need to be moved or replanted. No need to discard the plant, suspecting it is sickly without considering other options first.
Diapers for Moisture Maintenance
Cheap disposable diapers may look like the last thing one would want for their plants, but as it turns out, they can do wonders for our seedlings. In warm summer months, diapers can prevent potting soil from premature drying since they contain hydrogel, an element that makes them super absorbent and allows them to retain high volumes of liquid.

Prior to potting the plants, spritz water onto a diaper and let it soak into the fabric. This will activate the gel-like substance within. Then, combine the gel with the potting soil, and the result will be fluffy, absorbent soil capable of holding moisture for extended periods.
Banana Peels
A banana peel seems useless enough to throw away on a regular day. But today, we are considering an alternative to help get rid of the dust on plants. However, we have to be careful because we don’t want to leave any banana grease behind. Moreover, the aphids cannot stand the smell of bananas, so they will leave our beautiful plants alone.

Simply shred the banana peels into small pieces and wrap them around the plants to chase the pesky insects away. To remove dust from the plants, rub the peel on the leaves, and it should give a glossy appearance to the greens.
Turkey Baster
No need to panic if the plants have been overwatered. A bit of excess water will seep out into the saucer under the planter. However, it is not a good idea to let the plant sit in the water as this promotes root rotting.

One can always pick up their plant and throw the water sitting in the saucer down the drain, but this process is quite difficult and can be messy, especially when working with big plants. A turkey baster isn’t good only for the Thanksgiving feast. Use the old turkey baster sitting at home to remove any additional water from the saucer.
Overnight Drinking Water
Most people water their plants with regular tap water. Experts and plant enthusiasts claim this is not the best method. A better option would be using overnight drinking water, as tap water contains chlorine. If using overnight drinking water, there is enough time for the harmful chlorine to evaporate. Plants are like us; they could use better water for better growth.

It is highly recommended to allow the tap water to rest for a minimum of 24 hours before using it on plants. We understand that this may seem like too much work, so a good alternative is using cold, pre-boiled water.
Epsom Salt Solution
On the note of Epsom salts, a bathwater shower isn’t the sole option to get some healthy salts to plants. An easy and simple Epsom salt solution can be made by adding two tablespoons of it to a gallon of water.

The benefits of Epsom salt are many and far-reaching for plants. As it contains high levels of sulfur and magnesium, it provides life to plants. That being said, it should be used in moderation, much like any nutrients for plants. Excessive magnesium sulfate can harm plants by causing salt injury. So, it is important to not overdo this salty mixture or there will be more harm done than good.
Hard-Boiled Eggs
Eggs are a breakfast staple. Whether in the form of hard-boiled or sunny side up, eggs can be found being cooked in every other household at least once a day. Don’t discard the water after boiling the eggs. Eggshells are high in calcium, and a small amount is released into the boiling water when the eggs are cooked. Therefore, water becomes a superfood for plants.

Calcium is great for raising the pH of the soil, and that is significantly beneficial for all sorts of plants. Keep in mind that the water has to be cooled a little after the process. Don’t pour steeping hot water into the plants and allow it to reach room temperature first.
Using Bathwater
Nothing can compare to the feeling of taking a nice, relaxing bath to release stress after a long day. Interesting fact: bathwater has benefits to offer to plants, particularly if it has been laced with Epsom salt. Epsom salt is found in bath salts. However, there are a few factors to consider before this move.

Using soapy bathwater on plants can help keep away insects, but one must make sure that the products being mixed into the water do not contain any additives that could be harmful to plants. In addition, do not use bathwater on plants if they are edible or if there are pets around the house with a habit of chewing on them.
Chopsticks for Support
Plants that receive the right care in the form of food, sunlight, water, and soil nutrients will grow rapidly. Soon, plant owners have to find a way to stabilize their growth to keep them from breaking. Chopsticks are a good way to support plants once they start displaying a growth spurt. Chopsticks are also readily available and cheap, so this is a great choice for low-maintenance, budget-friendly hack enthusiasts.

Rattan, wood, and bamboo can be used to switch out chopsticks too. For the creative geniuses, try transforming them into a small arch, trellis, or frame.
Ikea Bag Holder Planter
It is safe to assume that almost everyone owns an Ikea bag holder. Chances are, however, that it is not being put to use regularly. Instead of keeping it idle and letting it rot away, best to put it to some use. Transform an old Ikea bag holder into a functional vertical garden to hold plants.

Hacks like this are especially helpful if one’s residential space is constricting and does not allow free gardening much. A vertical garden does not take up much space at all and is a smart way to utilize old bag holders. Make them into a planter by reducing waste and properly using space around the house.
Eggshells for Seedlings
There is something incredibly endearing about tiny pots that many newbie planters end up buying before purchasing an actual seedling. But this is actually a big waste of money. Halved eggshells work the same as tiny pots for seedlings. In fact, they are better than plastic or clay planters since eggshells contain traces of calcium carbonate.

Start collecting eggshells before the seedlings start growing and fill dirt into them. They will effectively nourish the soil with nitrogen and calcium, giving plants the boost they need to bloom and grow much faster. Plus, waste is decreased this way.
Egg Carton for Seedlings
Turns out, the eggshell isn’t the only part of an egg that can be used to help grow plants. Egg cartons can substitute small plant pots when trying to grow saplings. In general, cardboard boxes are easy to upcycle. Therefore, do not throw away the empty cardboard egg carton once all the eggs have been placed in the fridge because we have something for it.

After the seedlings have grown inside the egg cartons, they can be directly planted in the garden since this kind of packaging is biodegradable and disintegrates quickly. We recommend cutting small slits into the base of the cardboard cups to allow more room for the plants to stretch their roots.
Citrus Halves for Seedlings
Fortunately, the list of unique ways to grow seedlings is, quite frankly, endless, and another great technique to know is using citrus fruits. When peeling lemons, oranges, and grapefruits, cut the fruits in half since this is the optimum shape for seedling growth.

We already know how effective the rinds of different fruits and vegetables are for seedling growth if used as fertilizer. The rind of a citrus fruit presents a natural surrounding for the seedling that can promote plant growth. Fill potting soil into the rind before adding the seeds, and ensure they are watered on a daily basis to see noticeable results.
Cinnamon to the Rescue
Not every seedling in the batch will survive, regardless of how good care is being taken of them. Some of them might be lost to fungal infection, and that’s okay. Luckily, there are a few ways we can handle that issue, and cinnamon has been shown to be extremely effective in treating and reducing fungal infections.

This earthy spice has anti-germ properties to fight off mites, fungi, and whiteflies. Sprinkle a bit of cinnamon powder onto plant soil to stop it from damping off. This will fertilize the seedlings too. Be careful about the amount being used because too much of anything can negatively impact plants.
Sprinkling Soil With Eggshells
On top of using eggshells as a medium for growing seedlings, they can be used as a nutritious source for plants that help them thrive when they are peacefully growing in gardens. Sprinkling crushed-up eggshells onto plant soil enriches the soil with an element needed for strong plants: calcium.

Calcium from eggshells helps balance acidity within the soil. There is another method of putting eggshells to use to help plants. They can be turned into fine powder by crushing and grinding them up and mixing them with other organic elements filled with nourishing qualities. This is a sign to never discard eggshells.
Baby Plants as Gifts
Gift-giving is one of the love languages, and to many, this holds special significance. Plants are an adorable gift, especially baby plants. For ages, plants have served as the perfect housewarming gift. Rest assured, plants will bring joy to any friend or family member who receives one. It fills the house with good energy and a burst of fresh air every now and then.

Instead of purchasing new plants, conduct a little research and find out how the plants already available can be reproduced. There are multiple propagation methods that can be used with a wide variety of plants, so try to put a little effort into the process, and it should come out beautiful.
Upside-Down Water Bottle
Taking care of plants the right way is hard as is, but then we have to consider what happens to our favorite seedlings when we are away on vacation. Imagine this: going away for a week or two without having anyone to look after the plants. If the plant owner can manage someone to come and water their plants while they are gone, that’s great. However, if that is not feasible, an upside-down bottle can substitute.

Fill a water bottle halfway with water and then push it a few inches into the soil. The soil will absorb this water slowly and stay damp till the owner reaches home.
Water-Wicking
An upside-down water bottle is among the many hacks out there to keep plants well-watered when the owner is not home for a few days. This technique was introduced to the world by the cooking legend herself, Matha Stewart. A water-wicking method like this one is quite effective.

Trim a piece of cloth; make sure it is long enough to join the plant to the water. The rest of the work will be done by gravity – the cloth will wick the water slowly into the point from the container, maintaining the needed wetness in the soil. In case the pots are on the bigger side, multiple “wicks” can finish the job.
Ice Cube Watering
Having trouble watering the hanging plants? No worries; ice cubes are to the rescue! Simply place some ice cubes atop the plants and allow them to melt naturally. They will water the plants without causing much stress to the owner. This system can also prevent overwatering in addition to preventing breakage in fragile plants.

We find this to be the most effective with orchids. However, steer clear of ice cube watering if tending to tropical plants since cold water could potentially shock their roots. Keep the ice cubes to a minimal size to avoid negatively impacting the plants with too cold water.
Used Coffee Grounds
Many household items we discard after we finish using them the conventional way, unaware that they can help plants grow. Used coffee grounds are one such compound that plants love. Rather than throwing them away once they have made a nice cup of coffee, rinse them with water and use them as fertilizer for soil by sprinkling them over the plants. It is also possible to use them without rinsing, but this will give the soil an acidic kick, so keep that in mind for plants that aren’t fans of acidic soil.

Coffee grounds fight all kinds of insects while attracting earthworms. Don’t worry; earthworms do not harm plants in any way. Instead, they help with fertilization by eating the degrading plant bits.
Group Plants
An interesting fact about plants do not only do they breathe like living creatures, but they also thrive in the company, just like us. This is particularly true when humidity-loving vegetation is concerned, as they can take advantage of the moisture produced by nearby plants. Without going into many details, this process is called transpiration. Transpiration happens when plants consume liquid water from the soil and give out water vapor into the environment.

The humidity of a certain area will increase with the number of plants that are paired together. This technique is super fruitful during warmer months when the air is drier and hotter, and plants need more humidity.