This article was originally published on worldtravelling.com and has been republished here with permission.
Facing an endless list of home repairs can often feel overwhelming and strain your budget. But what if you could tackle many of these issues quickly, easily, and with items you already have at home? That’s exactly what we’re here to show you. Here, we unveil various ingenious yet straightforward tricks that will transform how you handle home maintenance. From silencing a squeaky floorboard to clearing a clogged drain, these hacks don’t just simplify your life; they also add a touch of creative satisfaction to your DIY endeavors.
We delve into everyday problems, offering solutions that are not only effective but also surprisingly simple. You’ll be amazed at how everyday objects and a bit of ingenuity can solve those pesky household annoyances. Whether you’re dealing with minor nuisances like a sticky door or more significant challenges like unsightly wall stains, our guide has got you covered. These hacks are designed to save you time, money, and unnecessary stress.

Clean Your Bathtub With Dish Soap And A Broom
Save yourself the back pain that comes when you bend to scrape and clean the bathtub. Use a broom specifically for this task and the same soap you use to do the dishes.

The detergent will dissolve the soap scum and mildew in the bathtub. You can brush and scrape it off with the broom while standing up. No more back pain! Getting rid of soap scum from your tub will keep your grout and glass fresh for longer. Combine a half gallon of boiling water and two tablespoons of dish soap in a bucket. Scrub all bathtub surfaces with a scrub sponge or dipped in the bucket. Transfer soapy water into the tub on a regular basis. After immersing your sponge or brush in your bucket solution, sprinkle baking soda straight onto the sponge or brush and scrub vigorously. Rinse the tub after it’s clean. Finish by using a clean, dry cloth to polish the tub faucet, drain, and handles.
Use Common Household Ingredients To Unclog A Drain
Here we have an easy recipe to unclog a slow-draining sink, bathtub, or shower. These are not abrasive chemicals that could damage the piping. Firstly, boil some water and pour it down the drain.

Second, pour ½ cup of baking soda down the drain (some people mix in a ¼ cup of salt) followed by ½ cup of plain white vinegar. Let it sit for 10 minutes and flush again with hot water. Using a wire hanger from your closet to unclog a drain is another simple but effective method. Curl one end into a little hook after straightening it out as much as possible. The hook should trap around the hair and another crud that has built up inside the drain. Remove the hangar, clean the hook, and snake it down the drain until it no longer pulls anything up. When you’re finished, flush the drain with hot water to remove any residual debris.
Removing Water Stains
To remove those unpleasant water stains on the ceiling, this solution acts as a cleaner before you paint over it. Mix one cup of bleach and three cups of warm water in a bowl and gently apply on the stain.

This mild homemade solvent will remove mildew, grease, and dirt, preventing the paint from sticking properly. To keep your walls clean, we recommend the following additional tips: Dust your walls on a regular basis to avoid grime accumulation. As soon as you see a stain, clean it. With a damp sponge, fresh stains can be removed fast and completely. When cleaning painted walls, start with tiny sections and work your way up. Take breaks after finishing a wall to avoid “wash marks.” Cleaning your walls with abrasive cleansers or bristle brushes might scratch the surface. For future painting work, consider semi-gloss or gloss paints, which are simpler to clean than flat finishes.
Wash Towels with Vinegar and Baking Soda
If you have a top-loading washing machine, you can do a load of laundry just like you normally would. You’ll simply swap out the stuff you’re now using. Baking soda will be used in place of laundry detergent in the washing machine. To substitute your detergent, half a cup of baking soda should suffice.

Those who still wish to add detergent to the wash can do so. Simply combine a small bit of baking soda and powder detergent with a small amount of water. Before commencing the wash, you can add both of them at the same time. This is one of the most effective ways to keep towels smooth and fluffy. When washing towels with vinegar, think of the vinegar as a fabric softener. Because you don’t want the baking soda and vinegar to combine at any point, it’s better to add the vinegar to the wash manually.
Remove Rust From Chrome With Foil
Aluminum foil has more domestic uses than we were initially aware of. One of them is that it easily clears rust from any chrome surface. It is recommended that you first clean such a surface with a microfiber towel and soapy water.
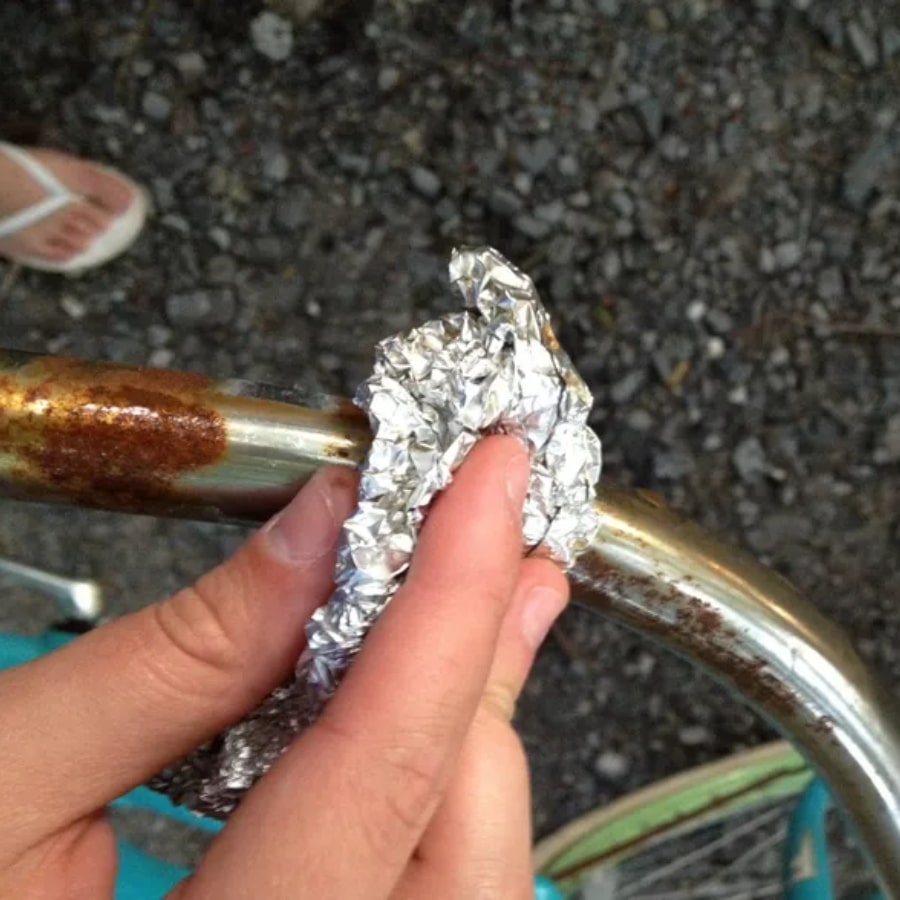
Then dip your aluminum foil ball in clean water and gently rub it on the rusty bits. You will be able to recover any chrome surfaces, such as work tools, a bicycle, or a car. Make a loose ball of aluminum foil, immerse it in a little water, and gently massage any rusted places with it. If the rust is exceptionally persistent, instead of water, try immersing the foil in some cola soft drink. Carbonic acid in cola drinks causes a chemical reaction with the iron oxide in rust, separating it from the chrome. Polish with a dry towel to finish. The best aspect about using aluminum foil is that it helps to seal the chrome as you clean it, preventing future rust issues.
Felt Stickers on Furniture
There is a simple and cheap solution to prevent scratch marks caused by the pulling in and out of the chairs. Get some from the hardware store some felt stickers and place them at the bottom of the chair legs.
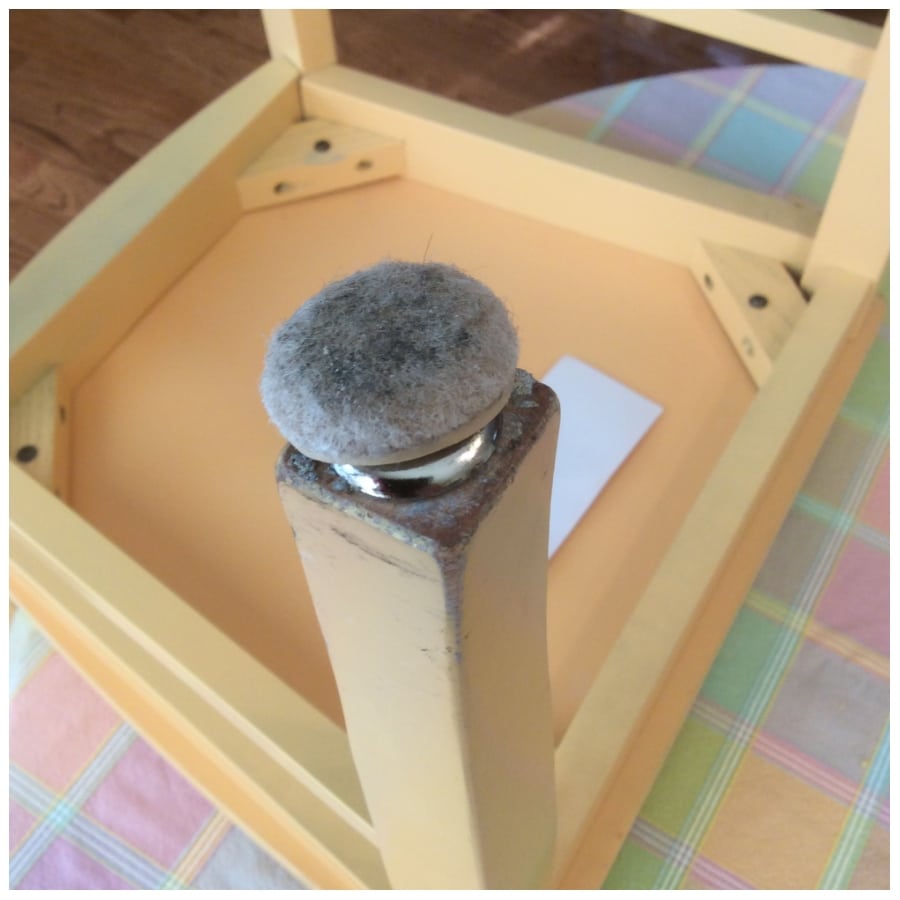
It will considerably reduce the sound of the dragging of the chairs. Change them every couple of months for the best results. Felt pads help eliminate noise as well, such as the scraping of a chair sliding in and out. They also allow you to move and slide heavy furniture and other objects with ease. Though this can be a nice feature, any sand or grit beneath the pad, or captured during the move, may scratch your flooring. A disadvantage of felt pads is that they collect pet hair and dust. In addition, the adhesive will eventually wear out and could partially detach or fall off, exposing your floor to damage. You may need to replace them every 4 to 6 months.
Clean the Garbage Disposal Using Ice Cubes
There’s a trick to efficiently clean your garbage disposal. Simply shove as many ice cubes as you can fit in the garbage disposal and then allow it to run for a bit.
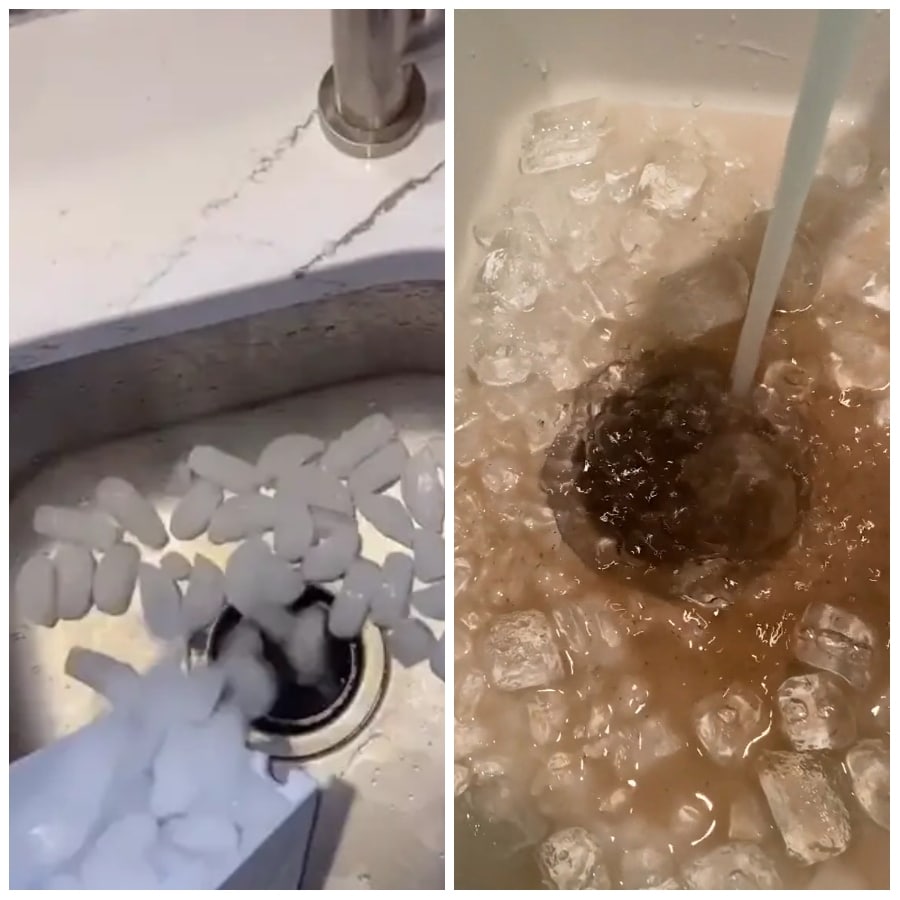
Let the broken-down ice wipe away the excess food and waste. Then, pour some hot water and lemon over the top when you’re done for that extra freshness! Do not feed your garbage disposal anything stringy. Avoid putting large amounts of particularly fibrous foods down your garbage disposal such as long celery stalks. The stringiness of the material can cause it to tangle in the appliance’s components and cause a jam. Do not feed your garbage disposal anything ultra-starchy, either. Foods like potatoes may seem harmless enough, but when put through a garbage disposal, they form a paste. This paste can make the appliance’s components jam or cause a clog in the drain line.
Rotate Your Ceiling Fans Correctly
Did you know that changing the rotation of your ceiling fan can save you heating and cooling costs? In winter, fans should turn clockwise, at a low speed, to pull the warm air up and spread it across the room.
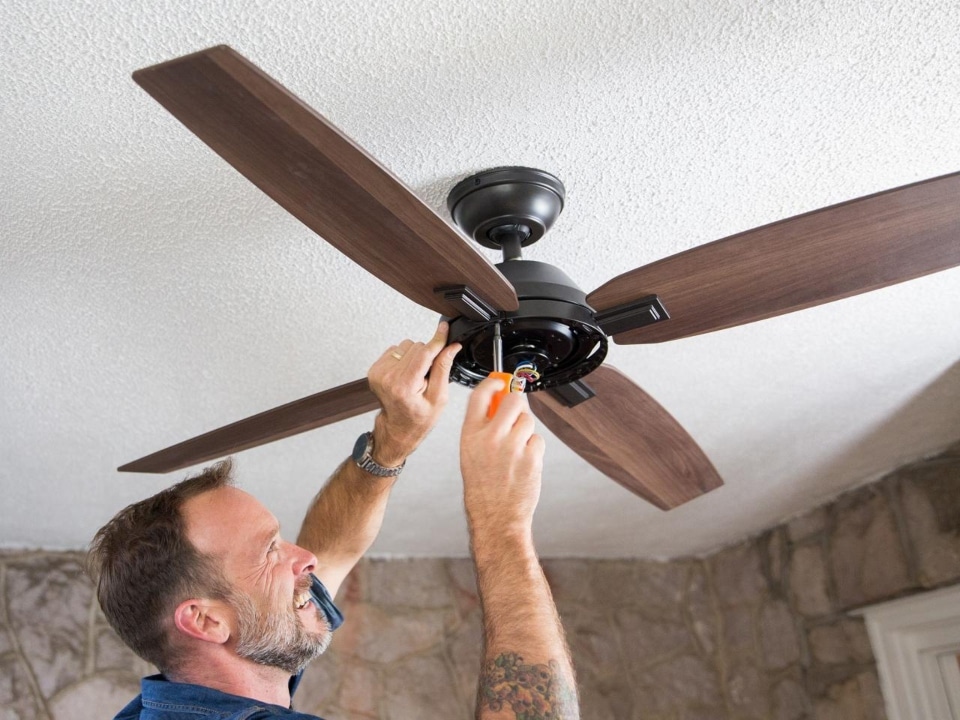
During the summer, set it to turn counterclockwise to push the cold air down. While a fan won’t change the temperature of the room, it can distribute cold and warm air to your advantage. Ceiling fans should rotate clockwise at a low speed in the winter. An updraft is created, which helps move heated air trapped near the roof out and around the space. This is particularly useful in spaces with high ceilings. Recirculating the warm air will allow your heating system to run less frequently, perhaps saving you 15% on your heating expenditures. There are a few options for changing the direction of your ceiling fan, depending on its type.
Use Cooking Spray To Fix A Squeaky Door Or Cabinet
Do you have a squeaky door? Maybe rusty hinges on a cabinet? Is it getting on your nerves, and you don’t happen to have the ever-so-handy WD-40 around?
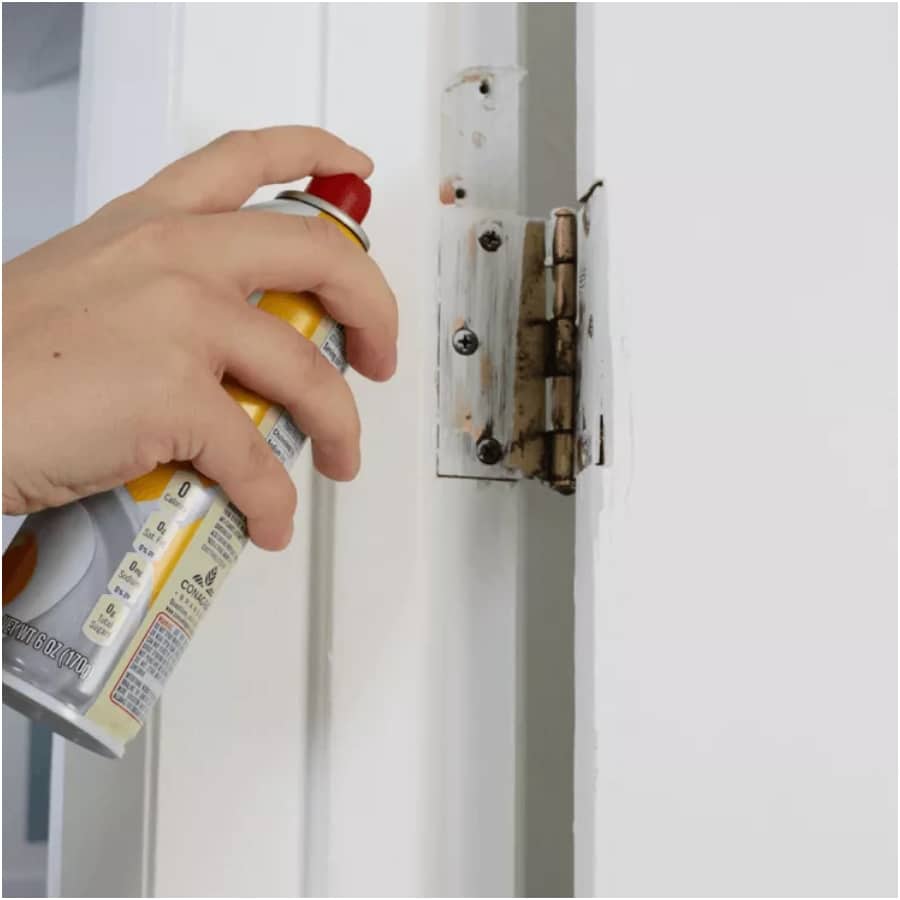
Don’t fret, we got a quick hack for you to get out of this pickle! Spray a little cooking on the hinges, and voilá, no more squeaky doors! After spraying oil on the hinges, swing the door back and forth several times until the squeaking is gone. Use a tissue to wipe the hinges and all other areas where the oil splattered. If you skip this part, over time, dust will accumulate on the oily surfaces and become grime. It also works for window hinges since it is the same mechanism. The following products also work as well as cooking oil spray: Olive oil, butter, soap, paraffin candle wax, and petroleum jelly.
Use Crayons To Fill In Nail Holes
If you have a surface with nail holes you wish to smooth and fix up, try this easy trick. Choose a crayon that closely matches the color of the wall you’re trying to repair.
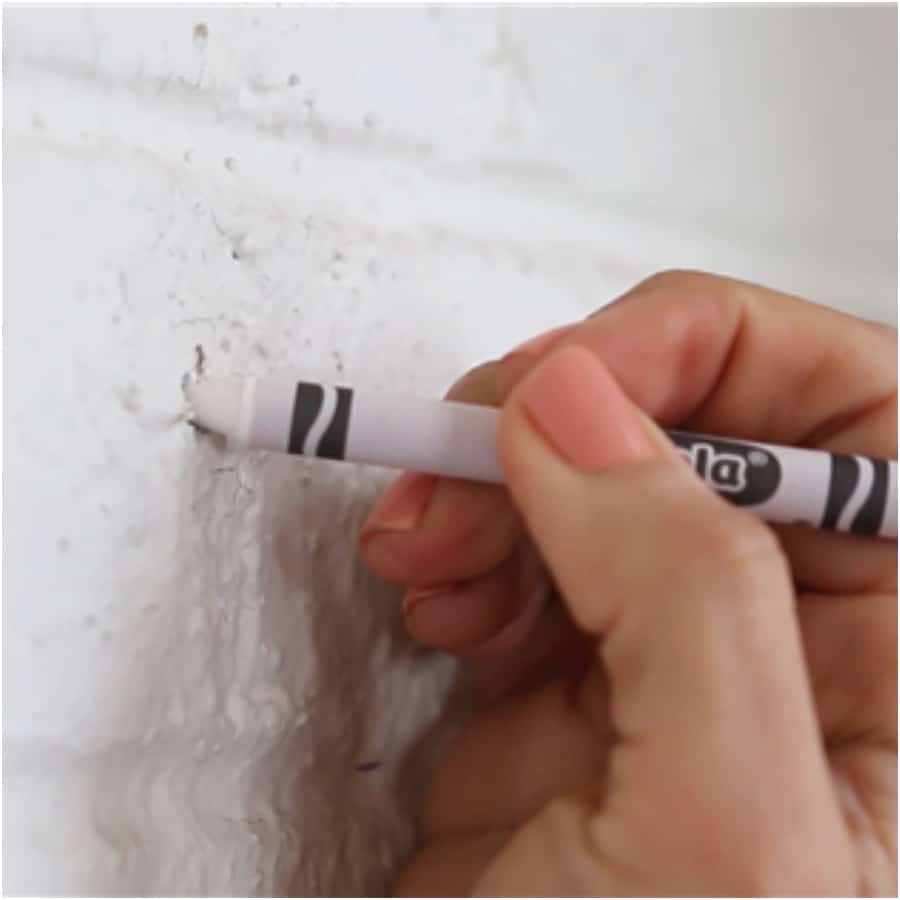
With firm pressure, rub the crayon over the nail hole. Its waxy consistency makes it malleable, and it will stuff the opening in a jiffy. While caulking is excellent for filling gaps and cracks in outside surfaces, it is rarely suggested for sealing nail holes in drywall or wood interior surfaces. Because the product is flexible, it will shrink with time, leaving a crater in the wall. The only area where caulk should be used instead of spackle to cover nail holes in drywall is where the ceiling meets the wall. Because the wall in that location is already indented, you will not notice any divots. Furthermore, because caulking is white, it will blend in nicely with white ceilings.
Remove Pet Hair From Carpet With A Squeegee
Pay attention to this tip if you have carpet and pets around the house. Removing dog or cat hair from the carpet is something we need to do more often than we would want.
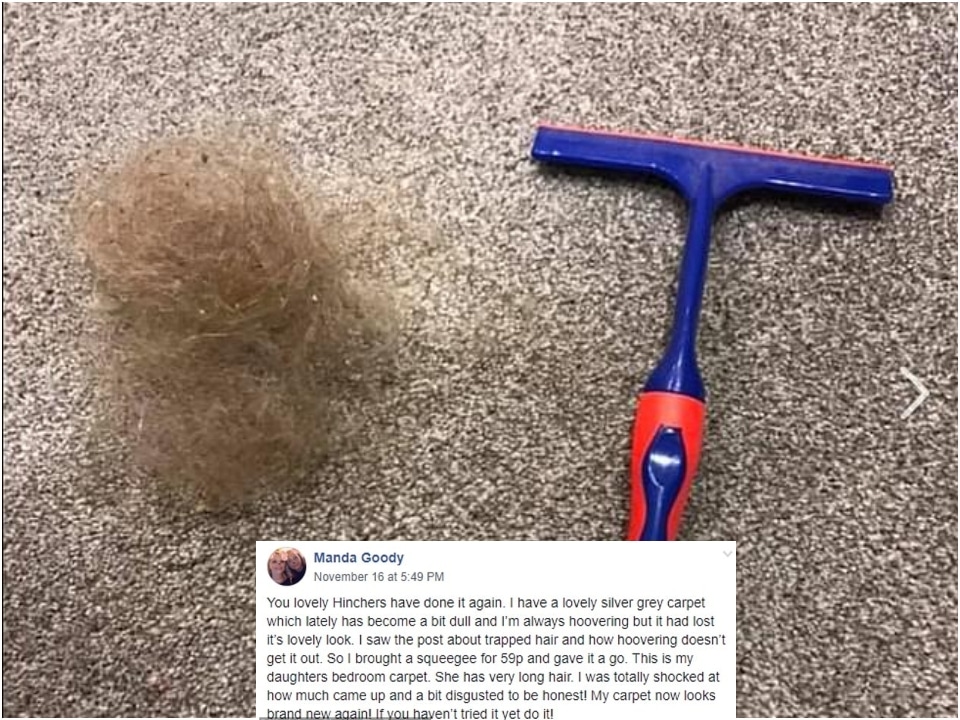
But you would be immensely surprised and also thankful for how well a regular squeegee can remove pet hair from the carpet. Give it a go! You can also remove hair with the fabric softener technique. First off, create a solution of 1 part fabric softener to 3 parts water in a spray bottle. Follow up by spraying your rug lightly with the mixture. Be careful not to apply too much; you only need to spray a light mist over your carpet and leave it to dry. Use a vacuum cleaner to suck up all the fur. The fabric softener loosens up the pet hair, allowing the hoover to remove it easily.
How to Resurface Worn Concrete
Breathe new life into your dated, damaged walkway with these simple resurfacing steps. Step 1: Prep and Clean – Safety gear on! Use a gas-powered pressure washer with at least 3,500 psi to remove dirt and grime. A 25-degree fan tip is ideal, and keep it 6-8 inches from the surface for best results. Step 2: Patch Up – While the concrete is still damp, mix 1 part water to 7 parts resurfacer. Use a paddle mixer for an even blend. Fill any divots with the mixture and level it with a finishing trowel. Wait 2-5 hours for it to set.
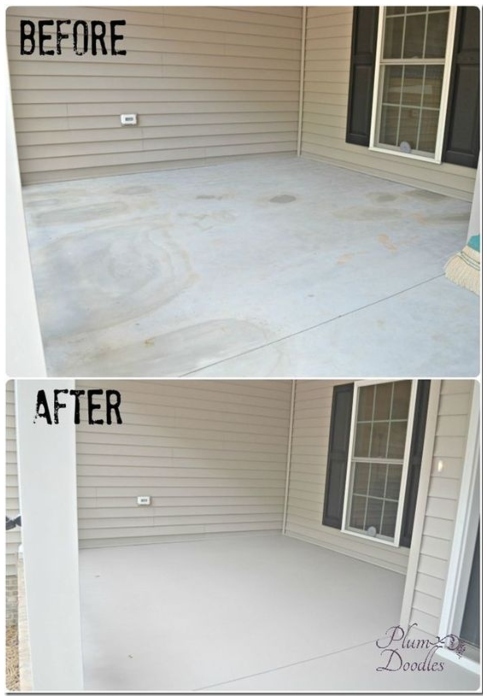
Step 3: Resurfacer On – Line walkway joints with peel-and-stick foam weatherstripping. Dampen the concrete if needed. Mix half a bag of resurfacer with 5½ cups of water. You’ve got about 20 minutes to work with it, so move fast. Step 4: Finish Up – Spread the resurfacer until it’s 1/8 to 1/4 inch thick. After waiting 5 minutes, sweep a nylon bristle broom across for a slip-resistant finish. Remove weatherstripping after 20 minutes and wait 6 hours before walking on your new surface.
Effective Steps for Sealing Concrete Slab Gaps
Sealing gaps between a concrete slab and a house is crucial to prevent water damage and pest infestation. Step 1: Clean the Gap – Start by removing debris from the gap for a clean surface. Step 2: Insert Foam Backer Rod – For wider gaps, place a foam backer rod to support the caulk, ensuring a snug fit.

Step 3: Apply Caulk – Use a durable urethane or polyurethane caulk, filling the gap evenly and smoothing it out. Step 4: Maintenance – Periodically inspect and touch up the caulk, especially in areas with frequent temperature fluctuations. This simple process can significantly enhance the longevity of your concrete surfaces and protect your home’s foundation.
Revitalize Your Carpets DIY-Style
Keeping your carpets in top shape doesn’t necessitate hiring professionals; you can achieve fantastic results with a simple DIY routine. Start by thoroughly vacuuming your carpet to pick up loose dirt and debris. Next, create a cleaning solution by mixing equal parts water and white vinegar. Using a spray bottle, lightly mist your carpet with the solution, taking care not to soak it.
Allow the mist to settle for a few minutes. Use a clean microfiber cloth to gently wipe across the carpet fibers, following the natural grain. Once the entire area is treated, run a clean, damp mop or cloth over the carpet to pick up any leftover solution. To finish, either let the carpet air dry naturally or accelerate the process using fans. With these easy steps, you can refresh your carpet and prolong its life, all while saving money.
Temporary Window Fix
Got a broken home window and need a quick, temporary fix? If you have Reflectix in your car—commonly used for sun shades or camping—you’ve got an emergency solution at hand. Simply cut the Reflectix to fit the window frame and secure it in place. This reflective material is excellent for thermal insulation, helping to maintain indoor temperatures.

It acts as a barrier to heat loss in winter and heat gain in summer, offering temporary relief while you wait for a proper repair. While it won’t let sunlight through, it’s a great makeshift insulator to keep your energy bills in check until you can replace the glass.
Clean Grout With Toilet Bowl Cleaner
After a while, the grouts between the floor tiles get dirty or grow fungus. There’s a quick way to clean and brighten these up with a common household item. Apply toilet bowl cleaner to the grout in question and let it sit for about 15 minutes.

Then gently scrub it off with a small cleaning brush or even an old toothbrush. The last step, mop the area with warm water and let it dry. Lo and behold. Grout is porous and absorbs dirt and filth like a sponge, so grout lines discolor quickly, especially if the sealant has worn away. Because grout is porous, caustic cleaning solutions like toilet bowl cleansers and vinegar can erode it, causing damage to your surface. Use a bleach solution to clean tiny areas like showers or kitchen backsplashes. Although oxygen bleach is preferred, chlorine bleach can be used if the grout lines are particularly filthy. Add water to dilute – A solution of 1 part bleach to 3 or 4 parts water should work, but for more tenacious stains, you may need a stronger solution.
Patch That Pesky Hole
So you’ve got a hole in the wall next to your door—a remnant of that time you swung the door open too forcefully, perhaps? Fret not, because expanding foam is your unexpected hero! This DIY hack is easier than making instant coffee and far more satisfying. Simply grab a can of expandable foam and squirt it into the offending cavity. Be generous, but don’t overdo it, as the foam will expand to fill the space.

Now, patience is key. Let the foam expand and dry according to the package instructions. Once it’s set, grab a sharp utility blade and carefully slice off the excess foam. And voila! The hole’s history, and your wall is as good as new. A quick paint touch-up, and no one will ever know your wall had a run-in with the door.
The Ultimate Painting Hack
For the perfectionists among us, painting a straight line next to trim can feel like an Olympic sport. Start by tackling the trim first, and don’t worry about overstepping onto the wall by an inch—it’s all part of the plan. Load up a 3″ brush with paint and gently run the bristle tips along the edge of the trim. With a delicate touch, you’ll find just the right resistance to make that line immaculate.
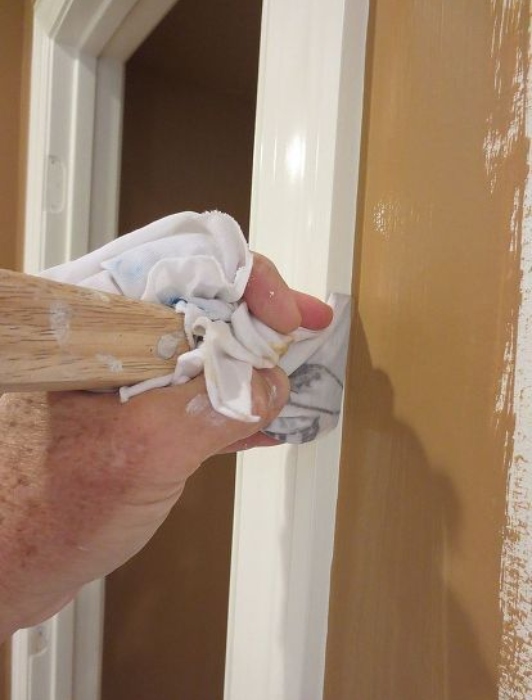
But wait, there’s more! For the crispest line you could dream of, grab your 5-in-1 tool and wrap it in a wet rag. Carefully drag it down the painted line at the perfect angle to make it even straighter. Voila! You’ll achieve a laser-straight line—as long as you haven’t had too much coffee, that is!
Guide to Cleaning Vinyl Siding
Cleaning your home’s vinyl siding efficiently involves a few straightforward steps. Step 1: Mix Cleaning Solution – Start by mixing T.S.P powder with warm water in a large bucket, or opt for a mixture of white vinegar, baking soda, and water for a natural alternative. Ensure you’re wearing gloves for safety. Step 2: Water Down Siding – Use a hose or pressure washer to spray down the siding, removing loose debris. Step 3: Scrub Siding – Employ a long pole brush to apply the solution and scrub the siding, especially focusing on areas with more build-up.

Step 4: Deep Scrub – For tougher spots, use a smaller brush for a thorough clean. Step 5: Rinse – Finish by rinsing the siding with water, utilizing a pressure washer if necessary to remove stubborn stains. This efficient method, taking about 2 hours, is effective for maintaining and rejuvenating the appearance of vinyl siding.
Ice Cube Technique
When it comes to caulking, achieving a smooth, professional finish can often feel like a sticky situation. Enter the Ice Cube Caulk Tool—a DIY hack as cool as it sounds. Take an ordinary ice cube and glide it along the caulk line, applying even pressure as you go.
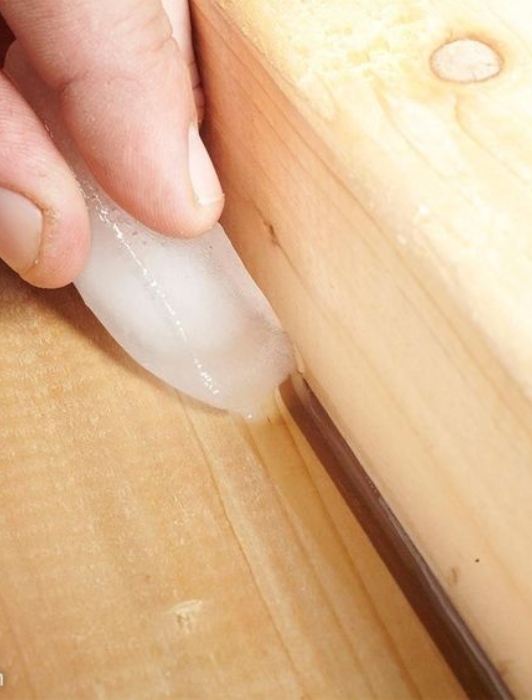
The layer of water that forms between the ice and the caulk acts as a smoothing agent, giving you that slick, expert look. Plus, you can even melt the ice cube slightly in your hand to manipulate the bead shape to your liking. So ditch those fancy caulk-smoothing tools, and reach for an ice cube instead. This is one hack that makes caulking a breeze—or rather, a freeze!
The Masking Tape Door Hack
Painting a door usually involves the tedious task of removing and then reinstalling the hinges, but what if you could skip that step altogether? Enter the masking tape trick! Simply take some quality masking tape and carefully apply it over the door hinges. Once they’re fully covered, grab a sharp knife to trim away any excess tape for a snug fit. This ensures the hinges are well-protected from any paint splatters or accidental brush strokes.

Now you’re free to paint the door in peace, without the nagging worry of ruining your hardware. When you’re done, just peel off the tape to reveal pristine, paint-free hinges. This simple yet effective trick saves time, and it keeps your door hardware looking as good as new. No hinge-removal headaches here—just a beautifully painted door!
Clean Your Oven Door With A Dishwasher Cleaning Tablet
A quick way to clean all the grease and grime accumulated over the years in your oven door is with a dishwasher tablet.
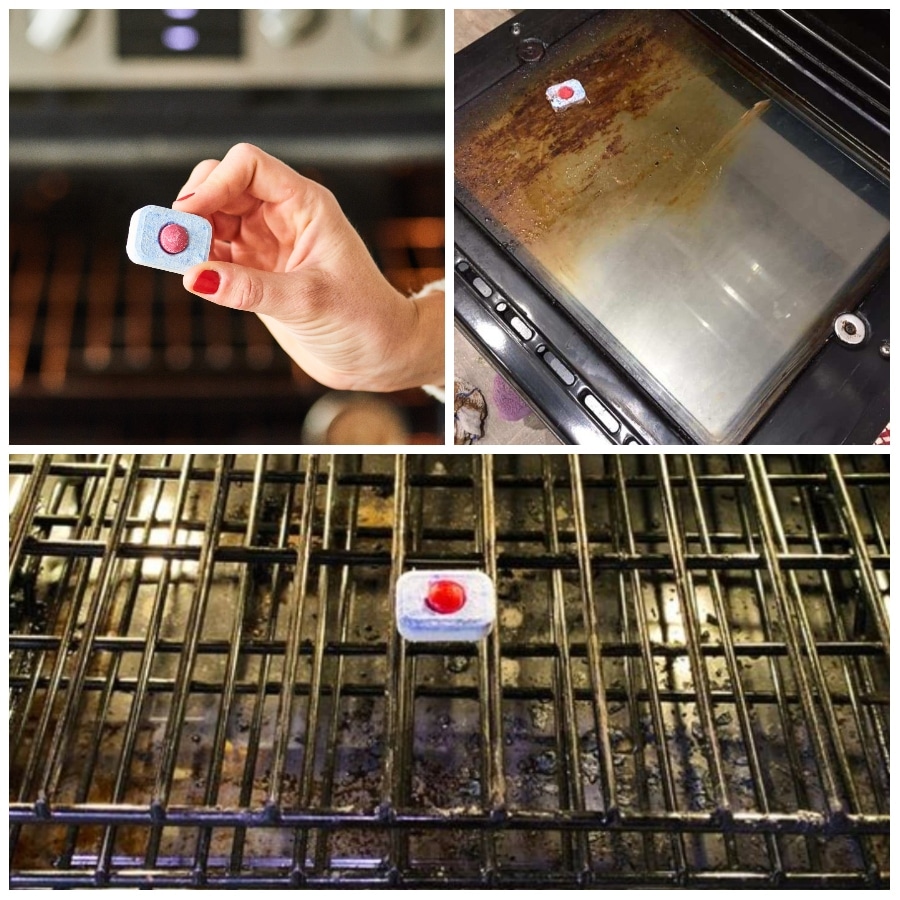
First, make sure you put rubber gloves on to protect your hands from harmful chemicals since dishwasher tablets contain bleach. Then, soak the tablet in warm water and scrub away the dirt. Rinse with a wet cloth. Dishwasher tablets are powerful dishwasher detergents that promise to cut through difficult grease and leave your dishes shining. It is only natural that those powerful cleaning solutions also remove oven oil and food stains. Especially considering the tablets claim to remove baked-on food, yet oven stains are unquestionably baked-on. Plus, the abrasive surface of the firm powder tablets helps scrub away those stuck-on spots while being soft enough not to scratch the oven glass.
Unscrew A Broken Lightbulb With A Potato
Have you ever broken a light bulb while it was still in the socket? Then you know how frustrating it can be to remove it. Cut in half a potato. Take one half and push the soft side into the broken bulb until the glass is fully engulfed.

Slowly turn it counterclockwise until the bulb is out, then safely discard it in the trash. Don’t forget to turn off the power and wear protective gloves! Another tool for removing a broken bulb is needle-nose pliers. Grab the metal component at the bulb’s base with the pliers. Remove it by turning it counterclockwise. Wrap the ends of the pliers in electrical tape if you need more grip. Or, you can use hot glue and a stick of wood. Apply a thick blob of hot glue on the damaged bulb’s base. Once dried, turn the stick to remove the base
Patch Nail Holes With A Bar Of Soap
Here’s another simple trick to fill in those nail holes on your walls. Instead of a crayon, you can go ahead and use soap! Take a basic bar of white soap and slowly rub it over the hole in a counterclockwise motion.
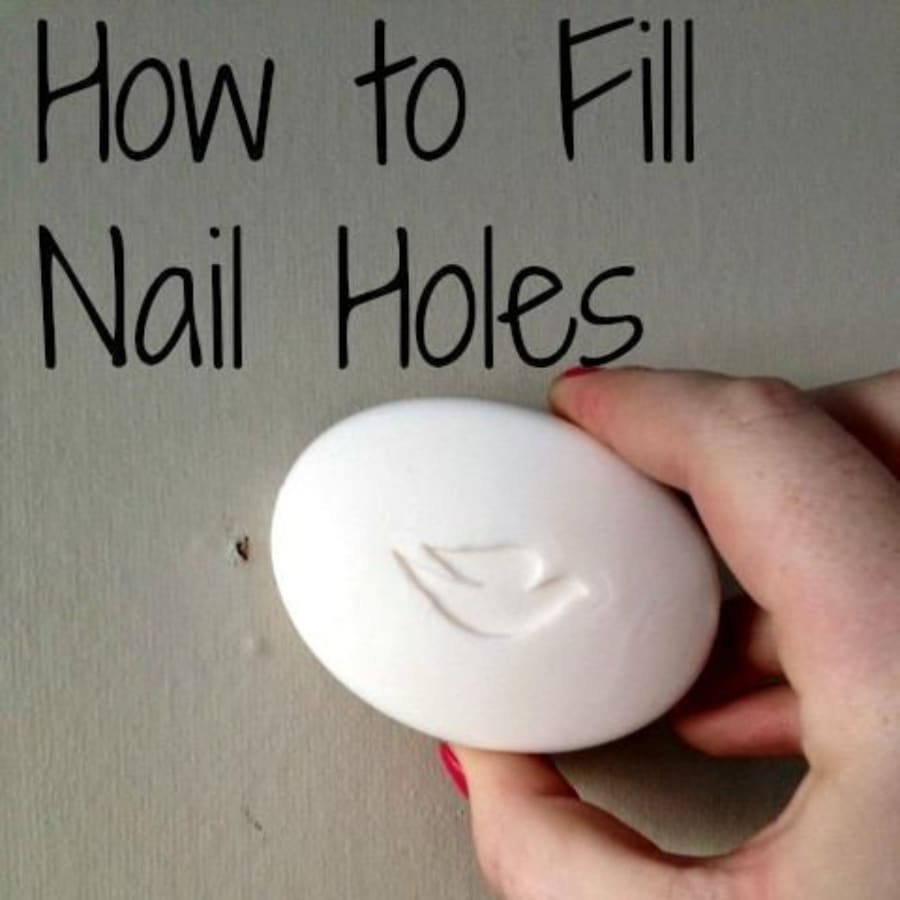
It will patch up the hole in no time. You can use a warm wet cloth to remove any soap residue left on the wall. An easy and effective way to solve this problem! Use Toothpaste to Fill Holes. Toothpaste is a great alternative to spackling if you have a hole in your wall smaller than 1/4 inch. It works best for small holes in the wall, particularly because it tends to crack. To avoid cracking, crush up some aspirin into powder, and mix it with a bit of toothpaste to create a paste. Then, apply the toothpaste-aspirin mix to the wall and let dry.
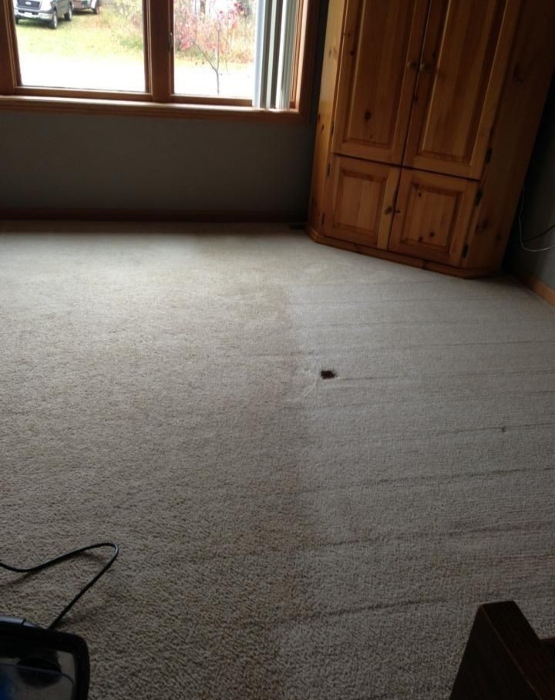
Treat Carpet Dents With Ice Cubes
There’s a simple way to restore overused, dented carpets to their former glory. Place an ice cube on the dented area of the carpet and let it melt away. Once the water is absorbed into it, you will see the hairs on the carpet spring back to normal in no time.
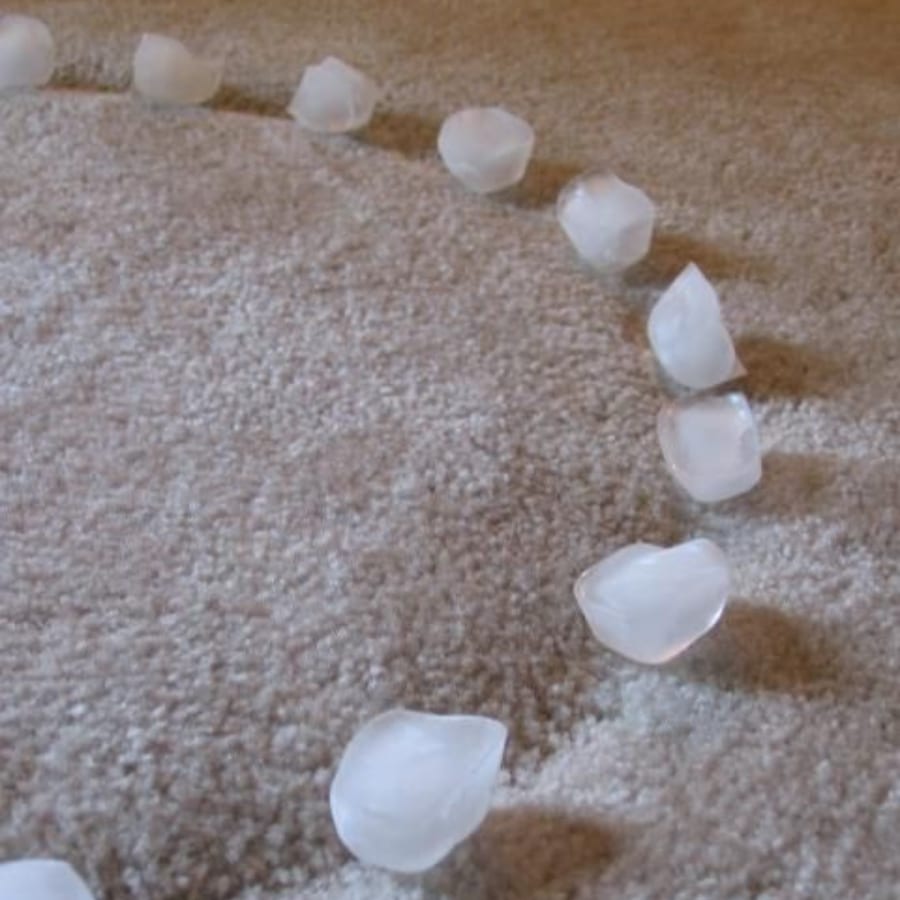
After the carpet is completely dry, take a hard-bristled brush and comb through the hairs to even the carpet and fluff it up. You can also remove carpet dents with a towel. Place a damp dish towel or cloth directly over the dent. Set iron on medium heat or on the steam setting, and run it over the towel for about thirty seconds to a minute—but don’t let the iron touch the carpet directly, as it could burn. Finally, vacuum over the spot or fluff it up to make the fibers uniform and high.
Prevent Doors From Rattling Or Slamming With A Cabinet Door Bumper
It never ceases to amaze us what great impact little things can have on everyday life. This tip is a great example of this. Place an inexpensive bumper on the cabinet door or on the door jamb to prevent it from rattling or slamming.
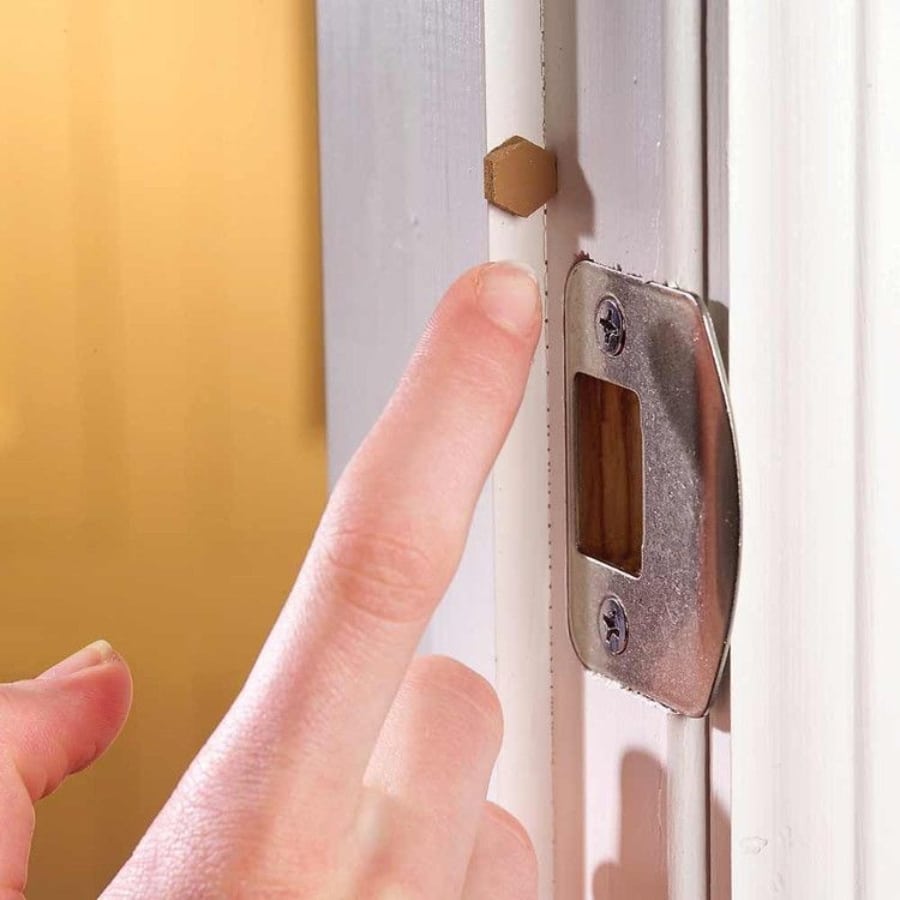
This also goes for drawers that slam closed. This will also prevent your doors and drawers from getting damaged, extending their useful life significantly. Bumpers come in different sizes and materials. A door closer is any mechanical device that closes a door in a controlled manner, preventing it from slamming once it has been opened manually or automatically. Installing a door closer is a great idea, but it is fairly costly. However, this technology is capable of successfully resolving the slamming door issue. When you place the air-powered piston between the door edge and the frame, it will assist in the slow closing of the door.
Quiet Squeaky Floors With Baby Powder
Do you have wooden floors? Perhaps squeaky floors? It’s probably because some loose pieces of wood are rubbing together. To fix this inconvenience, buy a small squeeze bottle (like the kind that comes in the hair dye kits) and fill it with baby powder.
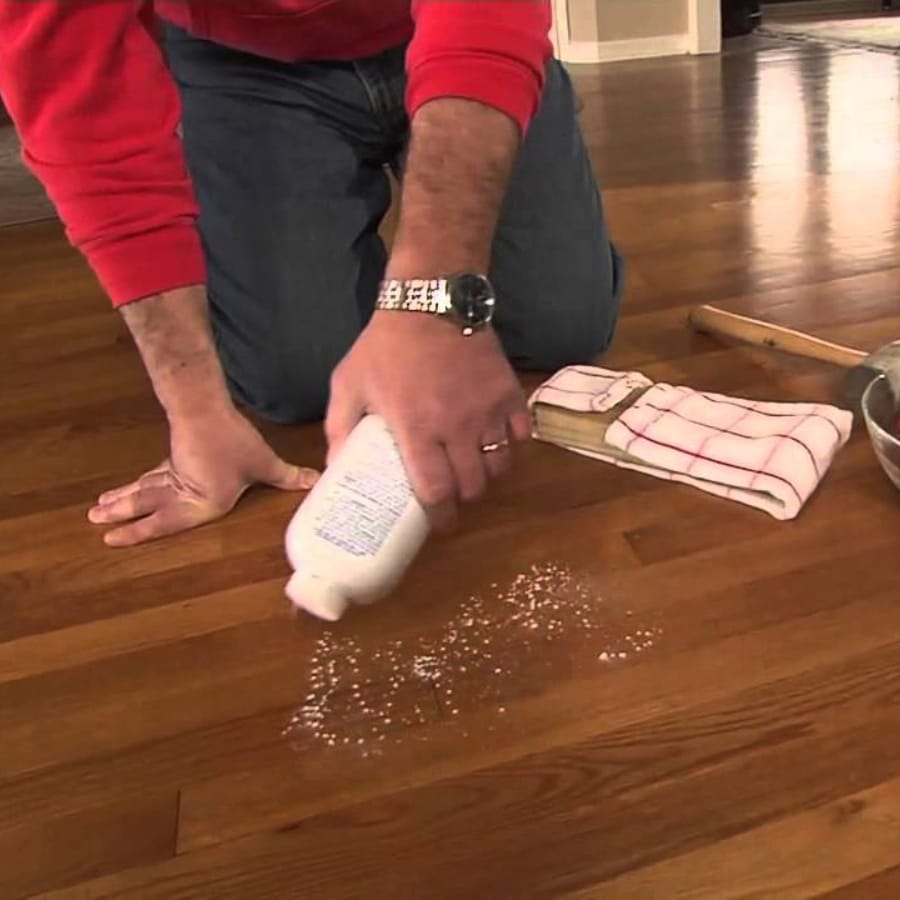
Then go ahead and squeeze the powder in between the boards and use a makeup brush to push the baby powder down in the cracks. Clean excess and enjoy the silence! Use construction adhesive to fill long gaps. A shim works for specific spots. If you find a long gap along a floor joist, a shim isn’t the best choice. Instead, use a caulking gun to push floor adhesive into the gap. When the adhesive hardens, it prevents movement in the floor. Most gaps appear on one side of a joist. If you find a gap on the other side, fill it with adhesive.
DIY Baseboard Installation
When embarking on a baseboard installation, the ceiling height often determines the baseboard’s width. For ceilings of 9 feet or more, a wider baseboard—around 5 and 1/4″ or more—can be quite suitable. The tools needed to get the measurements include a tape measure, a pencil, and some paper. The first phase of the process involves removing the old baseboards. Then, semi-gloss paint is used to paint the new ones. Carefully measuring and cutting the baseboard starts at one corner. If you prefer, consider adding insect powder behind the baseboards.
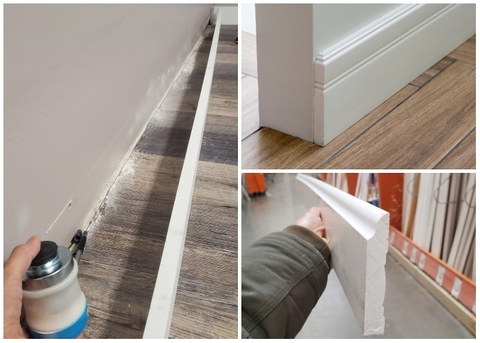
The baseboard is then attached using a brad nailer. The ensuing steps are to fill the nail holes with wood filler, sand the wood filler to make it smooth, and then attach the quarter-round, also known as shoe molding. Caulking the baseboard gaps ensures a tidy finish. The final touch-ups involve filling the nail holes and applying paint on the caulk to ensure a seamless look. This detailed process assures that the baseboards are not only visually pleasing but also long-lasting.
Repair Dents In Wood With A Hot Iron
To cure scratches or dents on your wooden floors or furniture surfaces, there is a cool trick you can try with an iron! Clean the area where the dent is of all dirt, then wet it with a few drops of cold water.
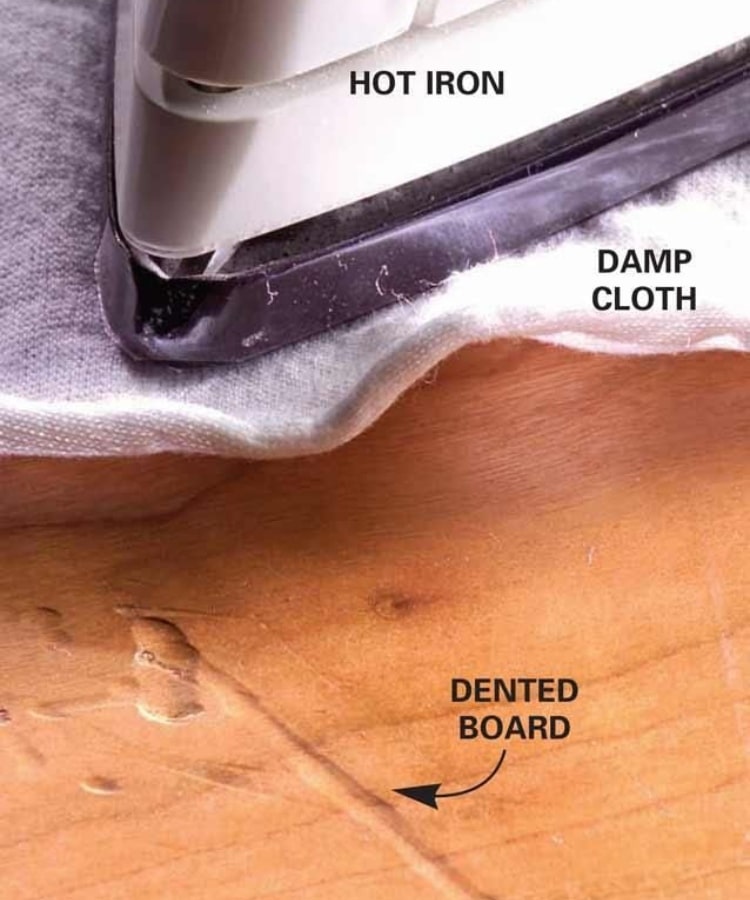
Make sure the indentation is wet, and place a moist towel over it. Turn the iron on and slowly go over the towel in a circular motion. Let it dry and marvel. For particle boards, there’s also a way to fix dents. Manufacturers make particle boards by combining sawdust, wood chips, and small wood scraps with adhesives and then press the mixture into a flat sheet. A hole in the particleboard will continue to chip until you repair it. Mix two-part epoxy repair putty. Work the putty with your hands until it is pliable. Apply it to the inner edges of the hole. The bonding agent acts as a bridge between the particle board and the epoxy-putty, ensuring adhesion. Fill the hole in with putty. Allow it to dry completely and sand it flat.
Remove Marker Or Crayon Scribbles On Walls With WD-40
This is for all the parents of small children out there that know that the struggle to keep the walls clean is very real! If your wall paint happens to have a sheen to it, then spray a bit of WD-40 and easily wipe off the markings from markers or crayons.

But don’t use WD-40 if your wall paint is matte kind because it can stain the walls. In this particular case, try a Magic Eraser. WD-40 is a lubricant spray that stands for the 40th attempt at water displacement. It was a chemist’s 40th effort at developing a spray that could effectively lubricate machinery. The spray has a wide range of applications in the home. It may clean your walls of grease, wax, and crayon stains. The walls in your house will not be affected by WD-40. The purpose of the spray is to establish a barrier between the grease and the surface material. As a result, the spray is non-greasy and effective in removing grease stains from walls. Spray raw, wooden paneled, wallpapered, or painted walls with the spray.
Repair Damaged Hardwood Flooring
A wooden floor polisher restores wood floors to their original beauty and tricks others into thinking they have been redone. Whenever you find scratches on your floor caused by skateboards and toys, polish them with a wooden floor polisher. This will bring shine to the floor, making it look brand new.
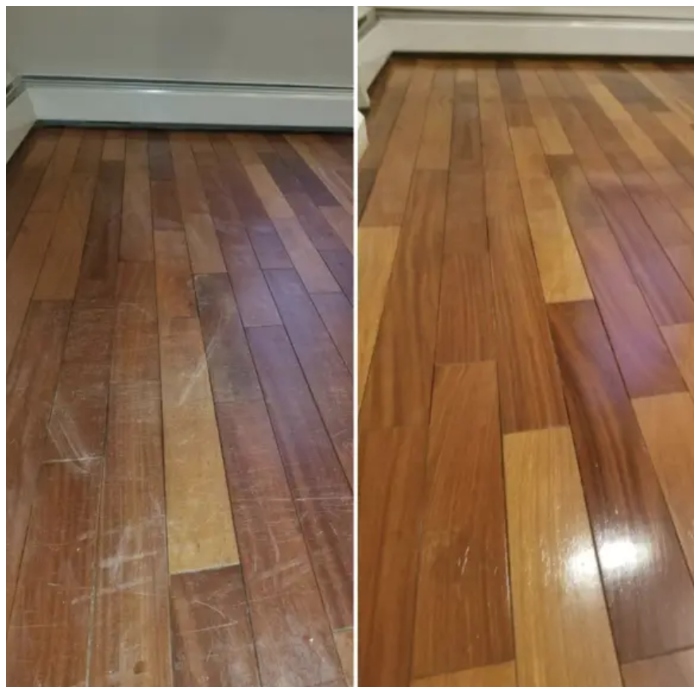
To repair deep gouges or dents in hardwood flooring, you can use a wood filler and wood stain. First, protect the surrounding area by taping off the damaged spot. Next, mix identical parts of epoxy-based filler and put it to the gouge using a putty knife, and allow the filler to dry. Sand and finish the repaired area.
Winterize Windows With Bubble Wrap
Check out this hack to quickly fix a window that is bleeding heat in the wintertime. Wet the window with a bit of water and then stick a piece of regular bubble wrap to the glass.
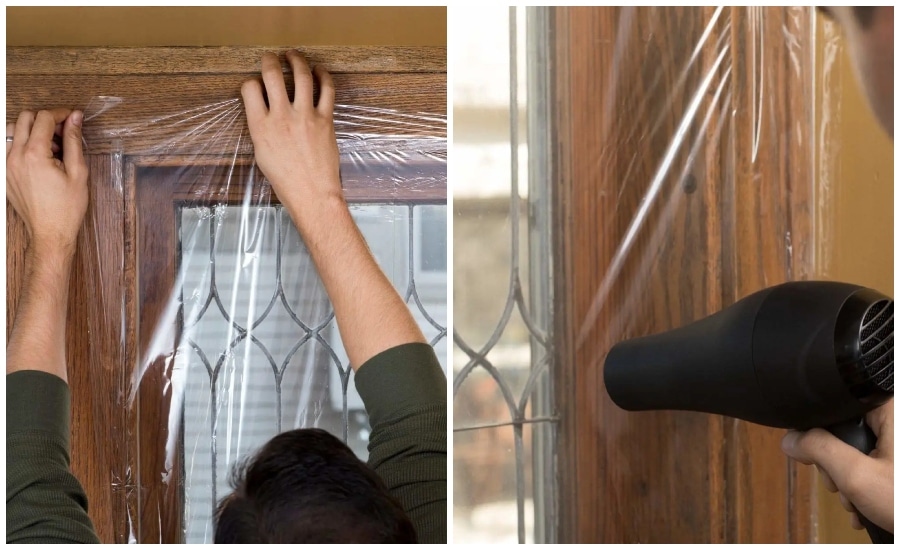
It might not be the most fashionable solution to this problem, but it will get you out of momentary trouble! Gotta keep the warm in! Bubble wraps serve as a good insulator because of their design which has small air pockets. Because the base material for bubble wraps is plastic, it heats up quickly, being a good insulator. The bubbly side must be placed toward the wet glass. While bubble wrap may not be a glamorous solution to keeping the house warm, it was not unreasonable when facing an ice cube home. It also is great for keeping the sun off windows during summer. This is a cheap way to insulate your house for little money.
Spot A Toilet Leak Using Kool-Aid
If you are not sure if your toilet is leaking, you will need a packet of Kool-Air to find out. Remove the lid of the toilet tank and pour the contents of a dark-colored Kool-Aid packet.
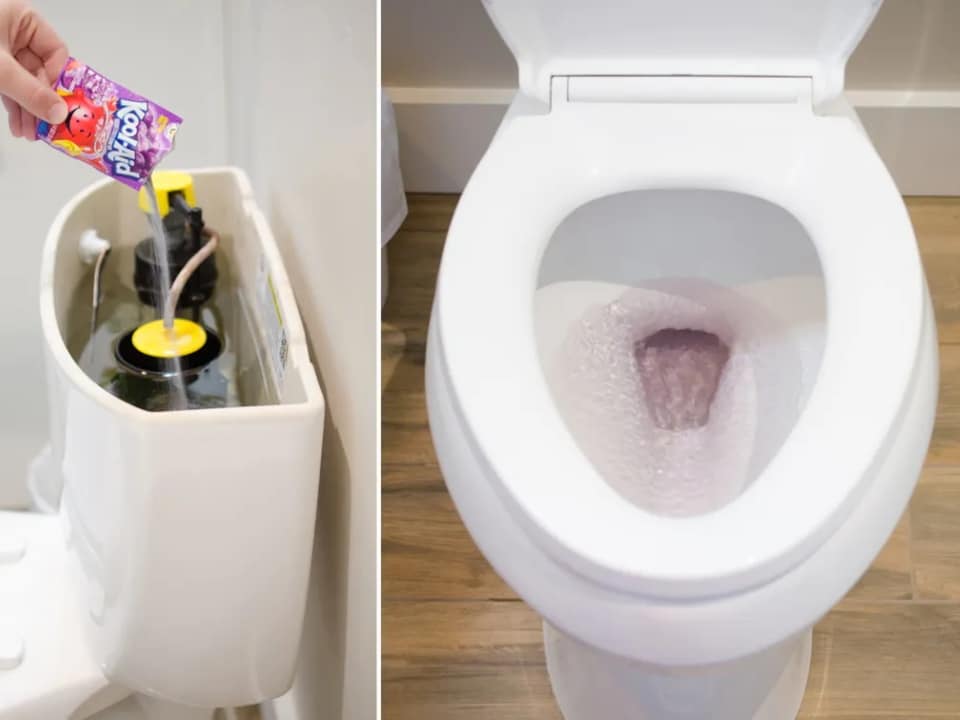
Wait about 30 minutes, and if when you return, you find the inside of the toilet bowl of the same color as the Kool-Aid, that means it’s leaking. Make sure you don’t flush before the 30 minutes are up. Small pieces of unpainted wood can be stained with Kool-Aid for craft and household projects. Simply pour three or four packets of Kool-Aid into a bowl of water, stir until the powder is completely dissolved, then soak the wood in the concoction overnight. Kool-Aid can be used to dye any light-colored yarn. Dissolve a sachet of the colored powder in water. Fill a saucepan halfway with the solution and bring the water and yarn to a boil, then remove the saucepan from the heat and let it dry, covered. Allow the yarn to dry after rinsing it in warm water.
Drill A Hole In Your Trash Can Liner To Fight Suction
If you have a trash can with a liner in your kitchen, then you are aware of the struggle trying to remove a full bag without it tearing and garbage spilling everywhere! Fixing the suction created between the bag and the liner is very easy.

All you need to do is drill a hole in the side of the plastic liner (not on the bottom to avoid leaks) and forget about the vacuum effect. Hotel staff has been utilizing this cleaning method for years. Keep extra trash bags at the bottom of the can so you can just pull a new one in after removing the old one. Adhesive hooks aren’t just for storage; they’re also ideal for slick trash bags. Place a few upsides down on the sides of your garbage can so the trash bag drawstrings may be looped over the hooks. Even if the garbage bag isn’t a perfect match for the can, the hooks will retain the drawstrings in place and prevent the trash bag from falling into it.
Prevent Clogged Drains From Forming
Why not save yourself the hassle of unclogging nasty drains by preventing them from ever getting clogged in the first place? There is a product that was specifically created to solve this issue, the TubShroom, easily available in your nearest supermarket, or it can be ordered on Amazon to be delivered to your door.

The product has a mushroom design that traps hair and keeps it out of sight until you remove and clean it. Limiting what you throw down drains is the best way to keep them clear. Food, coffee grinds, and grease should not be poured down the sink. Keep hair and soap scum out of the drains in the bathroom. Use a mesh screen to cover your tub and shower drain, so the hair is collected and the water can flow through. Another option is to replace the shower with one that has a built-in screen to prevent hair from clogging the drain. Brush your hair before showering or bathing. This method eliminates stray hair from the shower drain and prevents clogging.
Fix A Tear In A Screen With Clear Nail Polish
This hack comes in handy on the hot summer days when mosquitos attack! You can quickly fix all the small tears of your mosquito mesh screen with a few drops of clear nail polish.
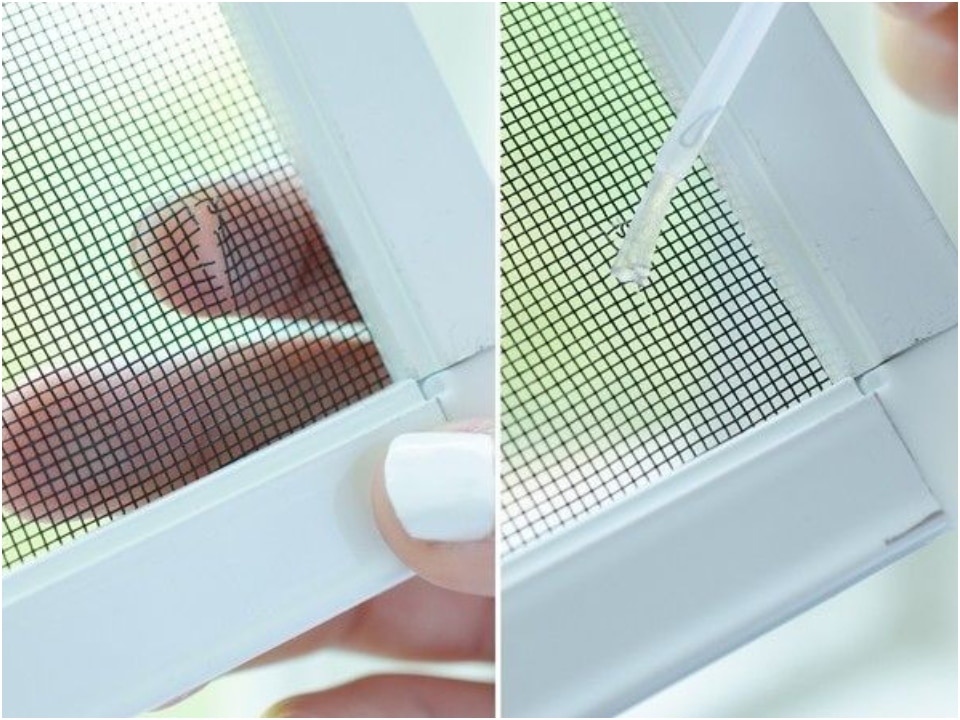
Once it completely dries up, it will act as an invisible glue. This is a very cheap way to extend the life of your screen! Clear fingernail paint can be used to patch minor holes (½ inch′ or smaller). Start by squeezing the fibers back into place and flattening them out as much as possible. Then, paint either side of the screen with nail polish, letting each coat dry in between. If the hole is larger, use tin snips to trim the damaged screen area such that no edges unravel. Cut a screen patch 1 inch larger in size than the screen hole. Carefully unwind strands around the patch’s edges. Weave the patch’s unraveling strands into the hole’s edges.
Prevent A Door From Shutting With A Rubber Band
You know when you are carrying groceries from the car to the house on your own, making countless trips, and there is no one around to keep the door open? Well, there is a quick hack to make this common situation more bearable.
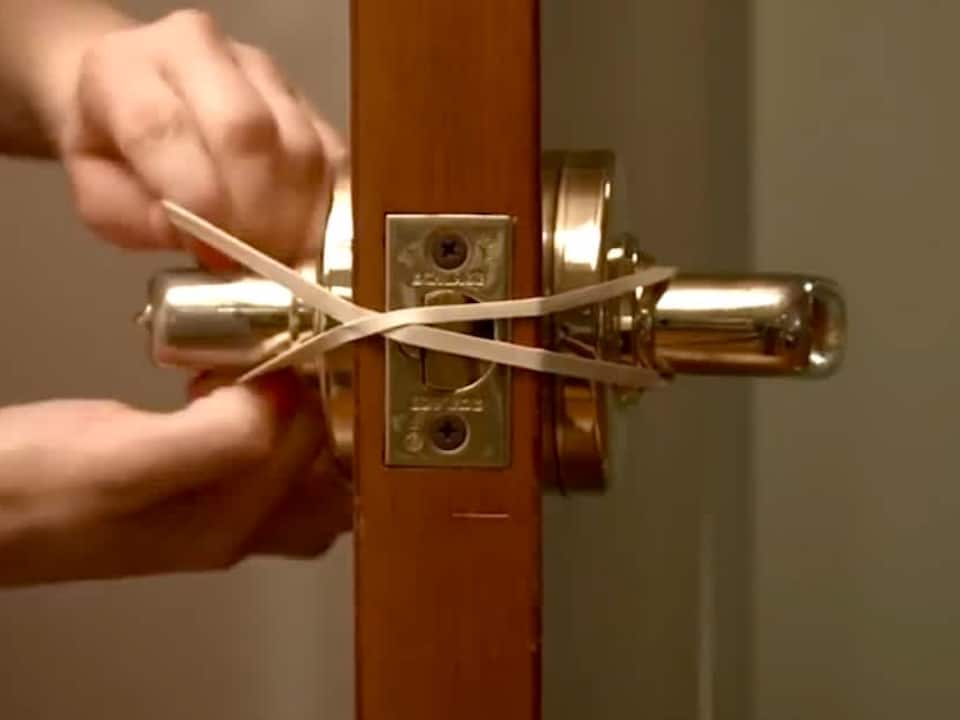
Take a rubber band and loop it on both sides of the doorknob, this will prevent it from latching and closing shut. Keep a rubber band in your purse or car! On a heavier door, try felt pads, but if they are not enough, use foam weather stripping to provide a soft, secure seal and minimize noise. Remove any dust or grime from the inner edge of the doorframe, then cut and press a length of weather stripping to suit the entire length of the doorframe. Also, if the sound of your screen door slamming scares you every time someone comes in or out, try installing a pneumatic door closer to do the job. These air-powered devices attach between the doorframe and the door edge and slowly close the door using an air-filled piston.
Your Measuring Tape Can Help You Find Studs
If you take a close look at the measuring tape you have at home, you will notice that some numbers are in red while the rest of them are black. Or, depending on the brand, instead of red numbers, you will find small black diamonds at intervals on the tape.
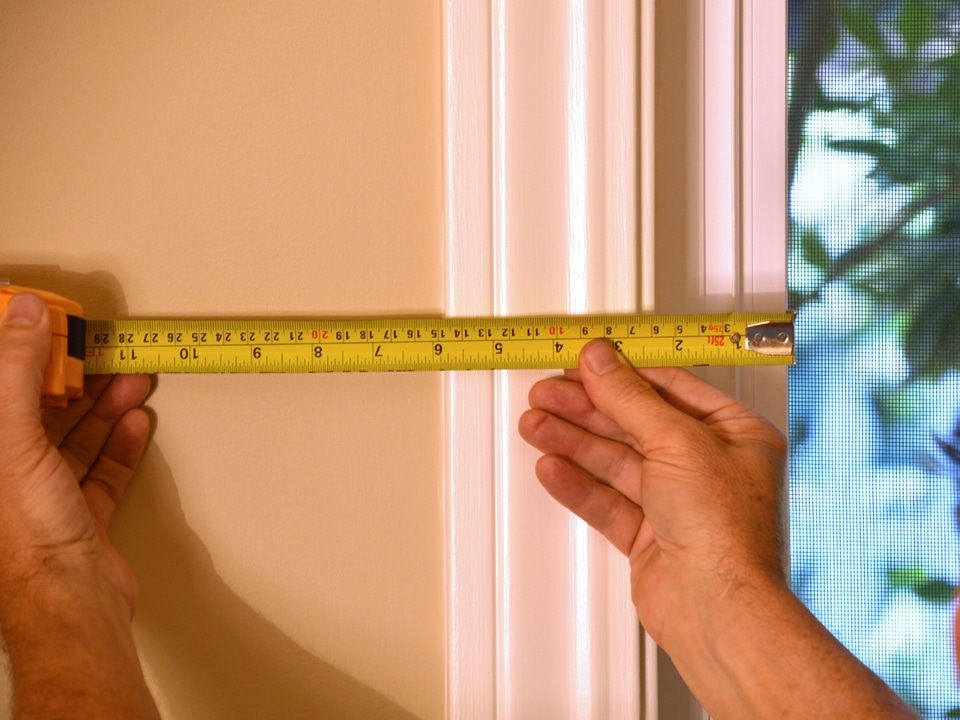
These markers are there to help you find the studs and the space between them on the walls of your home. This is super handy! There should be six studs spaced 16 inches apart for every 8-foot piece of your wall. That’s why every 16 inches, red numbers are highlighted. By utilizing the red numbers on the tape measure and noting the studs with a pencil, you can note exactly where the studs are. However, keep in mind that this method only works if you know the house was built utilizing the 8-foot stud spacing standard. If you’re unsure, use the stud finder to locate your studs the old-fashioned way before using the measuring tape as a guide.
Give Your Shower Head A Vinegar “Bath”
As you may know, tap water carries many minerals that start sedimenting until rust and plaque can be seen.

There is a simple hack to get rid of all the mineral deposits and other grime from your shower head by simply soaking it overnight in clear white vinegar. Rinse and repeat this process as many times as it is needed. You can also remove it to clean it. Remove the showerhead by twisting it counterclockwise. If you are having difficulties twisting it, try wrapping an old rag around the connecting nut and then twisting it with a wrench. Put the showerhead into a pot. Consider using a smaller container that just about fits the showerhead; this way, you will use less vinegar. Fill the pot with enough white vinegar to cover the showerhead. The acids in the vinegar will help dissolve the white mineral deposits on the showerhead.
Use A Foam Pool Noodle As A Garage Wall Bumper
Is your garage space small and your car runs the risk of getting scratched on the wall? Or maybe you open the car door and accidentally scrape the paint off the wall? Then keep reading to learn about this incredible hack that can save you hundreds of dollars in car paint repairs.
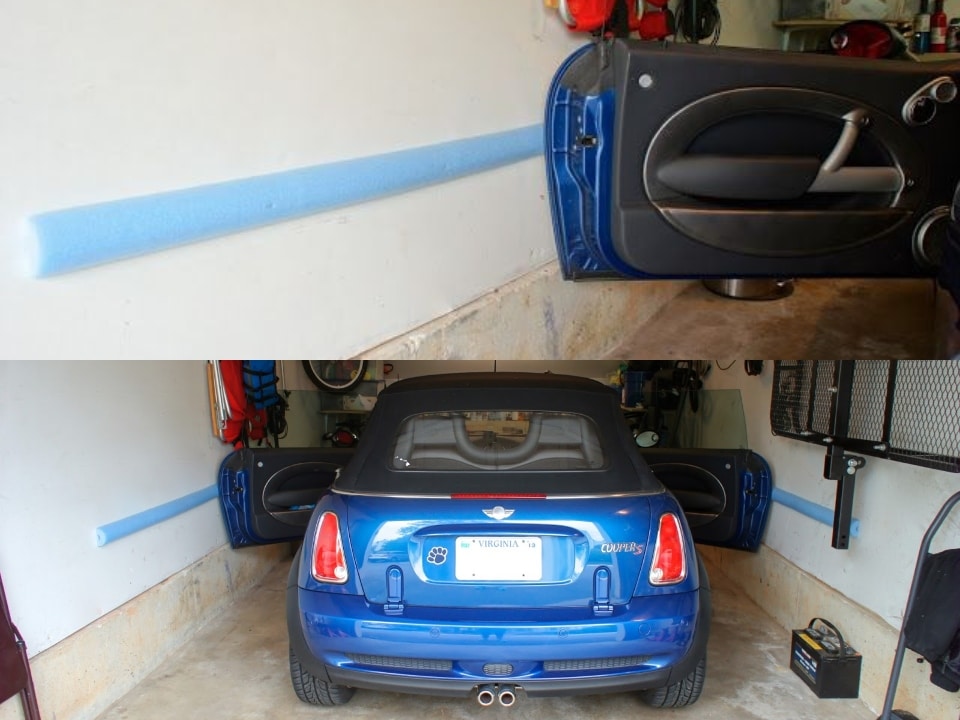
Take a foam pool noodle and carefully slice it in half, then glue it against the wall at the desired height. To mount the pool noodle to the wall, mark off the area where the noodle will be mounted. Using your measuring tape and pencil, draw a straight line that denotes where the pool noodle should be located. Open and close doors in the area to ensure you are on target. Next, apply ample glue to the back of the noodle and then hold it firmly in place on the target wall. Hold for up to 10 minutes or until you know that the glue has adhered to the noodle and wall.
Paint Screws With Nail Polish To Prevent Them From Coming Loose
Sometimes screws end up getting loose and falling out. Whatever you were trying to secure falls apart, and maybe the screw itself ends up getting lost!
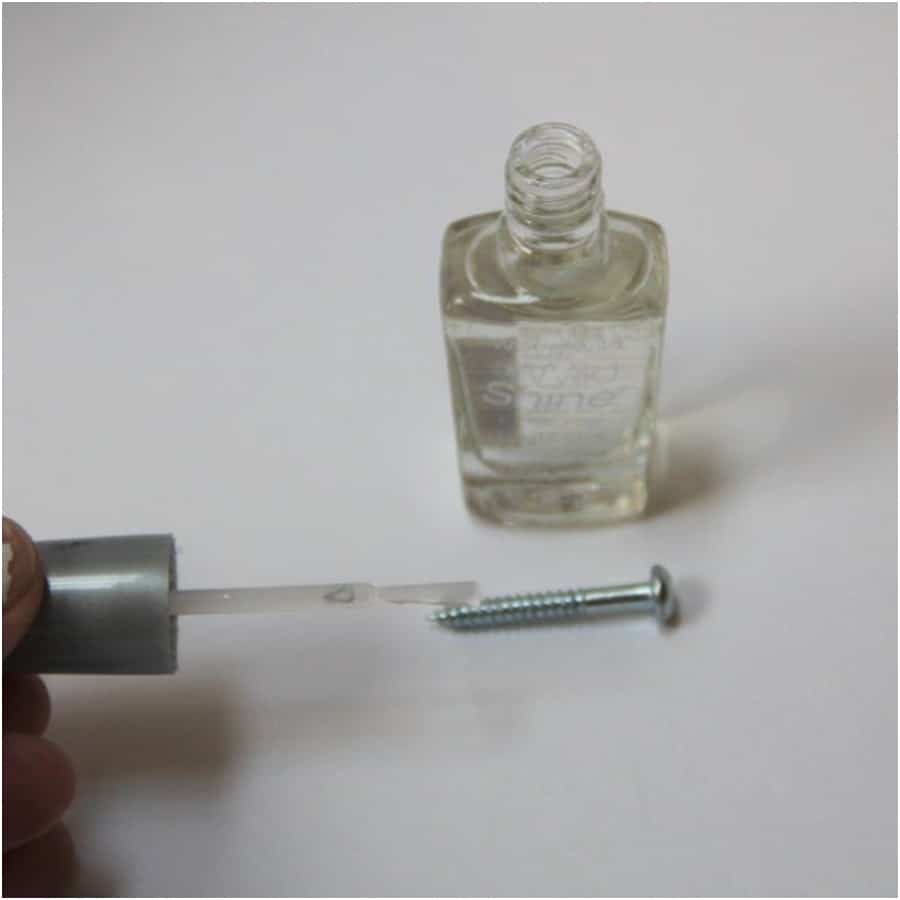
There’s an incredible hack for this specific issue. Take any nail polish you got laying around and paint the screws with a few coats. It acts like glue and will fix it in place. It’s a great way to keep glasses screws in place. Apply a very small amount of clear nail polish to the glasses’ screws. It seems to keep them put no matter what we get up to. You can also seal splinters in wood with nail polish. If the wood in your home shows signs of splintering, a quick coat of clear nail varnish will seal and smooth it down, preventing it from giving anyone a nasty surprise. If your clothing starts to fray, you can give it a coating of nail polish. It’s a quick way to save your denim skirts from fraying into oblivion.
Use Tape to Achieve The Perfect Caulk Edge
If you ever attempted to use caulk but couldn’t manage to get that perfect straight edge, then next time you pop by the hardware store, get some painter’s tape.

Remove the painter’s tape while the caulk is still wet unlike we do with paint. If you wait for it to dry, you might end up pulling up some of it. Painter’s tape is especially helpful when you are caulking between two different colors or two different surfaces. Example: A wood cabinet with an adjoining painted wall. If you are painting walls and trim the same color, there is less need for painter’s tape. You can apply it with a gun, smooth it with your finger, and let it dry a day before painting. If you are painting walls with contrasting trim and want a sharp, clean edge, it is time to get your tape out.
Use A Rubber Band To Remove Stripped Screws
Are you having a hard time removing stuck screws? Sometimes they’re so stubborn that not even electrical screwdrivers can do it. There’s a trick for this for you to try!
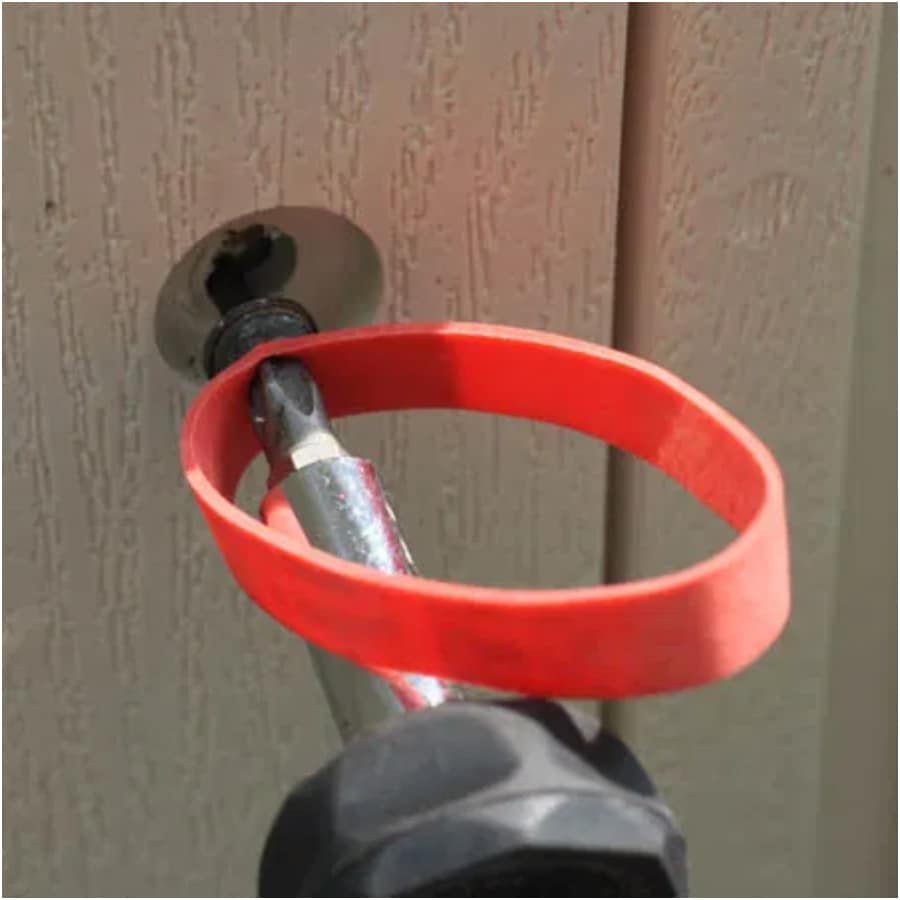
Place a rubber band over the head of the screw before trying to remove it with the screwdriver. That will add extra friction and allow you to safely take it out. The rubber band fills the gaps in the screw’s head and grips the drill bit for the screwdriver blade. The trick is using a rubber band that is at least as wide as your screw. Thinner rubber bands just won’t work. If you don’t have any rubber bands, sewing elastic (like the kind in waistbands) works in a pinch, too. If the screw is just barely stripped, you might be able to use the duct tape trick. Cover the stripped screw head in duct tape and fit your screwdriver into the groove on top of the tape. Apply pressure and turn counterclockwise. The tape should fill in the gaps making it easy to remove the screw.
Dishwasher Tablets Will Get Your Shower Sparkling
There are many other uses for common dishwasher tablets. They work brilliantly to clean the shower! Take a regular sponge and cut out a small indent on one of its sides matching the size of the tablet and place it on the empty slot.

Wet the shower surface and start scrubbing with it. It cleans thoroughly and makes everything shine. There are also other ways to get rid of limescale and grime. White vinegar is excellent for eco-friendly cleaning and restoring the luster of your shower. Spray any limescale with a solution of half water and half vinegar in an old spray bottle and leave for 15 minutes. You may need to use the rougher side of a non-scratch scouring pad and some elbow grease, depending on how bad the situation is. Rinse with warm water and dry with a soft towel.
Clean Dirty Oven Trays
This household recipe will leave your dirty oven trays sparkling new. Mix baking soda, soda crystals, and white vinegar together and leave the tray to soak in it for 30 minutes.
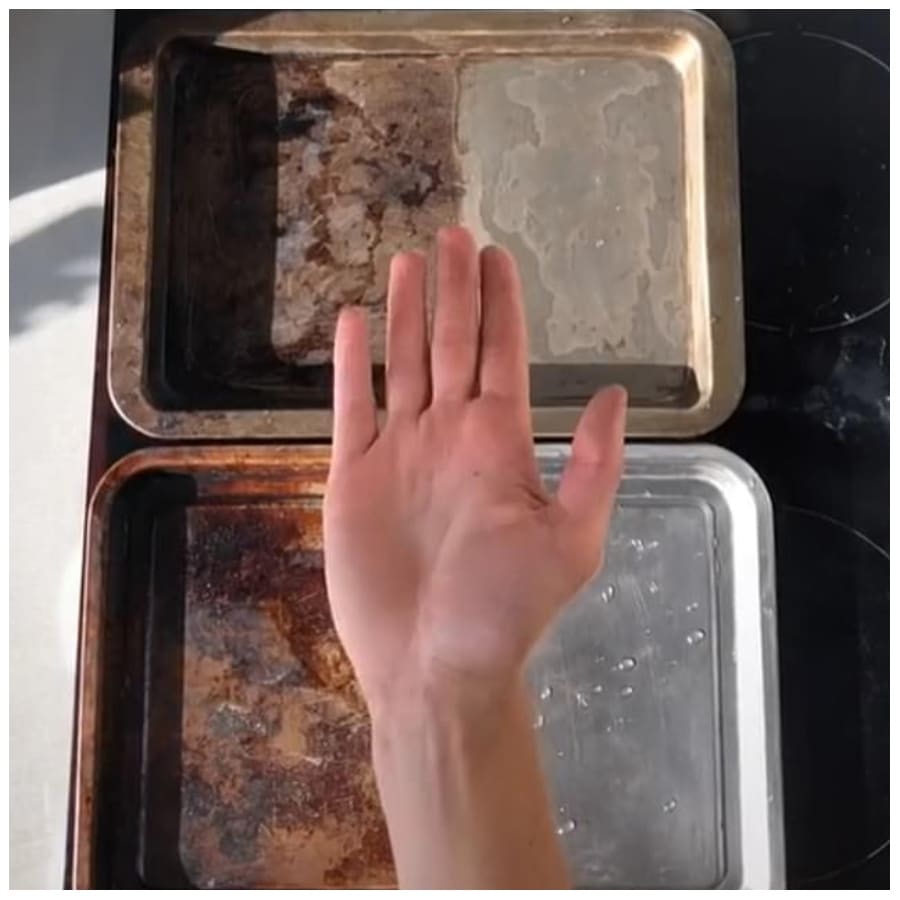
Then begin the cleaning process by scraping the loose grime before using a Brillo pad to lightly wipe excess dirt. Rinse with warm water and let it dry off. Keeping your baking trays in good shape all year helps them last longer, much like your oven. To keep them clean, follow these simple steps: If feasible, line your baking trays with parchment paper, immerse all of your oven trays in hot, soapy water right after use, don’t scrape your non-stick baking trays too hard with abrasives, and use paper towels to remove extra grease before and after cleaning. There you have it: your top five baking tray cleaning tips with no harsh chemicals!
Cleaning Cabinet Grease with Dish Soap
The majority of greasy places merely require one thing: warm, soapy water (after all, dish soap was created to cut through grease!). Clean the cabinets with a soap-and-water-soaked sponge, toothbrush, or tiny scrub brush after softening the grease with a sponge dampened with warm water. Finish by wiping with a dish towel to avoid any residue (which could attract more grime). This also works nicely with painted wood cabinets, for what it’s worth.

Grab some baking soda and a scour brush for older or more tenacious stains. Scrub the cabinets after wetting your brush with warm water and adding a pinch of baking soda. To remove the residue, use a moist, warm towel. Baking soda is not only effective in cutting oil, but it’s also non-abrasive, so it won’t harm your wooden cabinets.
How to Clean the Glass Panes Between the Oven Doors
To separate the door panes, first, open the door, then loosen the two screws on the top of the door (see photo below for screw placement), and then wipe down the glass with your preferred cleanser. Finally, thoroughly dry the door and re-screw it shut. It’s now spotless!

If your oven doesn’t have screws, this area of the door most likely has a few vent-like apertures. If your oven door does not unscrew, you could try soaking a washcloth in a solution that will evaporate and attaching or fashioning it to a metal hanger to clean it. It will disarm if you use a paper towel, but you can apply a few squirts of dish soap if necessary. You will no longer have to deal with unsightly and filthy oven doors.
Clean Your Washing Machine With Dishwasher Tablets
You can also clean your washing machine for cheap with dishwasher tablets. Simply put some dishwasher tablets in the washing machine and run a hot cycle.
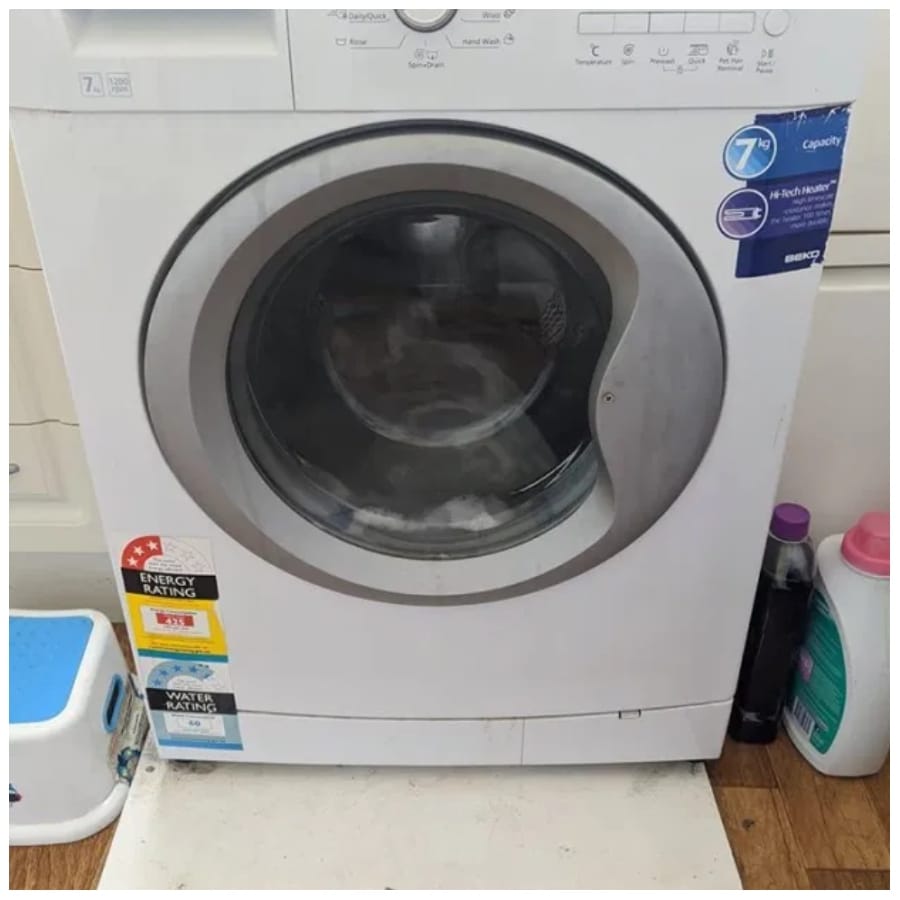
You can use up to four tablets at a time and they can be of any brand. You’ll be amazed to see the amount of dirt-water and grime that comes out of it. How many dishwasher tablets does it take to clean a washing machine? It takes only four tablets to clean your washing machine! Place them directly into your machine’s drum and set it up for a hot cycle without any laundry in, and leave the tablets to do their thing. Once the washing machine is finished, you can use it as usual. Using more than four tablets runs the risk of the product not draining away correctly and could leave a residue that will attach to your clothes or impact the usual washing cycle.
Clean Your Microwave Without Scrubbing
To thoroughly clean your microwave without having to do much scrubbing, simply pour equal parts of white vinegar and water into a microwave-safe bowl and microwave it for around seven minutes.

Once it starts evaporating, the steam will loosen up any grease stains, and remains of food stuck on the walls. This will make it very easy to clean afterward. How often should your microwave be cleaned? To keep bacteria build-up and harsh odors in your kitchen at bay, clean your microwave once a week to once every three to four weeks. You may need to clean it more frequently if you heat a lot of messy items like sauces or gravy. If you use it infrequently, you can go up to a month without cleaning it. Just don’t let the filth on the floor for too long. When should your microwave be replaced? Microwaves are designed to endure up to ten years. However, it will only last that long if you properly maintain it and clean it on a regular basis.
Amplify Music With This Trick
Here’s a neat trick for when you didn’t bring any speakers with you! Place your smartphone inside an empty glass or bowl; when you turn the music on, the sounds will be amplified considerately.
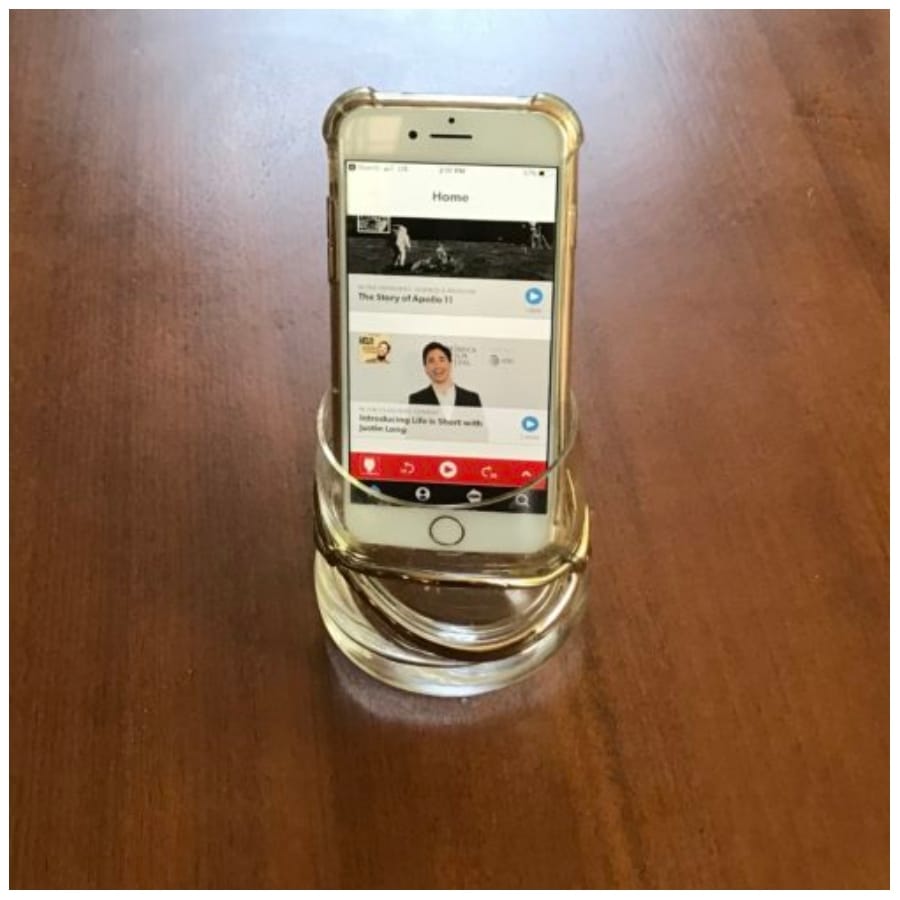
The sound waves will bounce off the sides of the container, making it louder. Who said natural physics could not be applied to solve everyday problems? Here are some pointers to help you get the most out of this: For the best boost, use a glass or porcelain cup or mug. Plastic is still functional, although not as well. Make sure your phone is just sitting in the cup; don’t force it in! Make sure the speaker is at the bottom of your phone. This usually entails placing the iPhone on its side. Because the speaker is on the top of the phone, you’ll want it upside down on Android. Experiment with different mugs and cups. Small modifications in the cup’s form can have a significant impact on the sound.
Use Aluminum Foil As A Funnel
Are you in a place with no kitchenware? Perhaps you are renting a house on vacation, or perhaps you just moved in and only have a few things with you!
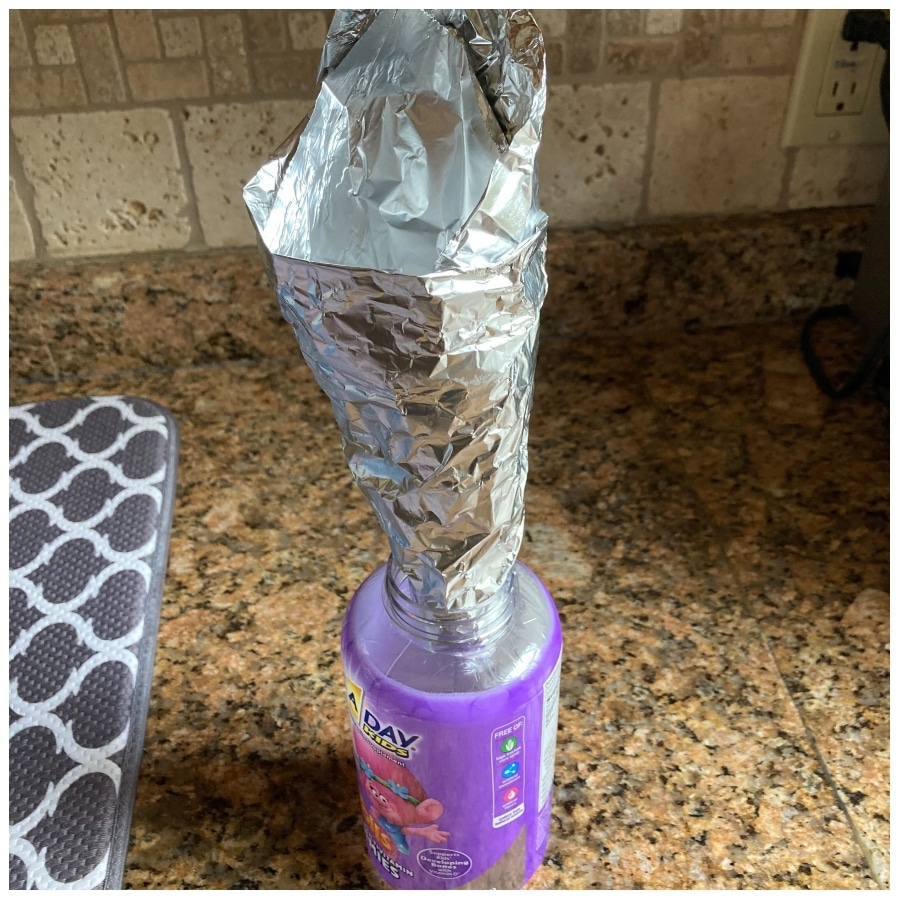
Well, if you happen to need a funnel, but there aren’t any available at the time, you can just roll some aluminum foil in a cone shape and use that instead. Make the mold out of paper or soft cardboard. Form a funnel out of the paper. Make sure it fits in the container you plan to use. To keep the model funnel together, tape it together. You now have a funnel model that you can use to wrap the aluminum foil over. Wrap the foil around the model and secure it. Tape one end of the foil to the funnel model lightly. To ensure that the tape adheres completely, line the entire edge with tape. To extract the aluminum foil funnel, remove the tape from the inside. You’ll be left with an aluminum foil funnel that’s correctly shaped.
Use Toothpaste To Clean Dirty Sneakers
Did you know toothpaste could also be a cleaning product? You can use toothpaste to clean dirty sneakers and get that pearly white going again! Apply some toothpaste on an old toothbrush, scrub on any dirty spots you find, then rinse with cold water.
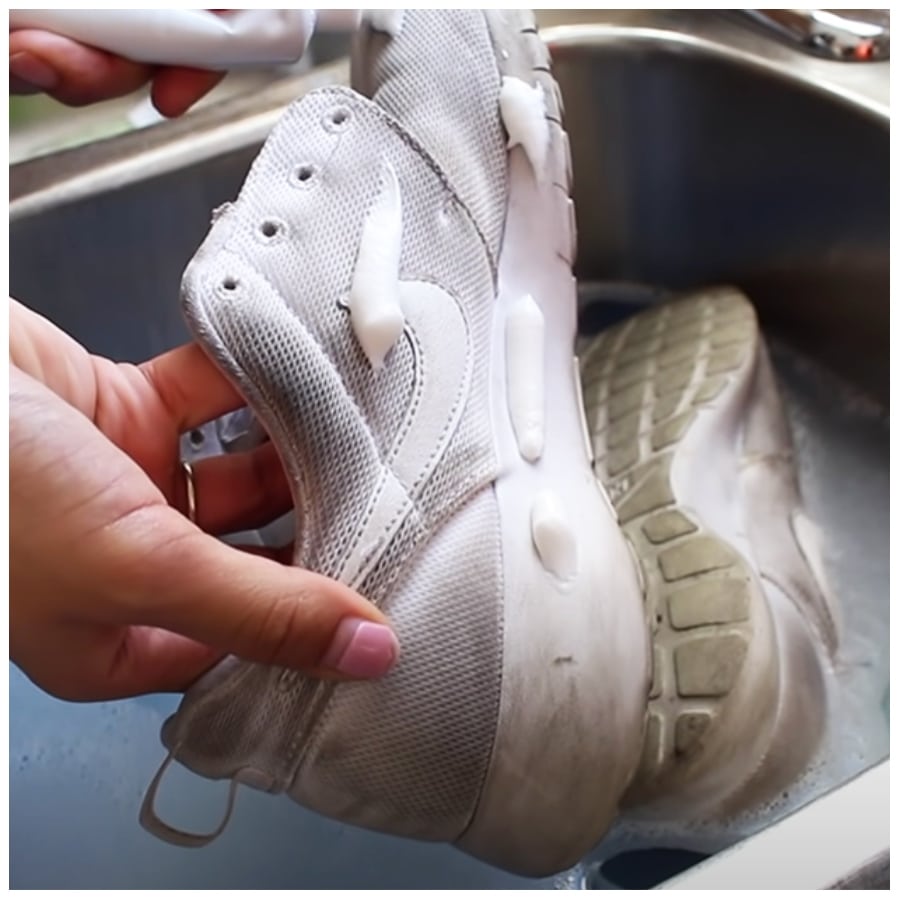
Do not use colored toothpaste; make sure you only use non-gel white toothpaste for this project. The white canvas is used in many classic summer footwear. It’s a fantastic look until you tread in mud or newly mowed grass. You can clean your shoes with baking soda to restore your white shoes to their original condition. Don’t put your canvas shoes in the washing machine or dryer. This might cause the shoes to fray or the sole to split from the upper, resulting in damage. Clean them with baking soda, hydrogen peroxide, and water. Rub it all over and scrub it with a toothbrush. Once dry, clap off any excess and rinse the shoe thoroughly with clean water.
Keep Your Garden Plants Watered
Here’s a simple trick to keep your garden watered without too much effort. Take any big soda bottle you have laying around the kitchen and make little punctures with an electric screwdriver.

Fill it with water and place it on the soil in between plants. The water will seep out slowly and give the roots time to absorb the moisture. Water your plant as usual before you leave on vacation. Fill the plastic bottle halfway with water, then flip it over and plunge it into the pot’s first few inches of dirt. Make sure the bottle is not too close to your plant and that the earth covers the openings in the bottle. As the soil dries out, the water will slowly leak out of the bottle. You can use an empty wine bottle for larger pots. Simply fill it up, lay your thumb over the entrance, and then flip it over and into the soil.
Use Tea Bags To Clean Dirty Dishes
Tea contains tannins, a chemical that causes tea stains on your cups over time. But ironically, it can also clean dirty dishes since the astringent properties of tea tannins cut through the grease.
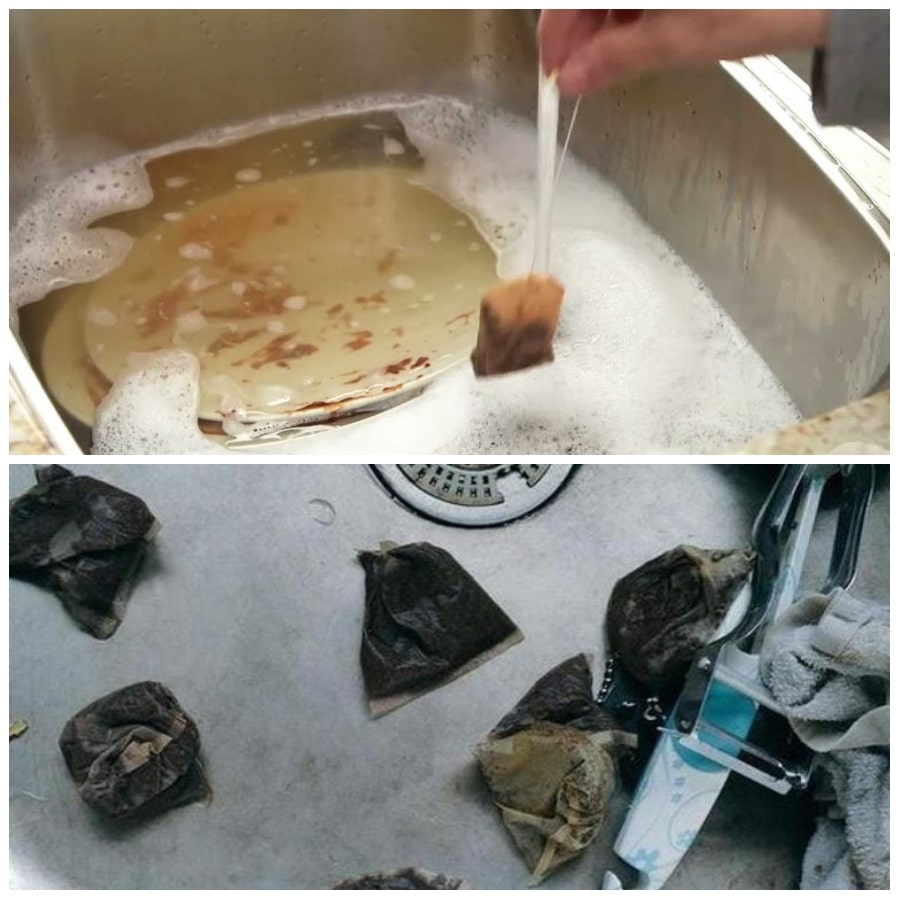
Submerge the dirty dishes in hot water in the sink and add about a dozen tea bags. Be amazed at how easily the grease comes off. Don’t dump the tea bag in the trash the next time you drink a cup of tea. Put the tea bag in the sink with some hot water if you have anything in the sink, like that morning’s sticky oatmeal bowl or a tough-to-clean pan from dinner. Allow time for it to soak. The tea should release any crusted filth, allowing you to wipe clean with little to no washing and less dish soap in the morning.
Use Shaving Cream To Soothe A Sunburn
If you happen to have a sunburn and no aloe vera gel at hand, you can use shaving cream instead. The menthol component in the shaving cream can have a cooling effect, and it also has moisturizing properties.

It can help you in a pinch, but dermatologists recommend not to leave it for too long or use one severe sunburn. Keep in mind that shaving creams contain soaps or surfactants that can easily cause irritation. Surfactants are compounds that lower the surface tension of the liquid they are in, making the liquid easier to mix with water and work up into a foam. Another common shaving cream ingredient is fragrance. It can cause allergic contact dermatitis or increase short- and long-term irritation. Shaving cream instructions usually indicate to rinse it off after use. Therefore, leaving it on the skin may not be beneficial because the soap ingredients can increase irritation.
Laundry Hack
Fill a bathtub with hot water and add 1/4 cup of baking soda, 1/4 cup of a mineral-based household cleaner, and a generous scoop of washing powder or liquid soap.
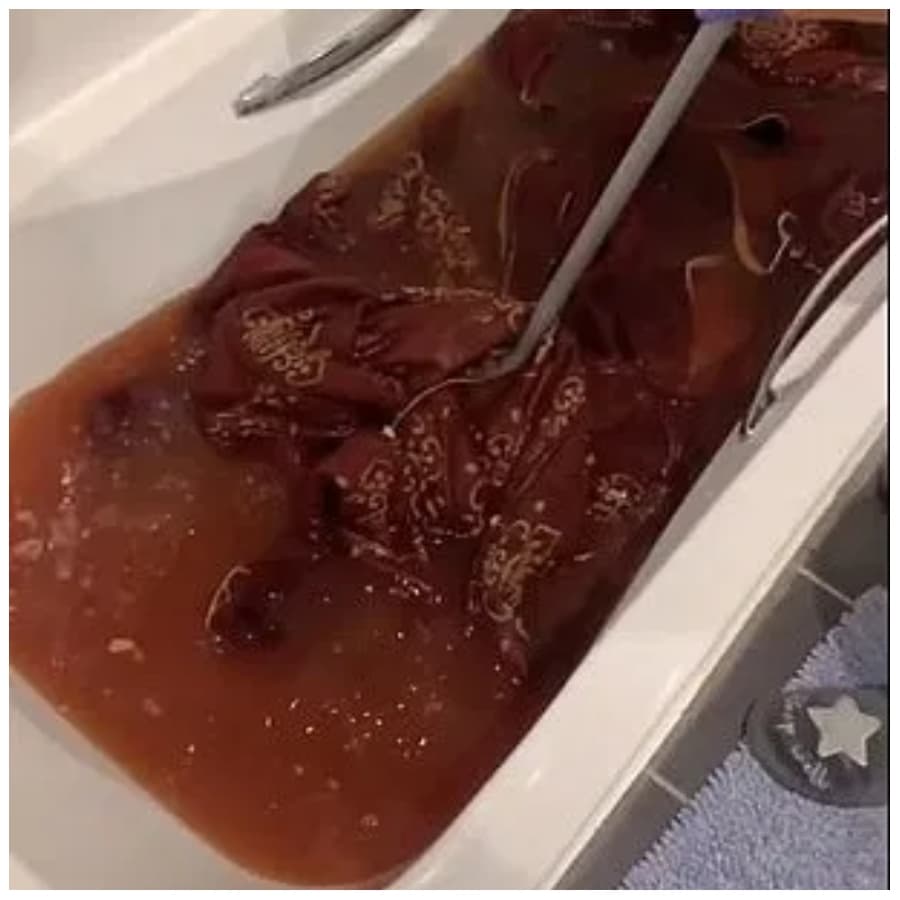
Leave the dirty laundry to soak for several hours, stirring the tub every hour or so. Remove items and chuck them in the washing machine on a regular cycle. Try using liquid dish soap to remove difficult food stains. Apply a small amount to the affected area or soak the entire garment in soapy water for a few hours. After that, rinse the soap out and wash as usual. Because dish soap is meant to break down oils, it works especially effectively on stains created by fatty foods. Transfer the small bottles of hotel shampoo to the laundry room. They’re fantastic at removing oil and blood stains. Simply squirt some on the stain, wait a few minutes for it to set, then dab at it until it disappears.
Loosen a Sticky Key With a Pencil
As the weather turns and moisture gets into the mechanisms, both keys and door locks start to stick and begin to rust rather quickly. If this happens to you, run a graphite pencil over your key a few times.

The graphite will act as a natural lubricant and allow the key to slide easily into the lock without any problems. If that does not work, then try the following. Take a screwdriver and remove the screws that are keeping the lock together. Clean the inside of the lock with Gum Out or another comparable cleaner once it has been taken apart. You should have some dirt drip out while using a cleaner. Wipe it down after cleaning it to remove as much cleaner as possible. After cleaning it, apply a graphite lubricant to loosen it up before reassembling the lock.
Clean Your Dirty Pots With Aluminum Foil
Sometimes soap and a sponge won’t be able to completely remove the grime from pots and pans. But there is a household item that can be used for this. Simply scrunch aluminum foil into a ball and scrub the grimy surface.

The abrasive material will help to remove even the most stubborn stains, leaving them sparkling clean and like new. Another use for aluminum foil is to tarnish silverware. Use aluminum foil to completely line a glass baking dish. Combine 1 tablespoon of baking soda and 1 tablespoon of sea salt, then sprinkle it into the dish. Now, add 1⁄2 cup of white vinegar to the dish. You’ll see fizzing as it reacts with the baking soda. Carefully add boiling water to the baking dish. Place your silverware in a single layer along the bottom of the dish. Make sure that each piece is making contact with the aluminum foil. Let the silverware soak for up to 3 minutes, and then dry with a microfiber cloth.
Use a Tennis Ball To Protect Your Car
It can be difficult to drive your car safely into your garage without hitting anything. Hang a tennis ball on a piece of string from your garage ceiling.
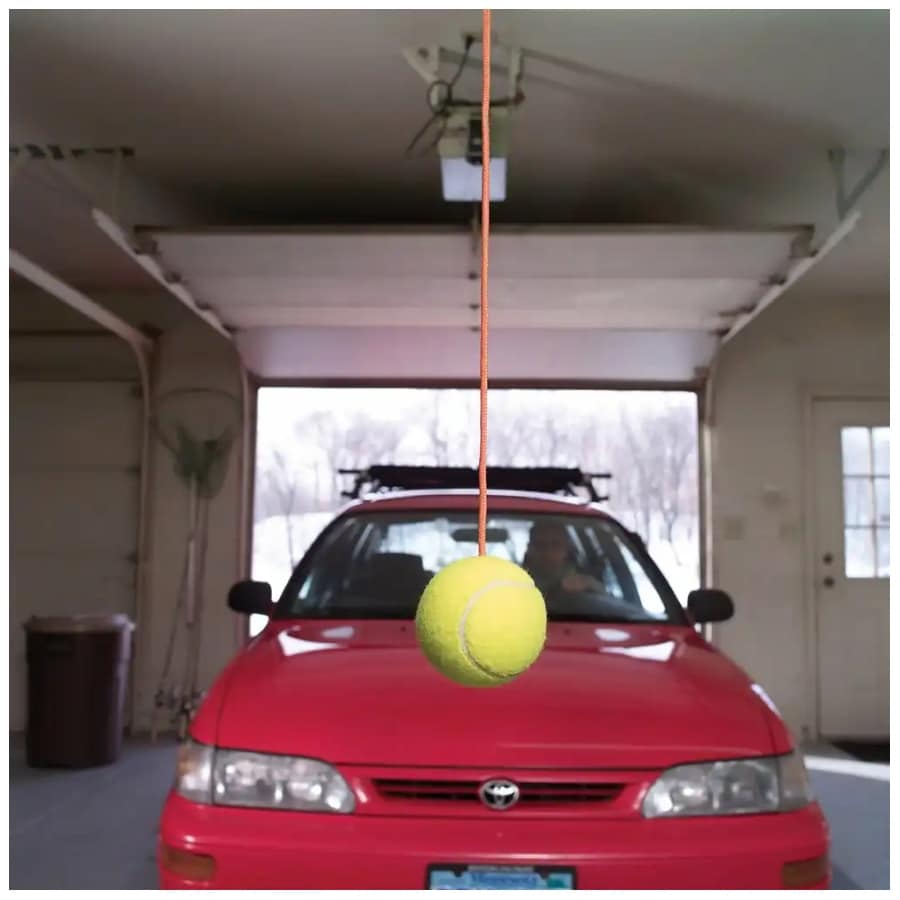
If you hang this just in front of where you need to stop your car, you create the ultimate buffer. When you hit that tennis ball, you know you need to stop. Clear out the garage. The more clutter on your garage floor, the more probable it is that you will have an accident. It’s time to clear up your garage if you can’t fit your car in it comfortably because you have too much junk. When it’s dark in your garage, it’s easy to underestimate your vehicle’s position. Invest in a garage door with long-lasting LED automated lights that turn on and off with each rotation. Another nice lighting option for your garage is sensor lights, which come in a variety of styles that can be hardwired or simply plugged into an outlet.
Treat A Smelly Garbage Can With Bread And Vinegar
Chances are your garbage can will start smelling foul after a while, even when you line it with several plastic bags. Take a slice of regular loaf bread and soak it in plain white vinegar. Place it at the bottom of the trash can overnight.
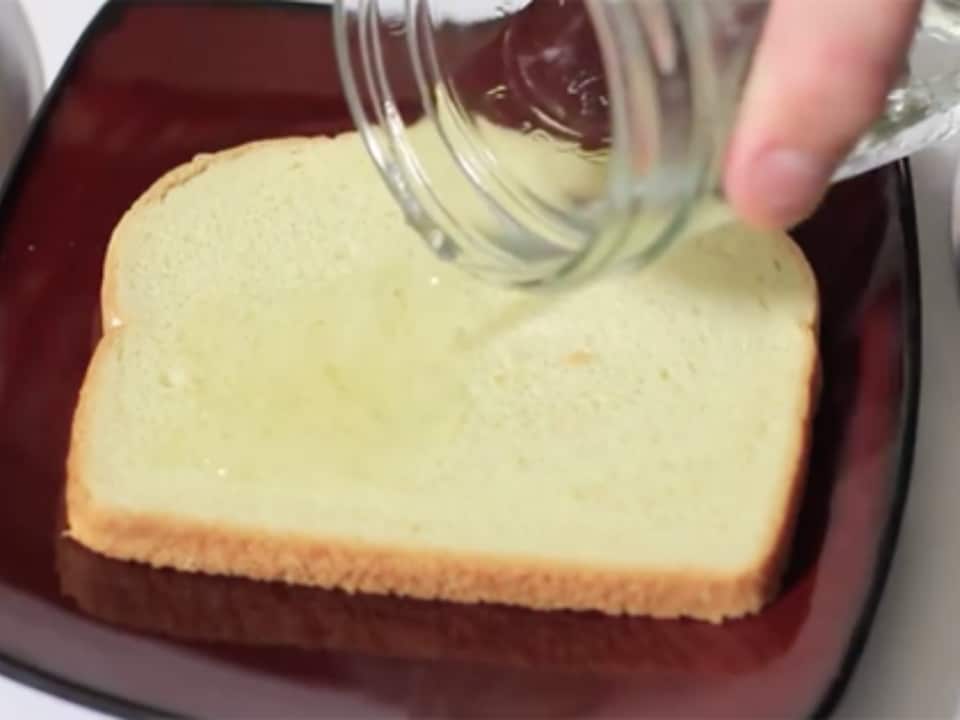
Remove it the next day before putting it in a new garbage bag and see if you notice the difference! You can add a paper towel underneath the bread for easy cleanup. Author Linda Cobb wrote in her 2001 book, “The Queen of Clean: The Royal Guide to Spot and Stain Removal,” that “smells in old trunks and drawers can be eliminated with a slice of white bread placed in a bowl and covered with white vinegar.” She advised me to “close the trunk or drawer for 24 hours, and when you remove the bread and vinegar, the odor will be gone!” While vinegar has long been thought to be useful for cleaning, the function of the piece of bread is unknown. Bread can be used to absorb spills, clean coffee grinders, pick up the glass, and wipe dusty artwork.
Use an Onion To Clean Your Grill
While there are special products and brushes to clean your grill, you already have everything you need to achieve the same results in a more natural way.
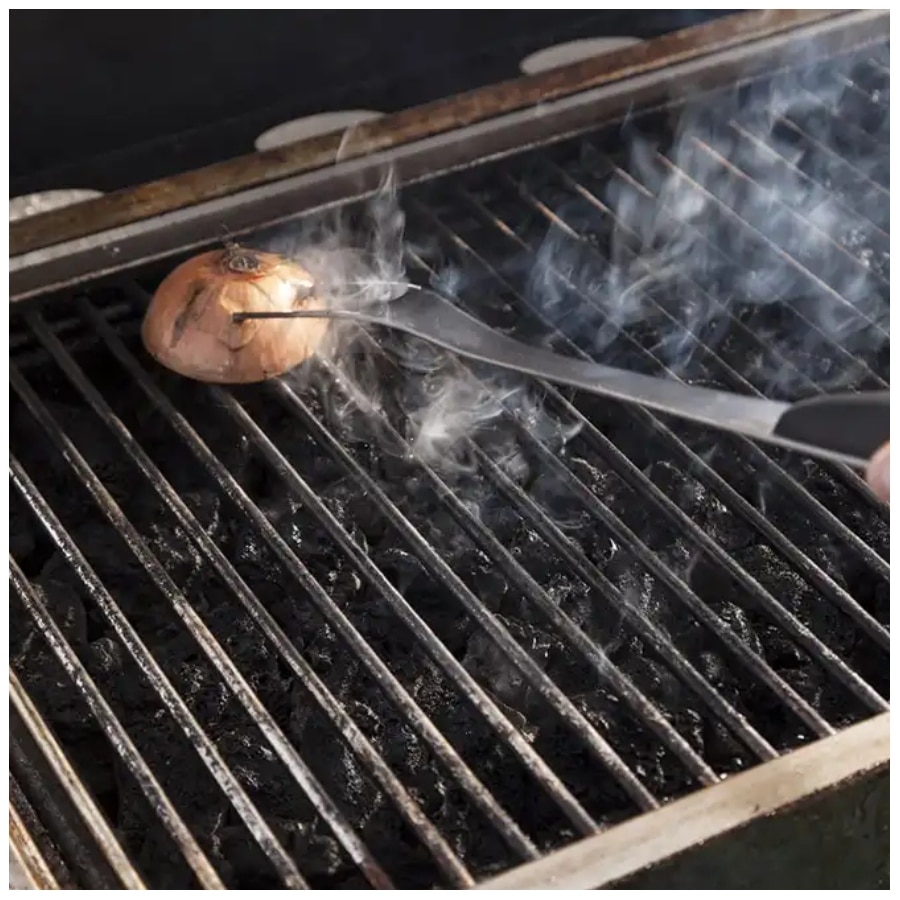
Onions are perfect for cleaning grills! All you have to do is stick half an onion on a fork and glide it over the grill to watch all of the grime wipe away. The easiest, non-toxic way to scrub a dirty grill rack clean is to wipe it down with an onion. You’re going to want to make sure your grill is hot when doing so, as the heat activates the onion’s natural cleaning power. And skewering your onion on a long grilling fork will allow you more freedom of motion and a firmer grip than a pair of tongs can offer you. Wiping down your clean rack with an onion before you even slap your meat and veggies down can make cleanup a breeze. That’s because the onion’s natural oils will form a protective coating on the metal.
Use Tongs and Towels To Clean Your Blinds
Blinds have so many sections that it can often seem like an impossible task to clean them thoroughly. Stop bending your hands and fingers in awkward positions that can ultimately hurt you with this super easy household trick.
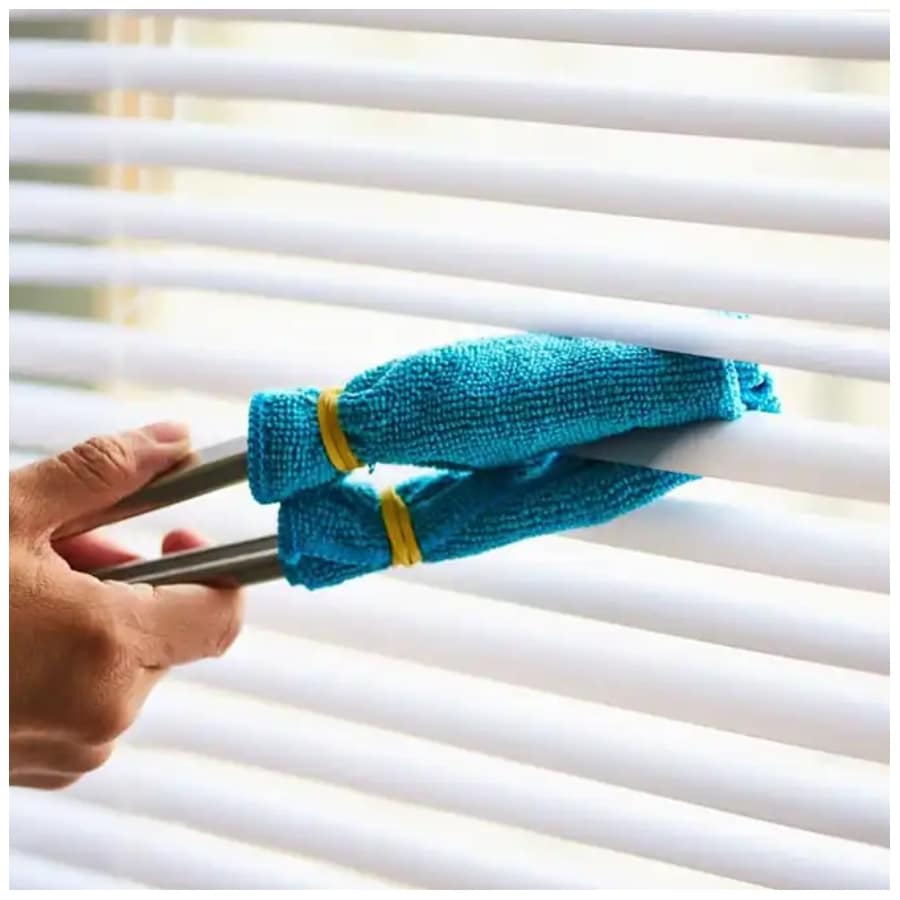
Simply grab your kitchen tongs and cover each side with a small microfiber towel and brush the dust away without major hassle! If you have standard window shades, start by lowering them completely. Wood and faux-wood blinds can be entirely closed; vinyl and aluminum blinds should be slanted downward but not totally closed because the slats sometimes overlap. To stabilize vertical blinds, grip the bottom of the blind in one hand. Starting at the top and working your way down, wipe the blinds with a microfiber cloth. If you wipe downward, they can come unhooked. You can also eliminate dust with a soft dusting brush attachment and a low-suction setting on your vacuum cleaner. The procedure is the same for horizontal blinds, only you clean from side to side.
Use a Peg To Keep a Nail in Place
A lot of accidents with hammers happen due to the nail moving out of its position before the hammer can power down onto it.
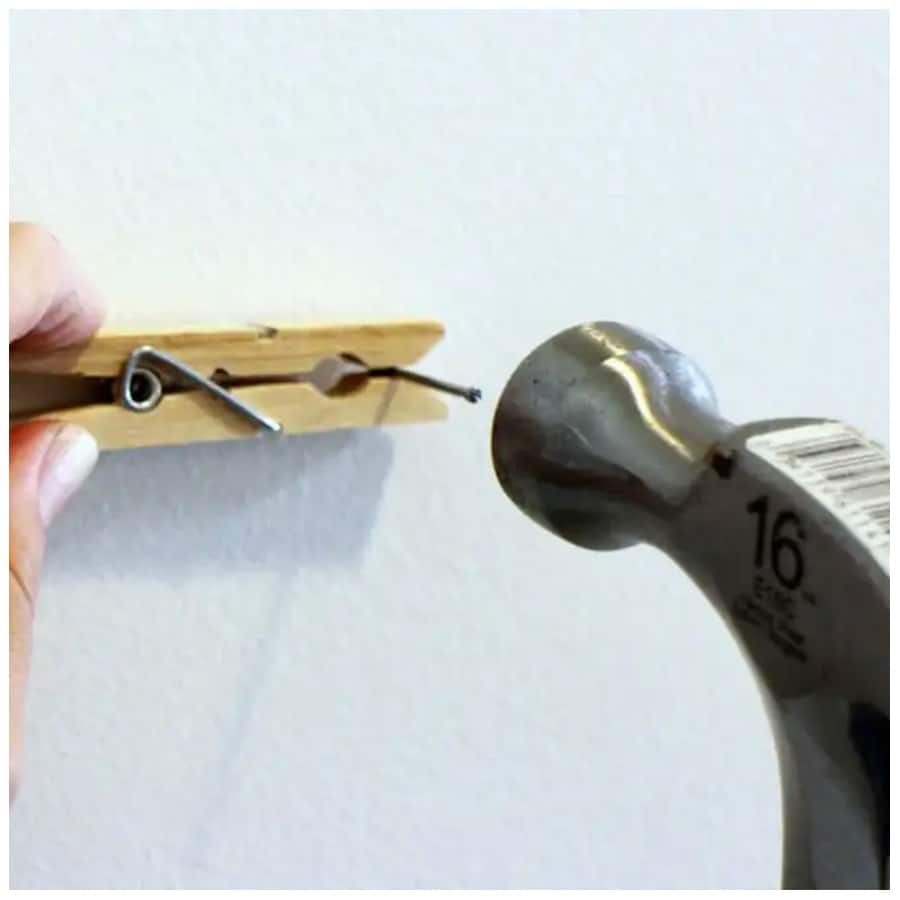
By holding the nail in place with a clothes peg, you can ensure that you’re only hitting the nail and not your thumb. It gives support to the nail and keeps your fingers out of trouble. Some people are afraid of ruining their walls, so they avoid putting up shelves, paintings, and other ornamental items. This doesn’t have to be the case, however. You can hammer nails into your wall without leaving a mess if you use certain strategies. You might even notice some cracks here and there. If you don’t put the nail in the appropriate spot, some of the paint or cement around it may fracture and come off, leaving massive holes in your wall. This emphasizes the importance of learning how to properly hammer a nail.
Use Your Phone While Wearing Gloves With Aluminum Foil
Once again, this might not be a home repair hack, but it’s such a good trick that we had to include it! If you live in a cold climate, you know how difficult it can be to use the touchscreen of any device while wearing thick gloves in wintertime.
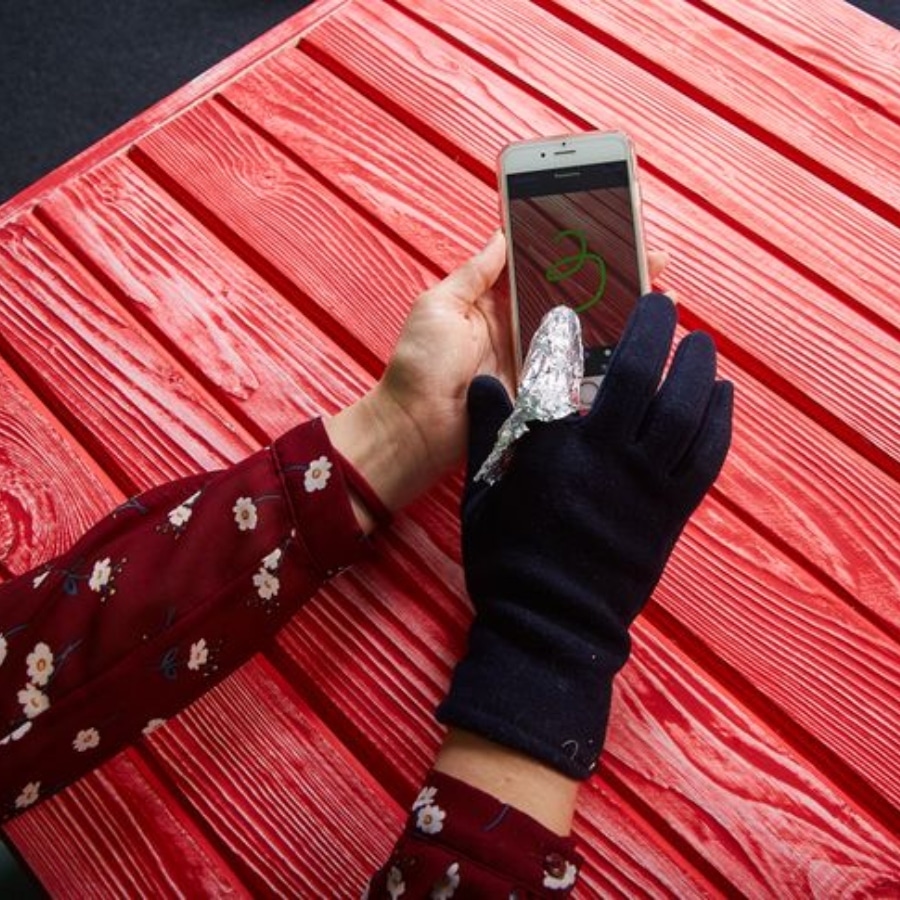
Take some aluminum foil and wrap it around the fingers you need to use for the phone screen. Then put the gloves back on, and voilá. However, there are special gloves that allow you to converse without removing them. Although no touchscreen gloves will keep your hands perfectly warm or allow you to type as accurately as bare fingers, the Moshi Digits are quite toasty, fit well, and allow you to type more accurately. Thin touchscreen wool gloves and leather gloves are also available. Keep in mind, though, that using voice commands and audio messages rather than typing in even the greatest of these gloves may be easier in the end.
Got Leg Cramps? Try Sleeping With Soap
This might not be a home repair hack, but it is a home remedy that many people swear by. If you have cramps or restless legs that disrupt your sleep, place a bar of soap under your fitted sheet.

Experts estimate that it is actually the placebo effect that makes this work or the presence of magnesium in the soap. Test a few different types and brands and see if this trick works for you. How do you quickly relieve a leg cramp? Stretch the affected muscle vigorously (for example, stretch your calf muscle by flexing your foot upward). Exercise your leg by jiggling it, massaging it, or forcing yourself to walk. Applying cold or heat – such as a heating pad or a warm bath – may also be beneficial. Muscle cramps can be caused by overuse of a muscle, dehydration, muscle strain, or just holding a position for too long.